
User Manual
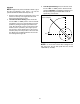

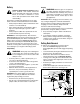
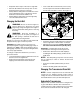
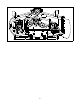

Table Of Contents
- SECTION 1: important safe operation practices
- SECTION 2: slope gauge
- SECTION 3: tractor set-up
- Gas and Oil Fill-up
- Setting the Gauge Wheels and Roller
- SECTION 4: know your lawn tractor
- Throttle Control Lever
- Choke Control
- Brake Pedal
- Seat Adjustment Lever
- Ignition Switch Module
- Drive Pedal
- Systems Indicator Monitor / Hour Meter
- Deck Lift Lever
- Electric PTO / Blade Engage Knob
- Cruise Control Lever
- Parking Brake Lever
- SECTION 5: operating your lawn tractor
- Safety Interlock Switches
- Reverse Caution Mode
- Starting the Engine
- Stopping the Engine
- Engaging the Parking Brake
- Driving The Tractor
- Driving On Slopes
- Setting The Cruise Control
- Using the Deck Lift Lever
- Operating the Headlights
- Moving The Tractor Manually
- Engaging the PTO
- Mowing
- SECTION 6: making adjustments
- Leveling the Deck
- Parking Brake Adjustment
- Seat Adjustment
- Steering Adjustment
- SECTION 7: maintaining your lawn tractor
- Engine
- Changing the Engine OIl
- Air Filter
- Cleaning the Engine And Deck
- Lubrication
- Carburetor
- SECTION 8: service
- Tires
- Fuse
- Cutting Blades
- Battery
- Cutting Deck Removal
- Changing the Deck Belt
- Changing The Transmission Drive Belt
- Hydrostatic Transmission
- SECTION 9: off-season storage
- Engine
- SECTION 10: maintenance chart
- SECTION 11: maintenance log
- SECTION 12: troubleshooting
- SECTION 13: attachments & accessories
- SECTION 14: Replacement Parts
- SECTION 15: specifications*
21
Figure 13
Fuel Filter
WARNING: Do not replace the fuel filter
when engine is hot.
The engine is equipped with an inline fuel filter located
on the left side of the engine.
Visually inspect the filter periodically for a build-up of
residue inside the filter body, and for a dirty element
which can be indicated by discoloration. Replace the
fuel filter when dirty.
Cleaning the Engine And Deck
Any fuel or oil spilled on the machine should be wiped
off promptly.
Do NOT allow debris to accumulate around the cooling
fins of the engine or on any other part of the machine,
especially the belts and pulleys.
Smart Jet™
Your tractor’s deck is equipped with a water port on its
surface as part of its deck wash system.
Use the Smart Jet™ to rinse grass clippings from the
deck’s underside and prevent the buildup of corrosive
chemicals. Complete the following steps AFTER EACH
MOWING:
1. Drive the tractor to a level, clear spot on your lawn,
near enough for your garden hose to reach.
IMPORTANT:
Make certain the tractor’s discharge chute
is directed AWAY from your house, garage, parked
cars, etc.
2. Disengage the PTO (Blade Engage), set the
parking brake and stop the engine.
3. Thread the hose coupler (packaged with your
tractor’s Operator’s Manual) onto the end of your
garden hose.
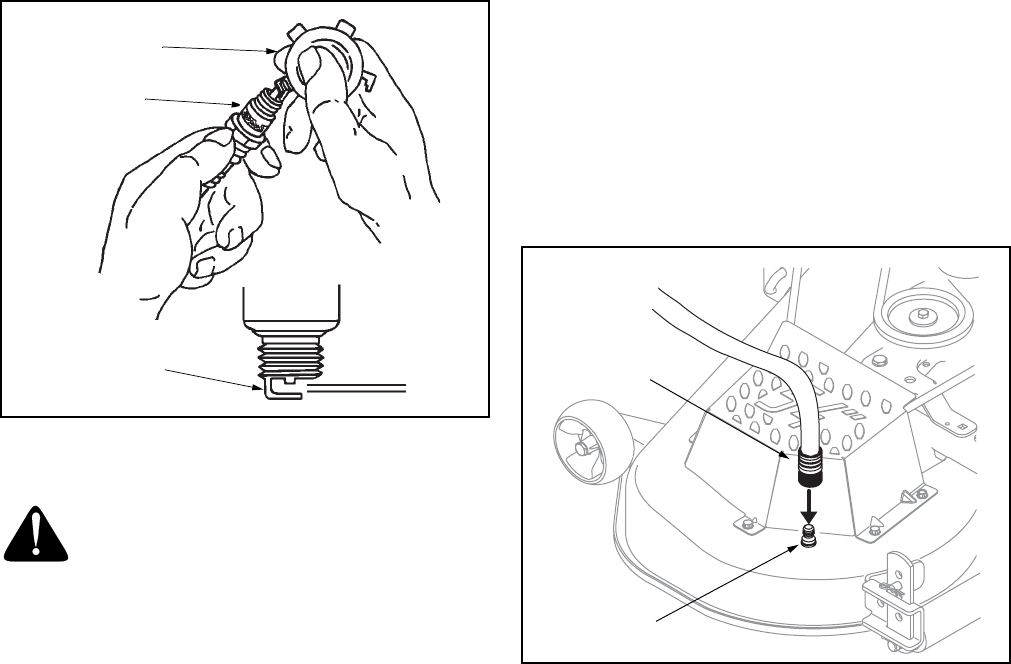
4. Attach the hose coupler to the water port on your
decks surface. See Figure 14.
Figure 14
5. Turn the water on.
6. While sitting in the operator’s position on the
tractor, start the engine and place the throttle lever
in the FAST (rabbit) position.
7. Move the tractor’s PTO (Blade Engage) into the ON
position.
8. Remain in the operator’s position with the cutting
deck engaged for a minimum of two minutes,
allowing the underside of the cutting deck to
thoroughly rinse.
9. Move the tractor’s PTO (Blade Engage) into the
OFF position.
10. Turn the ignition key to the STOP position to turn
the tractor’s engine off.
11. Turn the water off and detach the hose coupler
from the water port on your deck’s surface.
12. Repeat step 4- step 11 on the opposite side of the
cutting deck.
Feeler Gauge
Ground Electrode
Spark Plug
Gap
Water Port
Hose Coupler