
Manual

G730 32
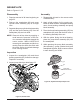
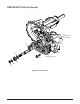
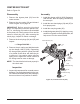
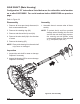
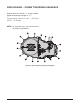
Figure 24, Center Section Kit (201)
CENTER SECTION KIT
RefertoFigure24
Disassembly
1. Remove the bypass plate (22) from the
center section.
2. Remove the plug seals (26) and discard.
Refer to gure 24, on page 32.
IMPORTANT: Before removing the check
plugs,itisimportanttonotetheirspecicloca-
tion,i.e.,checkplug(24)needstobereinstalled
inthesameportitwasremovedfromandthe
sameforcheckplug(25).Afterremovingthe
checkplugs,inspectfordebrisordamage.
3. Remove the check plugs (24) and (25) and
inspect.
— Charge Relief Kit —
4. Remove the pin, spring and ball that make
up the charge relief kit (202). Depressing
the charge spring with the (clean) at side
of a slotted screw driver will allow the pin
to slide out. Use caution when relieving
spring force. Inspect the center section at
the charge seat for wear or damage.
NOTE: Thecheckballshouldseatproperlyin
thecheckseat.
Inspection
1. Inspect all components for unusual wear or
damage. Pay particular attention to the cen-
ter sections threaded ports and passages;
there must be no lose particles or debris.
Assembly
1. Install the charge relief kit (202). Beginning
with the ball, then the spring, followed by,
the cross pin.
2. Install the new check plugs (24) and (25) in
their proper ports.
3. Install the new plug seals (26).
4. Install the bypass plate (22). Applying a very
small lm of grease on the bypass plate, will
help secure it in the center section.
26
22
Charge
Relief Kit
(202)
Center Section (20)
26
(24)
Check Plug
(25)
Check Plug