
Use and Care Manual

25
PRODUCT CARE
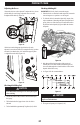
1. To increase the stiffness of the suspension and increase the
absorption of impacts, rotate the compression adjuster screw
clockwise towards the “SLOW” (or “0”) position.
2. To decrease the stiffness (soften the ride) rotate the
compression adjuster screw counter-clockwise towards the
“FAST” (or “18”) position.
To return the utility vehicle to its stock setting, use the
chart below:
Rebound
Adjuster
Pre-Load
Adjuster
Compression
Adjuster
Front Position 7 295 mm Position 5
Rear Position 4 300 mm Position 3
* -- These settings are based on a “full load” condition. 250 lb
(113 kg) driver, 250 lb (113 kg) passenger and 500 lb (227 kg)
cargo load.
SERVICE
WARNING
To avoid personal injury, be sure to check and service
the vehicle on a flat surface with the engine off and the
parking brake ON. If servicing under the cargo bed, be
sure that the cargo bed is supported so that it can not
inadvertently close. Do not touch muffler or exhaust
pipes while they are hot; Otherwise, severe burns
could result.
Changing the Oil
WARNING
Be sure to stop the engine before replacing oil. Allow
engine to cool down sufficiently, oil can be hot and
can burn.
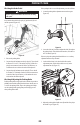
1. Park the vehicle on a flat surface and raise the cargo bed.
2. To drain the used oil, remove the drain plug at the bottom of
the engine and completely drain the oil into an oil pan.
3. After draining, reinstall the drain plug.
4. Fill with the new oil up to the upper notch on the dipstick.
5. See Figure 30 for oil recommendations.
SAE 0W-30
SAE 10W-30
SAE 10W-40
SAE 20W-50
SAE 15W-40
SAE 20W-40
Figure 30
CAUTION
Only use engine oil with API Service Classification of SJ or
Higher and JASO-MA Grade.
6. The engine oil capacity is 2.22 quarts (2.1 L).
Replacing Oil Filter
WARNING
Be sure to stop the engine before replacing oil filter.
Allow engine to cool down sufficiently, oil can be hot and
can burn.
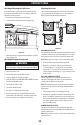
1. Park the vehicle on a flat surface, remove the seat and open
the engine access cover.
2. Make sure the engine is warm.
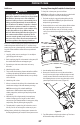
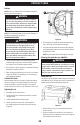
3. Remove the oil filter (a) (Figure 31).
a
Figure 31
4. Put a film of clean engine oil on the rubber seal of the
new filter.
5. Tighten the filter until it contacts the mounting surface.
6. Tighten filter by hand an additional 1/2-turn only.
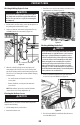
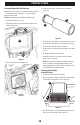
Draining the PCV Accumulator
The PCV accumulator should be drained at each oil change to
remove oil condensation. There are two PCV accumulators, one
near the front of the air intake box and one near the rear. To drain
the PCV accumulator, pinch the valve at the bottom of the tube
and allow the condensation to run out (Figure 32).
Figure 32