
Use and Care Manual

23
PRODUCT CARE
Checking the Brake Pedal
WARNING
Stop the engine and chock the wheels before checking
brake pedal.
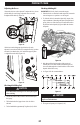
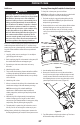
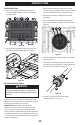
Inspect the brake pedals for free play (a), pedal stroke (b) and
smooth operation (Figure 25).
b
a
Figure 25
1. Release the parking brake.
2. Step on the pedal and measure the free play (a). There should
be between .3” and .5” (7-14 mm) of free play (a). If the free
play (a) measurement is outside of these specifications, see
an authorized service dealer to have the brake adjusted.
3. Step on the pedal and measure the stroke (b). There should
be less than 4.7” (120 mm) of stroke (b). If the measurement
is outside of these specifications, see an authorized service
dealer to have the brake adjusted.
Checking & Adjusting the Parking Brake
Pull the parking brake to apply the brakes with the key switch in
the ON position and the parking brake indicator should come on.
To release the parking brake, depress the parking pedal. Make
sure the parking brake warning lamp on the display goes off
when parking brake is OFF.
If the parking brake is in need of adjustment, proceed as follows:
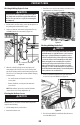
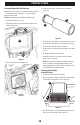
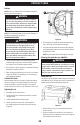
1. Locate the parking brake adjustment nut near the engine
(Figure 26).
b
a
Figure 26
2. Loosen the lock nut (a) and then tighten the bolt (b) to adjust
the parking brake. Turn the bolt until it touches, then back it
off a 1/4-turn (Figure 26).
If there is play in the parking brake handle there is a secondary
adjustment that can be performed.
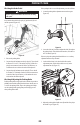
1. Look inside the driver’s side wheel well and locate the
adjustment point. Slide back the rubber cover (a) on the
adjustment nuts (b) (Figure 27).
a
b
Figure 27
2. Adjust the parking brake handle nuts (b) until the free play in
the handle is gone (Figure 27).