
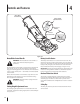
Operator`s manual

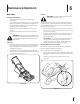


18 se c t i O n 7— se r v i c e
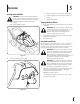
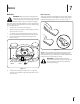
Blade Installation
Place the cutting blade, locking plate, and blade bolt on 1.
the motor shaft and thread the blade bolt in finger tight.
Refer to Fig. 7-1.
NOTE: Make certain to replace the parts in the exact order
in which they were removed. When installing the cutting
blade, be sure it is installed with the curved ends pointing
towards the mower deck and not towards the ground.
Torque the blade bolt down using a torque wrench to 2.
assure the bolt is tightened properly. The recommended
torque for the blade bolt is 170-220 in. lbs.
WARNING: The blade hardware is not only used to
attach the blade assembly, but is also an insulated
safety device and should never be altered in any
way. If replacement is necessary, use original
equipment parts as shown in the parts list.
To insure safe operation of your unit, all nuts and bolts must be
checked periodically for correct tightness.
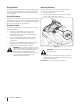
Off-Season Storage
The following steps should be taken to prepare your lawn mower
for storage.
Clean and lubricate mower thoroughly as described in the •
lubrication instructions.
We do not recommend the use of a pressure washer or •
garden hose to clean your unit.
Coat mower’s cutting blade with chassis grease to prevent •
rusting.
Store mower in a dry, clean area. Do not store next to •
corrosive materials, such as fertilizer.
Wipe the cord to remove any stains or foreign substance •
such as oil.
Store mower fully charged.•
IMPORTANT: We strongly recommend the mower be
charged once every two months during storage.
IMPORTANT: Always recharge mower fully. The charger
is a two stage charger. The first stage, equalize, supplies
a higher voltage to the batteries. This helps speed charge
time and balance the charge across the individual batteries.
The second stage, float, supplies a lower voltage. This
prevents the batteries from experiencing overcharging
damage and also “tops off” the battery charge. Depending
on battery condition the equalize stage will complete
in approximately 8 hours. When the equalize stage is
complete the charger’s green LED will stop blinking. This
starts the float stage. During the float stage the chargers
green LED will be on continuously. The float stage will
“top off” the batteries in approximately 4-6 hours, again,
depending on the condition of the battery. However, a full
14 hour charge is always recommended.