Safe Operation Practices • Set-Up • Operation • Maintenance • Service • Troubleshooting • Warranty Operator’s Manual Rechargeable Mower — Model CC500 BAT WARNING READ AND FOLLOW ALL SAFETY RULES AND INSTRUCTIONS IN THIS MANUAL BEFORE ATTEMPTING TO OPERATE THIS MACHINE. FAILURE TO COMPLY WITH THESE INSTRUCTIONS MAY RESULT IN PERSONAL INJURY. CUB CADET LLC, P.O. BOX 361131 CLEVELAND, OHIO 44136-0019 Printed In USA Form No.
1 To The Owner Thank You Thank you for purchasing a Lawn Mower manufactured by Cub Cadet. It was carefully engineered to provide excellent performance when properly operated and maintained. Please read this entire manual prior to operating the equipment. It instructs you how to safely and easily set up, operate and maintain your machine. Please be sure that you, and any other persons who will operate the machine, carefully follow the recommended safety practices at all times.
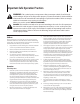
Important Safe Operation Practices 2 WARNING: This symbol points out important safety instructions which, if not followed, could endanger the personal safety and/or property of yourself and others. Read and follow all instructions in this manual before attempting to operate this machine. Failure to comply with these instructions may result in personal injury. When you see this symbol. HEED ITS WARNING! DANGER: This machine was built to be operated according to the rules for safe operation in this manual.
12. a. Step back from mower to fully extend your arms. b. Be sure you are well balanced with sure footing. c. Pull the mower back slowly, no more than half way toward you. d. Repeat these steps as needed. Slope Operation: Slopes are a major factor related to slip and fall accidents which can result in severe injury. Operation on slopes requires extra caution. If you feel uneasy on a slope, do not mow it.
8. To reduce a fire hazard, keep the motor cover free of grass, leaves and debris build-up. 9. Check the blade and motor mounting bolts at frequent intervals for proper tightness. Also, visually inspect blade for damage (e.g., bent, cracked, and worn). Replace blade with the original equipment manufacturer’s (OEM) blade only, listed in this manual. 10. Maintain your mower with care — Keep mower blade sharp and clean for best and safest performance.
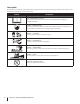
Safety Symbols This page depicts and describes safety symbols that may appear on this product. Read, understand, and follow all instructions on the machine before attempting to assemble and operate. Symbol Description READ THE OPERATOR’S MANUAL(S) Read, understand, and follow all instructions in the manual(s) before attempting to assemble and operate DANGER — ROTATING BLADES To reduce the risk of injury, keep hands and feet away.
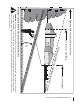
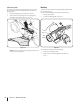
Sight and hold this level with a vertical tree... ted alo n g d ot or a corner of a building... Fold 15° Use this page as a guide to determine slopes where you may not operate safely. or a fence post in line ( re p r e s ent pe) ga 1 5 ° slo WARNING: Do not operate your lawn mower on such slopes. Do not mow on inclines with a slope in excess of 15 degrees (a rise of approximately 2-1/2 feet every 10 feet). A riding mower could overturn and cause serious injury.
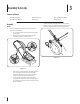
3 Assembly & Set-Up Contents of Carton • One Battery Mower • One Grass Catcher • One Side Discharge Chute • One Operator’s Manual • One Battery • One Charger Assembly 2. Handle 1. Tighten star knobs securing lower handle to handle brackets. See Fig. 3-2. Make certain the lower handle is seated securely into the handle mounting brackets. Remove any packing material which may be between upper and lower handles. a. Loosen each hand knob found on the inside of the upper handle. b.
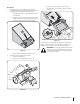
Grass Catcher 1. c. Follow steps below to assemble the grass catcher (if needed). Make certain bag is turned right side out before assembling (warning label will be on the outside). a. Place bag over frame so that its black plastic side is at the bottom. b. Slip plastic channel of grass bag over hooks on the frame. See Fig. 3-3. All the plastic channels except center top of bag attach from outside of bag. Place grass catcher on the pivot rod.
Side Discharge Chute Mulching To convert to side discharge, make sure grass catcher is off of the unit. Replace the rear mulching baffle and close the rear discharge door. To mulch, you will need the rear mulching baffle installed below the rear discharge door. 1. Lift the mulching plug on the right side of mower. 2. Slide chute hooks under hinge pin on mulching plug assembly. Lower mulching plug. See Fig. 3-6. If converting to mulching from the grass collection mode: 1. Remove grass catcher. 2.
Adjustments Charging the Battery WARNING: The battery contains corrosive fluid Height Adjustment The cutting height adjustment lever is located above the rear left wheel. See Fig. 3-8. To adjust the cutting height: and toxic material - HANDLE WITH CARE. Keep away from children. Do not puncture, disassemble, mutilate, or incinerate. Explosive gases could be vented during charging or discharging. Use in a well ventilated area, away from sources of ignition. IMPORTANT: Use only with battery pack 625-04118.
4 Controls and Features Motor/Blade Control Handle Cutting Height Adjustment Lever Battery Level Indicator Overload Protection Switch Safety Key Figure 4-1 Motor/Blade Control Handle WARNING: The motor/blade control handle is a safety device. Never attempt to bypass its operations. The motor/blade control handle is located on the upper handle of the mower. See Fig. 4-1. The motor/blade control handle engages and disengages the motor and blade.
5 Operation Starting Motor and Blade WARNING: Avoid accidental starting. Make sure you are in the operating position behind the mower when using it. To avoid serious injury, the operator and unit should be in a stable position while starting. 1. Insert safety key. Refer to Fig. 5-1. a. Depress starter button on the motor blade control. b. Pull motor/blade control handle up against upper handle. c. Release starter button. Stopping Motor and Blade 1.
Using as Mulcher Removing the Battery To set up the mulching attachments see the “Assembly & Set-Up” section. For effective mulching, do not cut wet grass. If the grass has been allowed to grow in excess of four inches, mulching is not recommended. If you have two batteries, you can use one battery while the other battery recharges. To remove the battery: Using Side Discharge 1. Remove the safety key. 2. Turn the locking knob parallel to the battery and lift the battery off the mower base. See Fig.
6 Maintenance & Adjustments Maintenance Deck Care WARNING: To reduce the risk of electric shock, do General Recommendations not expose the mower to water. • Always observe safety rules when performing any maintenance. • The warranty on this lawn mower does not cover items that have been subjected to operator abuse or negligence. To receive full value from warranty, operator must maintain the lawn mower as instructed here.
If the overload protection switch pops out shortly after resetting: 1. Release the motor/blade control handle and do NOT restart the mower for at least 15 minutes to allow the motor extra time to cool. 2. Press the overload protection switch inward to reset. 3. Restart unit. 2. Press shield in on either side to remove from hole. See Fig. 6-3.
7 Service Blade Care Blade Sharpening WARNING: When removing the cutting blade for sharpening or replacement, protect your hands with a pair of heavy gloves or use a heavy rag to hold the blade. Be certain to disconnect the power supply. To properly sharpen the cutting blades, remove equal amounts of metal from both ends of the blades along the cutting edges, parallel to the trailing edge, at a 25° to 30° angle. See Fig. 7-2.
Blade Installation Off-Season Storage 1. Place the cutting blade, locking plate, and blade bolt on the motor shaft and thread the blade bolt in finger tight. Refer to Fig. 7-1. The following steps should be taken to prepare your lawn mower for storage. NOTE: Make certain to replace the parts in the exact order in which they were removed. When installing the cutting blade, be sure it is installed with the curved ends pointing towards the mower deck and not towards the ground.
8 Troubleshooting Problem Mower fails to start Cause Remedy 1. Safety key not in switch. 1. Insert safety key. 2. Motor/blade control disengaged. 2. Depress starter button and engage motor blade control. 3. Battery discharged. 3. Charge battery. 4. Mower deck clogged with grass and debris. 4. Unclog mower deck. Make certain blade is free to move. 1. Battery discharged. 1. Charge battery. 2. Cutting too much grass. 2. Raise cutting height. 3. Clogged deck. 3. Unclog mower deck.
9 Replacement Parts Component Part Number and Description 925-04118 Battery Assembly 925-04381A Battery, 12V 725-04387A Battery Charger 724-04025P Motor, 48V 925-04102 Switch Assembly 925-04116 Safety Key Contact your Cub Cadet dealer to order replacement parts or a complete Parts Manual (have your full model number and serial number ready). Parts Manual downloads are also available free of charge at www.cubcadet.com.
Component Part Number and Description 634-04346 634-04347 Front Wheel Rear Wheel 942-04152 Blade 764-04050B Grass Bag 731-04177 Side Discharge Chute Contact your Cub Cadet dealer to order replacement parts or a complete Parts Manual (have your full model number and serial number ready). Parts Manual downloads are also available free of charge at www.cubcadet.com.
Notes 22 10
Section 10 — Notes 23
CUB CADET LLC MANUFACTURER’S LIMITED WARRANTY FOR walk-behind mowerS IMPORTANT: To obtain warranty coverage owner must present an original proof of purchase and applicable maintenance records to the servicing dealer. Please see the operator’s manual for information on required maintenance and service intervals.