Safety • Assembly • Operation • Tips & Techniques • Maintenance • Troubleshooting • Parts Lists • Warranty OPERATOR’S MANUAL 19-inch Rotary Lawn Mower — Model 18M IMPORTANT READ SAFETY RULES AND INSTRUCTIONS CAREFULLY BEFORE OPERATION Warning: This unit is equipped with an internal combustion engine and should not be used on or near any uniiproved forest-covered, brushcovered or grass-covered land unless the engine’s exhaust system is equipped with a spark arrester meeting applicable local or state laws (
This Operator’s Manual is an important part of your new lawn mower. It will help you assemble, prepare and maintain the unit for best performance. Please read and understand what it says. Table of Contents Slope Gauge........................................................ 3 Safe Operation Practices.................................... 4 Setup and Adjustment........................................ 6 Operating Your Lawn Mower............................... 8 Maintaining Your Lawn Mower.......................
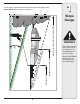
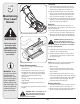
1 Use this page as a guide to determine slopes where you may not operate safely. Do not operate your lawn mower on such slopes. Slope Gauge 3IGHT AND HOLD THIS LEVEL WITH A VERTICAL TREE &O OR A FENCE POST OR A CORNER OF A BUILDING OT LD ALO NG D ESEN TED L I N E REPR LOPE TS A S WARNING Do not mow on inclines with a slope in excess of 15 degrees (a rise of approximately 2-1/2 feet every 10 feet). Operate WALK-BEHIND mowers across the face of slopes, never up and down slopes.
2 Safe Operation Practices WARNING This symbol points out important safety instructions which, if not followed, could endanger the personal safety and/or property of yourself and others. Read and follow all instructions in this manual before attempting to operate this machine. Failure to comply with these instructions may result in personal injury. When you see this symbol.
19. Shut the engine off and wait until the blade comes to a complete stop before removing the grass catcher or unclogging the chute. The cutting blade continues to rotate for a few seconds after the engine is shut off. Never place any part of the body in the blade area until you are sure the blade has stopped rotating. 20. Never operate mower without proper trail shield, discharge cover, grass catcher, blade control handle or other safety protective devices in place and working.
3 IMPORTANT: This unit is shipped without gasoline or oil in the engine. Fill up gasoline and oil as instructed in the accompanying engine manual BEFORE operating your mower. Setup and Adjustment 1. Remove any packing material which may be between upper and lower handles. A B a. Pull up and back on upper handle as shown in Figure 3-1. Make certain the lower handle is seated securely into the handle mounting brackets. Do not crimp cable while lifting the handle up. b.
3 c. Attach center top of bag from inside of bag. 6. Before attaching the grass catcher, the mulching baffle must be removed. See Figure 3-5. a. Lift rear discharge door. b. Remove mulching baffle. 7. Follow steps below to attach grass catcher: A a. Lift rear discharge door. b. Place grass catcher on the pivot rod. Let go of discharge door so that it rests on the grass catcher. See Figure 3-6. To remove grass catcher, lift rear discharge door on the mower.
4 Operating Your Lawn Mower Know Your Lawn Mower Blade Control Choke Knob Recoil Starter Cutting Height Adjustment Lever Gas Fill Oil FIll WARNING This blade control mechanism is a safety device. Do not bypass its operations. Use extreme care when handling gasoline. Gasoline is extremely flammable and the vapors are explosive. Never fuel the machine indoors or while the engine is hot or running. Extinguish cigarettes, cigars, pipes, and other sources of ignition.
WARNING: The operation of any lawn mower can result in foreign objects being thrown into the eyes, which can damage your eyes severely. Always wear safety glasses while operating the mower, or while performing any adjustments or repairs on it. 2 Starting Engine WARNING: Be sure no one other than the operator is standing near the lawn mower while starting engine or operating mower. Never run engine indoors or in enclosed, poorly ventilated areas.
5 Lubrication 1. Lubricate pivot points on the blade control at least once a season with light oil. The blade control must operate freely in both directions. See Figure 5-1. 2. Lubricate the wheels at least once a season with light oil (or motor oil). If wheels are removed for any reason, lubricate surface of the pivot arm and inner surface of the wheel with light oil. See Figure 5-1. Maintaining Your Lawn Mower 3.
5 Blade Care WARNING: When removing the cutting blade for sharpening or replacement, protect your hands with a pair of heavy gloves or use a heavy rag to hold the blade. Blade Adapter Blade Periodically inspect the blade adapter for cracks, especially if you strike a foreign object. Replace when necessary. Follow the steps below for blade service. 1. Disconnect spark plug wire from spark plug. Turn mower on its side making sure that the air filter and the carburetor are facing up. Blade Bell Support 2.
6 Problem Engine fails to start Trouble Shooting Engine runs erratic For repairs beyond the minor adjustments listed here, contact an authorized service dealer. Engine overheats Occasional skips (hesitates) at high speed Idles poorly Excessive Vibration Mower will not mulch grass Uneven cut Cause Remedy 1. Blade control disengaged. 1. Engage blade control. 2. Spark plug boot disconnected. 2. Connect boot to spark plug. 3. Fuel tank empty or stale fuel. 3. Fill tank with clean, fresh gasoline.
7 TO REDUCE THE RISK OF INJURY, DO NOT OPERATE UNLESS DISCHARGE COVER OR GRASS CATCHER IS IN ITS PROPER PLACE. IF DAMAGED, REPLACE IMMEDIATELY. Safety Labels WARNING TO REDUCE THE RISK OF INJURY, DO NOT O P E R AT E U N L E S S DISCHARGE COVER OR GRASS C AT C H E R I S I N I T S P RO P E R P L AC E . I F DA M AG E D, R E P L AC E I M M E D I AT E LY. MAX 15˚ AVOID SERIOUS INJURY OR DEATH • KEEP H A N D S A N D F E E T A W AY F R O M R O TAT I N G PA R T S .
8 Engine Safe Operation Practices WARNING: Gasoline and its vapors are extremely flammable and explosive. Fire or explosion can cause severe burns or death. If gasoline is spilled on yourself or your clothes, wash your skin and change clothes immediately. Gasoline and its vapors are extremely flammable and explosive. Fire or explosion can cause severe burns or death. If gasoline is spilled on yourself or your clothes, wash your skin and change clothes immediately.
• Tie up long hair and remove jewelry. Running engine produces heat. Engine parts, especially muffler, • Do not wear loose-fitting clothing, dangling drawstrings or items that could become caught. become extremely hot. Severe thermal burns can occur on contact. Combustible debris, Rapid retraction of starter cord such as leaves, grass, brush, etc., (kickback) will pull hand and can catch fire. arm toward engine faster than you can let go.
9 Operating Your Engine Know Your Engine Fuel Cap Air Cleaner Starter Grip Oil Fill Cap Oil Drain Spark Plug Muffler Figure 9-1: The major components of the engine. IMPORTANT: This engine is shipped without gasoline or oil in the engine. Running the engine with insufficient oil can cause serious engine damage and void the engine warranty. IMPORTANT: Using non- detergent oil or 2stroke engine oil could shorten the engine’s service life.
9 Check Oil Level IMPORTANT: Be sure to check the engine on a level surface with the engine stopped. 1. Remove the oil filler cap and wipe the dipstick clean. See Figure 9-2. 2. Insert the dipstick into the oil filler neck, but do not screw it in. Oil Fill Cap/ Dipstick 3. If the level is low, slowly add oil to the upper limit on the dipstick. See Figure 9-2 inset. 4. Tighten dipstick firmly before starting engine. Upper Level IMPORTANT: Do not overfill.
10 Maintaining Your Engine WARNING: Shut off the engine before performing any maintenance. To prevent accidental start-up, disconnect the spark plug boot. IMPORTANT: If engine must be tipped to transport equipment or to inspect or remove grass, keep spark plug side of engine up. Transporting or tipping engine spark plug down may cause smoking, hard starting, spark plug fouling, or oil saturation of air cleaner.
IMPORTANT: Used motor oil may cause skin cancer if repeatedly left in contact with the skin for prolonged periods. Although this is unlikely unless you handle used oil on a daily basis, it is still advisable to thoroughly wash your hands with soap and water as soon as possible after handling used oil. Paper Element Maintaining Your Engine NOTE: Please dispose of used motor oil in a manner that is compatible with the environment.
10 Maintaining Your Engine Storage Engines stored over 30 days need to be drained of fuel to prevent deterioration and gum from forming in fuel system or on essential carburetor parts. If the gasoline in your engine deteriorates during storage, you may need to have the carburetor, and other fuel system components, serviced or replaced. 1. Remove all fuel from tank by running engine until it stops from lack of fuel. Electrode 2. Change oil. See Oil Change section. 0.030 in.
NOTES 21
Model 18M 44 42 36 43 24 38 37 39 46 41 25 45 5 40 4 6 12 14 35 51 56 46 20 49 B 55 B 2 21 54 23 1 3 30 29 3 19 3 48 50 20 28 32 52 A 31 8 9 32 13 34 15 10 47 11 26 53 17 3 32 16 18 33 Wheel Tread A 7 22 22 27
Part No. Description Ref. No. Part No. 787-01362 19” Deck 29 710-0260A Bolt, Carriage, 5/16-18 x .62 2 731-05880 Spacer, .515 x 1.00 x .310 Lg. 30 710-1242 Screw, 5/16-14 x .750 3 710-1241 Screw, 1/4-15 x 1.000 31 712-04063 Nut, Flange Lock, 5/16-18 4 710-04577 Screw, Machine, M4-.7 x 10.00 32 712-04065 Nut, Flange Lock, 3/8-16 5 749-04312 Lower Handle 33 634-04346 Front Wheel 6 631-04232 Engine Shroud 34 634-04347 Rear Wheel 7 736-0504 Washer, Wave, .510 x .750 x .
Engine 1P70FUA 29 21 8 9 15 20 1 7 3 13 2 19 18 24 25 11 26 17 10 17 6 28 4 5 12 14 27 22 23 16 24
Part No. Description 951-10368 Fuel Tank 2. 951-10369 Flywheel Shroud 3. 951-10335 Rubber Fuel Tank Mounting Washer 4. 951-10334 Oil Filler Tube Assembly 5. 951-10333 Dipstick Assembly 6. 951-10413 Cylinder Head Complete 7. 951-10414 Short Block Assembly 8. 951-10321 Stop Switch and Brake Assembly 9. 951-10319 Recoil Spring and Pulley Assembly 10. 951-10344 Push Rod Kit 11. 951-10345 Valve Kit 12. 951-10370 Oil Drain Plug and Washer Assembly 13.
Cub Cadet LLC (Cub Cadet), The United States Environment Protection Agency (U. S. EPA) Emission Control System Warranty Statement (Owner’s Defect Warranty Rights and Obligations) The U. S. EPA and Cub Cadet are pleased to explain the emissions control system warranty on your model year 2005 and later small off-road engine. New small off-road engines must be designed, built and equipped to meet the stringent anti-smog standards.
(7) The engine manufacturer is liable for damages to other engine components proximately caused by a failure under warranty of any warranted part. (8) Throughout the engine’s warranty period defined in Subsection (a)(2), Cub Cadet will maintain a supply of warranted parts sufficient to meet the expected demand for such parts. (9) Any replacement part may be used in the performance of any warranty maintenance or repairs and must be provided without charge to the owner.
MANUFACTURER’S LIMITED WARRANTY FOR The limited warranty set forth below is given by Cub Cadet LLC with respect to new merchandise purchased and used in the United States, its possessions and territories. “Cub Cadet” warrants this product against defects in material and workmanship for a period of three (3) years commencing on the date of original purchase and will, at its option, repair or replace, free of charge, any part found to be defective in materials or workmanship.