
Operator`s manual
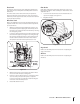


Chute Control
The distance snow is thrown can be adjusted by adjusting the
angle of the chute assembly. Refer to the Operation section for
instructions.
The remote chute control cables have been pre-adjusted at
the factory. Move the remote chute lever on the control panel
forward to pivot the upper chute down; move the lever rearward
to pivot the upper chute up.
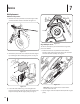
Wheel drive control
Refer to the Adjustment section of the Assembly instructions to
adjust the wheel drive control. To further check the adjustment,
proceed as follows:
With the snow thrower tipped forward (be certain to run 1.
the fuel tank dry before tipping the unit forward), remove
the frame cover underneath the snow thrower by removing
the self-tapping screws.
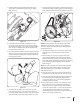
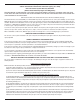
Locate the opening between the axle support bracket and 2.
the front frame support (See Figure 6-9). Looking through
this opening, with the wheel drive control released, there
must be clearance between the friction wheel and the
drive plate in all positions of the speed selector lever.
With the wheel drive control engaged, the friction wheel 3.
must contact the drive plate. See Figure 6-9.
If there is no friction wheel clearance, or the friction wheel 4.
does not solidly contact the drive plate, re-adjust the
lock nut on the lower end of the drive cable following the
instructions in the Assembly section.
Reassemble the frame cover.5.
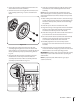
Chute Bracket
If the spiral at the bottom of the chute directional control is not
fully engaging with the chute assembly, the chute bracket can be
adjusted. To do so:
Loosen the two nuts which secure the chute bracket and 1.
reposition it slightly. See Figure 6-10.
Retighten the nuts. 2.
Auger Control
Refer to the Assembly section for instructions on adjusting the
auger control cable.
Skid Shoes
Refer to the Assembly section for instructions on adjusting the
skid shoes.
Figure 6-9
Figure 6-10
Axle Supp.
Bracket
Opening
Drive
Plate
Friction
Wheel
21se c t i O n 6 — Ma i n t e n a n c e & ad j u s t M e n t s