OPERATOR’S MANUAL 6x4 Utility Vehicle Model 640 IMPORTANT: READ SAFETY RULES AND INSTRUCTIONS CAREFULLY Warning: This unit is equipped with an internal combustion engine and should not be used on or near any unimproved forestcovered, brush-covered or grass-covered land unless the engine’s exhaust system is equipped with a spark arrester meeting applicable local or state laws (if any). If a spark arrester is used, it should be maintained in effective working order by the operator.
TABLE OF CONTENTS Content Page Important Safe Operation Practices................................................................... 3 Know Your Utility Vehicle ................................................................................... 7 Operating Your Utility Vehicle ............................................................................ 10 Servicing Your Utility Vehicle ............................................................................. 12 Service Chart ..........................
SECTION 1: IMPORTANT SAFE OPERATION PRACTICES WARNING: This symbol points out important safety instructions which, if not followed, could endanger the personal safety and/or property of yourself and others. Read and follow all instructions in this manual before attempting to operate or service this vehicle. When you see this symbol - heed its warning.
26. 27. 28. 29. 30. contains carbon monoxide fumes, which are very poisonous and can be deadly. Do not change engine governor setting or over speed the engine. The governor is set at the factory for safe operating speed. Assure safety interlock switch is adjusted correctly so engine cannot be started unless gearshift is in the neutral position. Do not touch engine or muffler while engine is running or soon after it is stopped. They will be hot and can cause a burn.
c. When practical, remove gas-powered equipment from the truck or trailer and refuel it on the ground. If this is not possible, then refuel such equipment on a trailer with a portable container, rather than from a gasoline dispenser nozzle. d. Keep the nozzle in contact with the rim of the fuel tank or container opening at all times until fueling is complete. Do not use a nozzle lock-open device. e. Extinguish all cigarettes, cigars, pipes and other sources of ignition. f. Never fuel machine indoors. g.
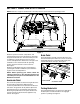
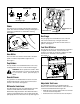
SECTION 2: KNOW YOUR UTILITY VEHICLE NOTE: Reference to right or left hand side of the utility vehicle is observed from the operating position. Figure 1 Brake Pedal Read this operator’s manual, safety labels, and operating instructions on the vehicle before operating. Compare the illustrations in this manual with your unit to familiarize yourself with the location of various controls and adjustments. Reference to the right or left hand side of unit is observed from the operating position.
• • 12V Power Outlet To engage the parking brake, push brake pedal down firmly, pull out on the parking brake knob, and release foot from brake pedal. Brake pedal will stay down and parking brake light on dash will come on to indicate parking brake is engaged. To release parking brake, push down on brake pedal and parking brake latch will release. The 12V power outlet is located on the right side of the dash panel.
Low Fuel Light Engine Oil Pressure Light Engaged P Alternator Discharge Light Parking Brake Figure 6 Choke The choke lever is located on the left side of the dash panel. The choke is used when starting a cold engine. It richens the fuel mixture for cold weather starting. See Figure 7. Gearshift Lever Differential Lock Lever Disengaged Figure 8 Gas Gauge Choke The gas gauge is located under the seat on the left side. It is mounted on top of the gas tank and it indicates amount of fuel in tank.
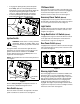
to dump cargo. If the cargo box has a manual lift, there is a support rod to lock the box in place. See Figure 11. WARNING: Make sure seat is in locked position prior to operation and do not try to adjust the seat position while operating the vehicle. WARNING: Do not exceed the vehicle’s Total Load Capacity of 1,400 lb., which includes driver, accessories, and cargo. Do not exceed 1,000lb. in the cargo box.
Driving Utility Vehicle • • • • Make sure front wheels are turned to the desired direction. Depress brake pedal to release parking brake. To avoid damaging transmission, depress brake pedal fully and make sure vehicle is completely stopped before shifting into Forward or Reverse. • WARNING: Make sure support rod is securely locked before leaning into engine and transaxle area of vehicle. Do not operate vehicle unless cargo box lift strap is latched down.
• • If using an electric lift, raise cargo box to dump load and lower box when empty. WARNING: The center of gravity changes as a loaded cargo box is raised. Do not allow rear wheel to hang over the edge of a loading dock or ravine. The cargo box weight may shift over center and vehicle could tip over backwards. Towing Loads WARNING: To help prevent personal injury due to loss of control or tipping, always tow a load slowly enough to maintain control. WARNING: A loaded cargo box can be very heavy.
• could change the polarity and cause damage to your engine’s alternating system. Lubricate three grease fittings on each u-joint with 2 or 3 shots of grease 100 hours. Rear & Center Arms Clean Battery and Terminals • • Lubricate the eight grease fittings on the rear and center arms every 50 hours. • Engine • • Read the Honda Engine operator’s manual for any service or maintenance information pertaining to the engine.
Wheel Replacement If the vehicle has not been put into use for an extended period of time, charge the battery with an automotive type 12-volt charger for a minimum of one hour at six amps. WARNING: Using an unstable lifting device and vehicle support may result in bodily injury. Use a safe lifting device and supports to work on raised vehicle. Replacing Headlights Headlights Rear Wheels • • • • • • Remove the two screws from the each headlight housing located behind each fender.
Drive Chain Tension • • WARNING: Do not rely on a lifting device alone to support machine while servicing. Always use jack stands or wooden blocks to support vehicle while work is being performed with machine raised. • • • NOTE: Drive chain is set taught at the factory, so it will not reach normal stretch limits until vehicle has experienced reasonable hours of operation (100 hrs). • • • • • • • • • Stop vehicle on level surface, but do not apply parking brake.
Drive Belt Adjusting Brake The wet brake system is an internal part of the transmission and it is adjusted externally without opening the transmission. There are two sets of brakes that may require adjustment. Each set consists of two rotating friction plates placed between three fixed steel plates operating in oil. Each set of brakes is operated by it’s respective lever arm. The brakes are properly adjusted at the factory.
• Prepare fuel system for storage. If planning to store vehicle with fuel tank empty: WARNING: Damage may occur if direct hose spray comes in contact with any other electrical components, i.e. at instrument cluster or under dash. Storage Add a small quantity of fresh stabilized fuel to tank. Run engine until it runs out of fuel. This will circulate fuel mixture through engine.
SECTION 6: ACCESSORIES Description Electric Bed Lift Horn Rear Electric Outlet Rear Receiver Hitch Brush Guard Floor Mat Front Receiver Hitch Heavy Duty Tires Model Number 39A-100-100 39A-101-100 39A-102-100 39A-103-100 39A-104-100 39A-105-100 39A-106-100 39A-107-100 NOTE: Some of these accessories may come already equipped on your vehicle. If they are not equipped, they may be ordered through your local Cub Cadet service dealer.
SECTION 8: TROUBLESHOOTING Trouble Engine will not start Possible Cause(s) Battery has low voltage. Loose or corroded battery connections. Fusible link is melted. Spark plug wire is loose or disconnected. Faulty spark plug or coil. Fuel shut-off valve turned off. No Fuel or improper fuel. Plugged fuel filter. Defective starter solenoid. Open-circuit in wiring. Engine is hard to Engine is cold. start Plugged fuel filter. Carburetor not adjusted properly or dirty. Engine oil viscosity too heavy.
MANUFACTURER’S LIMITED WARRANTY FOR: The limited warranty set forth below is given by Cub Cadet LLC with respect to new merchandise purchased and used in the United States, its possessions and territories. Cub Cadet LLC warrants this product against defects for a period of two (2) years commencing on the date of original purchase and will, at its option, repair or replace, free of charge, any part found to be defective in materials or workmanship.