Safety • Assembly • Operation • Tips & Techniques • Maintenance • Troubleshooting • Parts Lists • Warranty OPERATOR’S MANUAL 21-inch Rotary Mower — Model 439 IMPORTANT READ SAFETY RULES AND INSTRUCTIONS CAREFULLY BEFORE OPERATION Warning: This unit is equipped with an internal combustion engine and should not be used on or near any unimproved forest-covered, brushcovered or grass-covered land unless the engine’s exhaust system is equipped with a spark arrester meeting applicable local or state laws (if an
This Operator’s Manual is an important part of your new lawn mower. It will help you assemble, prepare, and maintain the unit for best performance. Please read and understand what it says. Table of Contents Slope Gauge ....................................................... 3 Safe Operation Practices ................................... 4 Setup and Adjustment ....................................... 6 Operating Your Lawn Mower .............................. 8 Maintaining Your Lawn Mower .....................
Use this page as a guide to determine slopes where you may not operate safely. Do not operate your lawn mower on such slopes. 1 Slope Gauge ������������������������������������������������� ��� ��������������� ���������������������������� �� �� � � � � � ����� �� � � � � � ������ � � � � ���� � �� � � � � � ���� 3 WARNING Do not mow on inclines with a slope in excess of 15 degrees (a rise of approximately 2-1/2 feet every 10 feet). A riding mower could overturn and cause serious injury.
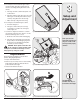
2 Safe Operation Practices WARNING This symbol points out important safety instructions which, if not followed, could endanger the personal safety and/or property of yourself and others. Read and follow all instructions in this manual before attempting to operate this machine. Failure to comply with these instructions may result in personal injury. When you see this symbol.
19. Shut the engine off and wait until the blade comes to a complete stop before removing the grass catcher or unclogging the chute. The cutting blade continues to rotate for a few seconds after the engine is shut off. Never place any part of the body in the blade area until you are sure the blade has stopped rotating. 20. Never operate mower without proper trail shield, discharge cover, grass catcher, blade control handle or other safety protective devices in place and working.
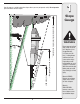
3 IMPORTANT: This unit is shipped without gasoline or oil in the engine. Fill up gasoline and oil as instructed in the accompanying engine manual BEFORE operating your mower. 1. Remove any packing material which may be between upper and lower handles. Setup and Adjustment � a. Pull up and back on upper handle as shown in Figure 3-1. Make certain the lower handle is seated securely into the handle mounting brackets. b. Tighten star knobs securing upper handle to lower handle, Figure 3-1.
3 5. Follow steps below to assemble the grass catcher (if needed). Make certain bag is turned right side out before assembling (warning label will be on the outside). a. Place bag over frame so that its black plastic side is at the bottom. A Setup and Adjustment b. Slip plastic channel of grass bag over hooks on the frame, Figure 3-5. All the plastic channels except center top of bag attach from outside of bag. c. Attach center top of bag from inside of bag. C 6.
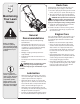
4 Operating Your Lawn Mower Know Your Lawn Mower Blade Control Recoil Starter Grass Catcher Cutting Height Adjustment Levers (for each wheel) WARNING The blade control is a safety device. DO NOT bypass its operations. Use extreme care when handling gasoline. Gasoline is extremely flammable and the vapors are explosive. Never fuel the machine indoors or while the engine is hot or running. Extinguish cigarettes, cigars, pipes and other sources of ignition.
4 Starting the Engine WARNING: Be sure no one other than the operator is standing near the lawn mower while starting engine or operating mower. Never run engine indoors or in enclosed, poorly ventilated areas. Engine exhaust contains carbon monoxide, an odorless and deadly gas. Keep hands, feet, hair and loose clothing away from any moving parts on engine and lawn mower. � Refer to engine manual for help with the engine. 1.
5 Deck Care Clean underside of the mower deck after each use to prevent build-up of grass clippings or other debris. 1. Disconnect spark plug wire. Drain gasoline from lawn mower, or place a piece of plastic under the gas cap. 2. Tip mower so that it rests on the housing. Keep the side with the air cleaner facing up. Hold mower firmly. Maintaining Your Lawn Mower WARNING: Never tip the mower more than 90º in any direction and do not leave the mower tipped for any length of time.
5 Blade Care WARNING: When removing the cutting blade for sharpening or replacement, protect your hands with a pair of heavy gloves or use a heavy rag to hold the blade. Periodically inspect the blade adapter for cracks, especially if you strike a foreign object. Replace when necessary. Follow the steps below for blade service. 1. Disconnect spark plug wire from spark plug. Turn mower on its side making sure that the air filter and the carburetor are up. Maintaining Your Lawn Mower 2.
6 Engine fails to start 1. 2. 3. 4. 5. 6. 7. Engine runs erratic 1. Spark plug wire loose. 2. Blocked fuel line or stale fuel. Trouble Shooting Blade control disengaged. Spark plug wire disconnected. Fuel tank empty or stale fuel. Fuel valve closed. Faulty spark plug. Blocked fuel line. Engine flooded. 1. 2. 3. 4. 5. 6. 7. Engage blade control. Connect wire to spark plug. Fill tank with clean, fresh gasoline. Open fuel valve. See engine manual. Clean, adjust gap, or replace. Clean fuel line.
Safety Labels Found On Your Lawn Mower �� ������ ��� ���� �� ������� �� ��� ������� ������ ��������� ����� �� ����� ������� �� �� ��� ������ ������ �� �������� ������� ������������ 7 Safety Labels WARNING ����������������������������� � ��������������������������������������������� � ����������������������������������������� �������������������������������������������� � ���������������������������������������������� � ��������������������������������������� ������������������������������������������ ����
� � � �� � �� �� �� � �� �� � � �� � �� �� � �� �� �� �� �� �� �� �� �� �� �� �� �� �� �� �� �� �� �� �� �� �� �� �� �� �� �� �� �� �� �� �� �� �� �� �� �� �� 14 �� ��
Bail Cover 28 736-0270 Bell Washer .265 x .75 x .062 2 746-1130 Control Cable 40-inch 29 710-0654A TT Sems Screw 3.8-16 x 1.00 3 726-0240 Cable Tie 30 687-02071A Pivot Arm Assy - RH 4 664-04054 Grass Bag Assembly 687-02070A Pivot Arm Assy - LH 5 747-04080 Grass Bag Frame 31 732-04175 Spring Lever 6 732-0700 Trailshield Wire 32 710-1652 TT Screw 1/4-20 x .625 7 731-04998 Trailshield 33 714-0104 Int. Cotter Pin .072 dia. x 1.
MANUFACTURER’S LIMITED WARRANTY FOR The limited warranty set forth below is given by Cub Cadet LLC with respect to new merchandise purchased and used in the United States, its possessions and territories. “Cub Cadet” warrants this product against defects in material and workmanship for a period of two (2) years commencing on the date of original purchase and will, at its option, repair or replace, free of charge, any part found to be defective in materials or workmanship.