Safe Operation Practices • Set-Up • Operation • Maintenance • Service • Troubleshooting • Warranty Operator’s Manual Snow Cab/Sun Shade WARNING READ AND FOLLOW ALL SAFETY RULES AND INSTRUCTIONS IN THIS MANUAL BEFORE ATTEMPTING TO OPERATE THIS MACHINE. FAILURE TO COMPLY WITH THESE INSTRUCTIONS MAY RESULT IN PERSONAL INJURY. CUB CADET LLC, P.O. BOX 361131 CLEVELAND, OHIO 44136-0019 Form No.
1 To The Owner Thank You Thank you for purchasing a Cub Cadet Snow Cab/Sun Shade. It was carefully engineered to provide excellent performance when properly operated and maintained. Please read this entire manual prior to operating the equipment. It instructs you how to safely and easily set up, operate and maintain your equipment. Please be sure that you, and any other persons who will operate the equipment, carefully follow the recommended safety practices at all times.
Important Safe Operation Practices 2 WARNING! This symbol points out important safety instructions which, if not followed, could endanger the personal safety and/or property of yourself and others. Read and follow all instructions in this manual before attempting to operate this machine. Failure to comply with these instructions may result in personal injury. When you see this symbol.
Children 1. 2. Tragic accidents can occur if the operator is not alert to the presence of children. Children are often attracted to the machine and the mowing activity. They do not understand the dangers. Never assume that children will remain where you last saw them. a. Keep children out of the mowing area and in watchful care of a responsible adult other than the operator. b. Be alert and turn machine off if a child enters the area. c.
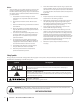
3 Assembly & Set-Up Contents of Carton 7 4 3 2B Hardware & Loose Pack Items 7 3 13 2A 14 5 9 10 8 1 5 6B 11 12 6A 17 Figure 3-1 Ref. 1 Part Number 749-05389B Description Rear Support Qty. Ref. 1 10 712-04063 Flange Lock Nut, 5⁄16-18 2 712-04064 Flange Lock Nut, 1⁄4-20 4 Part Number Description Qty.
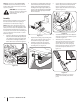
NOTE: All references to LEFT, RIGHT, FRONT, and REAR indicate the Snow Cab/Sun Shade position when sitting in the tractor seat in the operator’s position. 2. CAUTION: Do not transport the tractor on a trailer or in the bed of a truck with the snow cab or sun shade installed. If your tractor is equipped with a drain hose as shown below, the oil drain tube and clip must be removed from the frame before installing the front right support (#6A). See Figure 3-3.
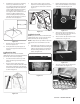
8. Assemble the canopy prior to attaching it to the top of the frame. Insert the cross supports (Ref. part #3) into the side supports (Ref. part #7). Then attach the center rod (Ref. part #4) in the mouting holes located on the front and rear cross supports. Then assemble the cross support rods (Ref. part #4) with rod connectors (Ref. part #4) and place the ends into the mouting holes located on the inside of the side supports. 3. There are two straps on the rear mesh flap of the sun shade.
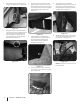
6. The outer front clips attach to the front fenders near the wheels. See Figure 3-14. 8. Unzip the cab door and locate the five straps inside the cab. There is one in the front (near the hood) and a four along the top. Snap the ends of each strap together and then tighten them securely. See Figure 3-16. 11. If your tractor has a snow thrower installed, the chute directional control can be positioned or routed inside the cab through the zippered opening on the left side of the cab. See Figure 3-19.
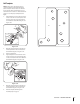
Drill Templates NOTE: Some tractors will require the use of the Snow Cab/Sun Shade Mounting Kit (#759-05086) in order to install. To order the snow cab/sun shade mounting kit see your authorized service dealer or contact Customer Support or use the paper templates to the Right. 1. Align template A on the right side of the tractor as shown in secure in place with the hex screw, nut and screw from the Snow Cab/Sun Shade Mounting Kit. See Figure 3-21. A B Figure 3-21 2.
Notes
CUB CADET LLC MANUFACTURER’S LIMITED WARRANTY FOR SEPARATELY SOLD ATTACHMENTS AND ACCESSORIES IMPORTANT: To obtain warranty coverage owner may be required to present an original proof of purchase and applicable maintenance records to the servicing dealer. Please see the operator’s manual for information on required maintenance and service intervals.
Medidas de seguridad • Configuración • Funcionamiento • Mantenimiento • Servicio • Solución de problemas • Garantía Manual del Operador Cabina para nieve/Parasol WARNING READ AND FOLLOW ALL SAFETY RULES AND INSTRUCTIONS IN THIS MANUAL BEFORE ATTEMPTING TO OPERATE THIS MACHINE. FAILURE TO COMPLY WITH THESE INSTRUCTIONS MAY RESULT IN PERSONAL INJURY. CUB CADET LLC, P.O.
1 Al propietario Muchas gracias Gracias por comprar una cabina para nieve/parasol Cub incluidas y/o ilustradas en este manual no se apliquen a todos Cadet. Ha sido cuidadosamente diseñada para brindar los modelos. Cub Cadet LLC se reserva el derecho de modificar excelente rendimiento si se la hace funcionar y se la mantiene las especificaciones de los productos, los diseños y el equipo sin correctamente.
2 Importantes medidas de seguridad ¡ADVERTENCIA! ESTE SÍMBOLO INDICA INSTRUCCIONES DE SEGURIDAD IMPORTANTES QUE, DE NO SEGUIRSE, PODRÍAN PONER EN PELIGRO SU SEGURIDAD PERSONAL Y/O SU PROPIEDAD O LAS DE TERCEROS. LEA Y CUMPLA TODAS LAS INSTRUCCIONES DE ESTE MANUAL ANTES DE INTENTAR HACER FUNCIONAR ESTA MÁQUINA. SI NO RESPETA ESTAS INSTRUCCIONES PUEDE PROVOCAR LESIONES PERSONALES.CUANDO VEA ESTE SÍMBOLO.
Niños 1. 2. Pueden ocurrir accidentes trágicos si el operador no está atento a la presencia de niños. Por lo general, los niños se sienten atraídos por la máquina y su actividad. No entienden los riesgos ni los peligros. Nunca suponga que los niños permanecerán en el lugar donde los vio por última vez. No permita nunca que los niños menores de 14 años de edad utilicen esta máquina.
3 Montaje y configuración Contenido de la caja 7 4 3 2B Herrajes y Hardware & artículos sueltos Loose Pack Items 7 3 13 2A 14 5 9 10 8 1 5 6B 11 12 6A 17 Figure 3-1 Ref. Part Number Description Qty. Ref. 1 10 712-04063 Tuerca de seguridad con brida 2 712-04064 Tuerca de seguridad con brida 4 Part Number Description Qty.
NOTA: Todas las referencias a IZQUIERDA, DERECHA, ADELANTE y ATRÁS indican la posición relativa de la Cabina para nieve/ parasol desde el asiento del tractor, en la posición del operador. 2. PRECAUCIÓN: No transporte el tractor sobre un remolque ni en la caja de un camión con la cabina para nieve/el parasol colocados. Antes de instalar el soporte delantero derecho (n.° 6A), se deben extraer del bastidor el enganche y el tubo de drenaje de aceite. Consulte la Figura 3-3.
8. Ensamble el dosel antes de colocarlo en la parte superior del marco. Inserte los soportes cruzados (Ref. Parte # 3) en los soportes laterales (Ref. Parte # 7). Luego, conecte la varilla central (Ref. Parte # 4) en los orificios de engarce ubicados en los soportes cruzados delantero y trasero. Luego ensamble las varillas de soporte cruzadas (Ref. Parte # 4) con los conectores de varilla (Ref. Parte # 4) y coloque los extremos en los orificios de montaje ubicados en el interior de los soportes laterales.
6. Una correa elástica pasa por el frente del capó. Se usa dicha correa para ajustar la Cabina para nieve alrededor del capó y evitar que ingrese nieve a la cabina. Los ganchos de la correa se enganchan al capó, cerca de las ruedas delanteras. Consulte la Figura 3-14. 8. Hay un par de imanes en la sección inferior en cada lado de las placas de piso. Dichos imanes ayudan a sostener la parte inferior de la Cabina para nieve contra las placas de piso. Consulte la Figura 3-16. 11.
2. Perfore los orificios adecuados con la broca de 9⁄32” que se provee en el Kit de montaje de la Cabina para nieve/parasol. Consulte la Figura 3-21. 3. Extraiga la plantilla A. 4. Se debe alinear la plantilla B del lado izquierdo del tractor y se debe sujetar en su lugar con los tornillos hexagonales y las tuercas del Kit de montaje de la Cabina para nieve/parasol. Consulte la Figura 3-21. A B Figure 3-21 5.
CUB CADET LLC GARANTÍA LIMITADA DEL FABRICANTE PARA ACCESORIOS Y ELEMENTOS QUE SE VENDEN POR SEPARADO IMPORTANTE: Para obtener cobertura de garantía, el propietario debe presentar el comprobante de compra original y los registros de mantenimiento correspondientes al centro de servicio técnico autorizado del distribuidor.
Consignes de sécurité • Assemblage • Utilisation • Entretien • Réparations • Dépannage • Garantie Manuel de l’utilisateur Cabine de protection pour l’hiver / l’été WARNING READ AND FOLLOW ALL SAFETY RULES AND INSTRUCTIONS IN THIS MANUAL BEFORE ATTEMPTING TO OPERATE THIS MACHINE. FAILURE TO COMPLY WITH THESE INSTRUCTIONS MAY RESULT IN PERSONAL INJURY. CUB CADET LLC, P.O.
1 Au propriétaire Merci Nous vous remercions d’avoir acheté une cabine de protection fonctionnement. Veuillez noter que ce manuel peut mentionner Cub Cadet. Ce produit a été soigneusement conçu pour vous offrir une performance remarquable lorsqu’il est correctement utilisé et entretenu. une vaste gamme de spécifications techniques concernant l’équipement facilement et sans danger.
2 Consignes de sécurité importantes AVERTISSEMENT ! CE SYMBOLE INDIQUE LES CONSIGNES DE SÉCURITÉ IMPORTANTES QUI, SI ELLES NE SONT PAS RESPECTÉES, PEUVENT METTRE EN DANGER VOTRE PROPRE SÉCURITÉ ET CELLE D’AUTRUI OU ENTRAÎNER DES DOMMAGES MATÉRIELS. VEUILLEZ LIRE ET RESPECTER TOUTES LES INSTRUCTIONS DU PRÉSENT MANUEL AVANT D’UTILISER CET ÉQUIPEMENT. LE NON-RESPECT DE CES CONSIGNES PEUT ENTRAÎNER DES BLESSURES CORPORELLES.
Enfants 1. h. Un accident grave risque de se produire si l’utilisateur de l’appareil n’est pas toujours vigilant en présence d’enfants. Les enfants sont souvent attirés par les appareils en mouvement et les activités liées à la tonte. Ils ne se rendent pas compte des dangers. Ne prenez jamais pour acquis qu’un enfant va rester là où vous l’avez vu. a. Éloignez les enfants de la zone de travail et placezles sous la surveillance d’un adulte autre que l’utilisateur de l’appareil. b.
3 Assemblage et montage Contenu de la boîte 7 4 3 2B Quincaillerie Hardware & et pièces Loose Pack Items 7 3 13 2A 14 5 9 10 8 1 5 6B 11 12 6A 17 Figure 3-1 Ref. Part Number Description Qty. Ref. 1 10 712-04063 Écrou Autobloquant À Bride, 5/16-18 2 712-04064 Écrou Autobloquant À Bride, 1/4-20 4 Part Number Description Qty.
NOTE : Toutes les mentions de GAUCHE, DROITE, AVANT et ARRIÈRE de la cabine de protection ne s’entendent qu’à partir du poste de conduite de l’appareil. 2. ATTENTION : Ne transportez pas l’appareil sur une remorque ou dans la benne d’un camion si la cabine de protection est installée. Avant d’installer le support avant droit (Réf. 6A), retirez l’attache et le boyau de vidange d’huile du châssis. Voir Figure 3-3. L’attache et le boyau de vidange d’huile s’installent dans le support avant droit. 5.
8. Assemblez la verrière avant de l’attacher au sommet du cadre. Insérez les supports transversaux (référence n ° 3) dans les supports latéraux (référence n ° 7). Ensuite, fixez la tige centrale (réf.partie 4) dans les trous de montage situés sur les supports transversaux avant et arrière. Assemblez ensuite les tiges de support transversales (référence n ° 4) avec des raccords à tige (réf. N ° 4) et placez les extrémités dans les trous de montage situés à l’intérieur des supports latéraux. 3.
6. Les attaches avant s’attachent sur les ailes à l’avant de l’appareil, à proximité des roues. Voir Figure 3-14. 8. Ouvrez la porte de la cabine et repérez les cinq sangles à l’intérieur de la cabine. Il y a une sangle à l’avant de la cabine (à proximité du capot) et quatre sangles sur la partie supérieure de la cabine. Fixez les sangles l’une à l’autre, puis serrez-les bien. Voir Figure 3-16. 11.
Gabarits de perçage NOTE : L’ensemble d’installation 759-05086 est requis pour installer la cabine de protection sur certains appareils. Contactez le centre de service agréé de votre région ou communiquez avec le service à la clientèle pour commander l’ensemble d’installation ou utilisez les gabarits de perçage. 1. Alignez le gabarit A sur le côté droit de l’appareil, puis fixez-le en place à l’aide du boulon hexagonal, de l’écrou et du boulon fournis dans l’ensemble d’installation. Voir Figure 3-21.
CUB CADET LLC GARANTIE LIMITÉE DU FABRICANT POUR LES ACCESSOIRES VENDUS SÉPARÉMENT IMPORTANT : Le propriétaire doit présenter le reçu original et les relevés d’entretien au concessionnaire pour faire honorer la garantie. Le propriétaire de l’équipement est tenu de respecter le calendrier d’entretien tel qu’il est indiqué dans le manuel de l’utilisateur.