
Replacement Part List


3Section 1 —ASSembly & Set-Up
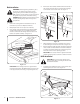
2. Install the discharge baffle using the two 1” carriage bolts
(and two flange nuts) to secure the back portion, and two
⁄” carriage bolts (and two flange nuts) to secure the front
portion. See Figure 1-5.
Figure 1-5
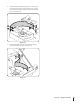
3. Install the left baffle using three ⁄” carriage bolts (and
three flange nuts) to secure it. See Figure 1-6.
Figure 1-6