
Service manual

19
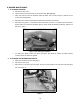
INSTALLING THE MOWER DECK
WARNING: Disengage PTO, stop engine and remove key to avoid accidental starting and
injury.
WARNING: When handling the mower deck, be careful not to cut yourself on the sharp blades.
1. Lift one side of the mower deck to achieve the desired cutting height.
2. Push the button in the center of the handle of each of the retaining pins to insert the retaining pins through the
appropriate front and rear height adjustment holes in the mower deck channel. Select the lowest holes that
allow insertion of the pins just above the bottom inside edge of the power unit frame U-brackets inside the
brackets.
NOTE: The same height adjustment hole must be used for both front and rear pin installation.
3. Release the mower deck.
4. Repeat the above procedure to install the other side of the mower deck.
NOTE: The same height adjustment hole must be used for all four pin installations.
5. Adjust the mower deck as required. Refer to “Adjustments” in your Operator’s Manual.
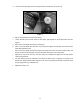
6. Install the PTO belt by executing the following procedures:
1. Remove center mower deck cover by first removing two large wing nuts.
2. Push against idler arm to release tension on the PTO belt. For increased leverage, a 3/8-inch square
drive of a breaker bar can be placed in the 3/8-inch square hole of the idler arm. The breaker bar han
-
dle can be pushed to release tension on the PTO belt.
NOTE: Be sure the narrow side of the belt is in the bottom of the pulley grooves.
3. Carefully remove old PTO belt, and replace it with a new belt.
4. Release force on the idler arm to restore tension to new PTO belt. If used, remove breaker bar from
idler arm.
5. Replace center mower deck cover and secure it in place with two large wing nuts.
NOTE: Ensure that the center mower deck cover is replaced and secured with the two large wing nuts.
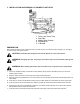
7. Turn the T Handles on each side of the hydraulic pumps clockwise two turns to shut the valves. (CAUTION
DO NOT OVERTIGHTEN.