
Manual


SECTION6: MAKINGADJUSTMENTS
WARNING: Do not at any time make any
adjustments without first stopping engine
and disconnecting spark plug wire.
EngineAdjustments
See the separate engine manual packed with your unit
for adjustments to the engine.
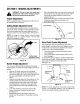
CuttingHeightAdjustmentLever
The cutting height adjustment lever is located above
the left rear wheel. To adjust the cutting height, pull the
lever out and away from the mower and then move it
forward or back for a new cutting height. See Figure 14.
NOTE: For rough or uneven lawns, move the height
adjustment lever to a higher position. This will help
prevent the scalping of grass.
, Lower
Adjustment Lever
Figure 14
HandleHeightAdjustment
Your mower is shipped with the handle in the higher
height position. To lower the handle height, proceed as
follows.
• Remove the starter rope from the rope guide.
• Remove the upper handle by removing the wing
nuts and carriage bolts. Lay the upper handle out of
the way, being careful not to bend or kink the
cables.
• Remove the hairpin clips from the weld pins on the
handle brackets and remove the wing nuts and
carriage bolts from the upper hole on the handle
mounting bracket. Press out on the legs of the
lower handle and remove lower handle from the
mower.
• Turn lower handle around so the notch on the
bottom of the lower handle isfacing forward.
See Figure 15.
• Reassemble, placingthe bottom holes in the
handle over the weld pins in the handle mounting
bracket.
Place the hairpin clips in the inner holes in the weld
pinsand insertthe carriage bolts the upper hole on
the handle mounting bracket and secure with
plasticwing nuts.
Reassemble the upper handle to the lower handle.
Attach the starter rope as instructed inthe
Assembly Section.
Lower Handle-_._
Notch
Figure 15
DriveClutchControlAdjustment
The adjustment wheel is located in the drive clutch
control handle housing and is used to tighten or loosen
the drive belt. You will have to adjust the drive clutch
control if any of the following happens:
• The mower does not propel itself with the drive
clutch engaged.
• The mower's drive wheels hesitate with the drive
clutch engaged.
To resolve the above problems, rotate the adjustment
wheel with your fingers. Clockwise to tighten the cable
and counter-clockwise to loosen the cable.
See Figure 16.
Bottom View
® ®
Adjustment
Wheel_
pper
Handle
Clutch
Control
Figure 16
NOTE: For some people the drive clutch control may
not be in a comfortable position. You can adjust the
handle out by tightening the adjustment wheel.
12