
Owners manual
INSTRUCTIONS:
1. Remove the clamp that holds the dust boot to the driveshaft. Spread the part that is
crimped with a flathead screwdriver to free up the clamp.
2. Remove the bolts that hold the front of the driveshaft to the front differential and remove
the driveshaft.
3. Separate the shift cable from the shift lever on the transmission, use caution not to
damage the end of the cable.
4. Remove the steel retainer clip that secures the shift cable to the shift cable bracket.
5. Free the cable from the bracket by squeezing the plastic flanges and sliding the cable out.
Re-route the cable to the bottom side of the transfer case and let it rest on the cross
member.
6. Remove the 2 bolts that hold the bracket to the back of the transmission.
7. Open up the plastic clip and free it from the gas lines. Remove the stock bracket. The
plastic clip that attaches to the gas lines will be reused, remove it from the bracket. Try
not to damage it.
8. Remove the nut that secures the shift lever. Hold the shift lever securely while removing
the nut to prevent damage inside the transmission. Remove the shift lever.
9. Install the new shift lever using the stock nut and locktite. Hold the shift lever securely
while tightening the nut to prevent damage inside the transmission.
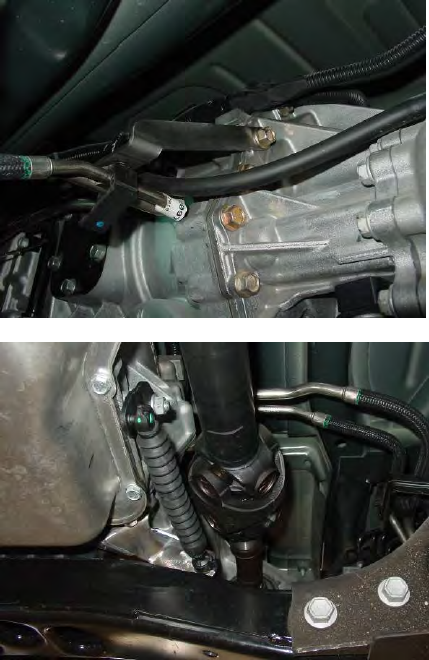
10. Remove the upper bolt that holds the transfer case
to the back of the transmission and install the
supplied upper bracket. Install the plastic fuel
line clip. Use locktite on the stock bolt and
tighten it down. Use the included photo for
reference.
11. Install the new cable bracket using the stock bolts
and locktite. Use the included photo for
reference.
12. Slide the cable into the new bracket, make sure
the plastic flanges spring out and secure the
cable in place. Install the steel retaining clip.
13. Attach the end of the cable to the shift lever.
14. Install the new drive shaft and secure it to the front
differential using the stock hardware and
locktite.
15. Make sure the rubber boot on the back of the
driveshaft is seated in the correct position and
secure it to the drive shaft using the stock
clamp. Use a pair of dikes to crimp it down.
16. Make sure there are no clearance issues and that
the driveshaft will not hit anything as it rotates.