
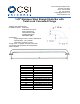
Specifications

IMPORTANTINSTRUCTIONS
SAFETYNOTE:ConcealedIn‐WallsupportbackingisALWAYSREQUIREDforthisproduct(not
included)–andmustbesuppliedandselectedbyalicensedinstaller/contractortomeetboth
weightbearingandlocalcoderequirements.
PRODUCTINSTALLATIONSHOULDBEDONE BYALICENSEDINSTALLER/CONTRACTOR.
CAUTION: Personalinjuryand/orpropertydamagemayresultfromimproperwallsupportor
mounting,whichisnotcoveredunderwarranty.
WARNING:DoNOTusethisinstructionsheetforstraightgrabbarsorgrabbarswithwelded
studorinternalthreads
ITISESSENTIALTOMARKTHECENTERLINEDISTANCEBETWEENTHETWOMOUNTINGFLANGE
PLATESASWELLASTHEDISTANCEFROMCENTEROFEACHMOUNTINGPLATETOTHEFINISH
FLOORTOASSUREPROPERALIGNMENT.
INSTALLATIONSTEPS:
1. Confirmcontentsofbox:Grabbarand6screws,whicharestainlesssteelwithPhillipshead.
2. Tools&suppliesneeded:Phillipsscrewdriveror3"drillbitextender,pencil,drill,and
siliconecaulk.
3. Carefullyconsiderthemountinglocationbeforeinstallation:Installonlywhereproper
structureisprovidedbehindthewall.Measureareaofthegrabbarandavoidpipes,wires,
grout,etc.
4. Usethemountingflangesasatemplate,markthecenterofscrewholelocations.
5. Drillmountingholes.
6. IMPORTANT:MUSTHAVEPROPER,CONCEALED,IN‐WALLBACKINGINSTALLEDBYA
LICENSEDINSTALLATIONPROFESSIONAL.
7. Onthebacksideofeachflange,whereitwilltouchthewall,applyabeadofsiliconecaulk
aroundeachscrewhole.
8. Installthebarwiththemanufacturer’sprovidedscrews.Afterinstallingthebar,inspecteach
screwtoensureitistight,straightandflushwiththeflange.
WARNING:Avoiddamagetowall,tile,orfastenersbynotover‐tighteningscrews.
9. Twisttheflangecoverontomountingflangeplates.