
User`s guide


228 VEREX Director V4.73 User's Guide 21-0381E v4.7.3
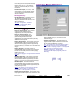
The System Communication screen
This screen provides acc ess to monit oring,
numeric pagin g, and comm unications set tings
for a specific panel.
Tip: Beginning with VEREX Director V4.0, you can use
Wizards to set up a new system, and initiate
communications with panels. (Look in the T
ools
menu).
How to Get Here
Multi-Account Systems: First select [Account Folders]
in the 'tree', and locate and double-click the desired
account.
MyTools Bar: System Communication
In the Tree
: Configuration (click the "+"),
ÖSystem, ÖCommunication
(Under the specific
panel group and panel--if listed in the 'tree'.)
Related
Topic: "Other Desktop Choices"
Tip: The Grid / Form toolbar-button allows selecting
your preferred view-mode (forms view is recommended
here).
Things You Can Do
View or chan ge settings a s desired for the
specific panel (see the selection-descriptions).
Setting a Panel to Automatically Dial-In
and Transmit Messages to VEREX
Director
Panels with their o wn dedicated e xternal
modem (or IP interface--if ≥ V3.3 Director) can
be set to au tomatically dial-in and transmit
messages to the VEREX Director system.
(In other configurations, the messages are transmitted
when a connection is made with the specific
panel/account—either manually by an operator, or
through a scheduled/repeating communications session
that was set up previously.)
First, check t hat the "Pa nel Groups" for each
applicable panel contain no other panels (one
panel per 'Panel Group').
For details, refer to "Panel Groups and Connection
Settings".
-------------------------
Then, access "Configuration ÖSystem
ÖCommunication" for the specific panel as
described previously.
Now, refer to the descriptions under
" Configuration ", being sure to s elect
the following items:
• Applicable communications device under
"Callback to Director" (9);
• "Director Phone Number" or "Interface
IP..." settings, as applicable, and;
• Your desired "Reporting Mode".
IP Connections: Secure and regular IP connections
are also supported. More: "IP Connectivity"
Pick-List (bottom of the form)
-Panel: If the tree is not set to show items on a
panel-by-panel basis, you will be able to
select a panel here (for systems that have
more than one).
A "Panel Group" reference may also be shown here,
or
you can set the 'tree' to list configuration topics
separately for each panel. For more information, refer
to "Other Desktop Choices".
Configuration (PC/Panel ID, Host
Reporting)
Note: Some of the following settings will be hidden
depending on the "PC Connection Type" selected for
the 'panel group' associated with this panel. For
details, refer to "Panels, Panel Groups, and Related
Settings".
- Serial Number (also known as "Host Address"):
Enter the serial number of the specific panel
(this allows the software to identify each
panel).
Tip: The serial number is typically hand-written (5
digits) on a small sticker on the circuit board.
- Panel Code (also known as Account UID): This is a
reference number to identify the panel, site, or
account.
For a new panel, this can be any non-zero number,
and can be the same for all panels per site or per
account if desired. For settings to be uploaded from
an existing panel (i.e., a "Get from Panel" communica-
tions session), the panel itself must have a non-zero
"Panel Code" set up by an authorized service person,
and that number must also be entered here.
Note: In the unlikely event of two panels having the
Monitoring, Numeric Paging, & Remote Mgt. Settings