
User`s guide


Table Of Contents
- Copyrights and Trademarks
- Disclaimer
- Welcome to NetVision
- Common / Daily Tasks
- 5 Starting your Software and Logging In
- 6 Alarm / Reporting Features and 'Chatting'
- 7 Playing or Downloading Video Recordings
- 7.1 Overview--Types of Playback
- 7.2 Playback--Technical Details
- 7.3 Synchronized Playback (v2.3 SP2)
- 7.4 Video Search (v2.3 SP2)
- 7.5 Searching for Motion
- 7.6 Working with the Playback Screen
- 7.7 Viewing and Printing 'Snapshots'
- 7.8 Working with the File List
- 7.9 Quad Playback
- 7.10 Server Management--Identifying Remote Servers for Playback
- 8 Viewing Live Cameras
- 9 Recording Camera-Views
- System Administration and Maintenance
- 10 Tasks Applicable to Remote Stations and the Video Server
- 10.1 PC Date and Time
- 10.2 Checking your Software Version
- 10.3 Introduction to Video File Management (Filekeeping and Housekeeping)
- 10.4 To Allow Using a Blank CD (Roxio - Easy CD Creator 5 basic with DirectCD)
- 10.5 Filekeeping (v2.3 SP2)
- 10.6 Housekeeping
- 10.7 Automatic Video File Management (Self Housekeeping)
- 11 Tasks Performed at the Video Server Only
- 10 Tasks Applicable to Remote Stations and the Video Server
- System Configuration
- Software Installation and Network Set Up
- 19 PC Requirements
- 20 Software Installation or Upgrade
- 21 Network and Connectivity Issues
- 21.1 General Network Requirements
- 21.2 IP Addressing on the Network
- 21.3 Network Services
- 21.4 Network Ports
- 21.5 To Connect via the Internet
- 21.6 Remote User Permissions
- 21.7 For Remote Viewing, Recording, Playback, and/or Audio Monitoring
- 21.8 For Alarm Alerts
- 21.9 For E-Mail Alerts
- 21.10 Windows Dial-Up Networking Connection (i.e., not via the Internet)
- 21.11 Network Usage
- Reference Topics
- 22 Using the Small Remote Module
- 23 Remote Configuration
- 24 The WatchDog Feature
- 25 Hardware Reference
- 26 Troubleshooting
- 27 Using the ATM Interface Option
- 28 Working with the Older Playback Engines
- 28.1 The Video Playback Feature (Micro DVR)
- 28.2 Step 1: Open the Video Player
- 28.3 Step 2: Local / Remote, and Connection Screen
- 28.4 Step 3: Searching for Video/Alarm Files
- 28.5 Smart Motion Search (Micro DVR)
- 28.6 Step 4: Playing a Video
- 28.7 Window Options and File Properties (Micro DVR, Quad Player)
- 28.8 Viewing and Printing 'Snapshots' (Micro DVR)
- 29 Viewing Cameras through a Web Browser
- 30 Setting up an IP Camera or Video Server module (v2.3 SP2)
- 31 Panoramic Video Surveillance--PVS (v2.3 SP2)
74 NetVision Plus/Elite and Micro DVR v2.3 SP2 User's Guide 21-0400E v2.3.3
15.3
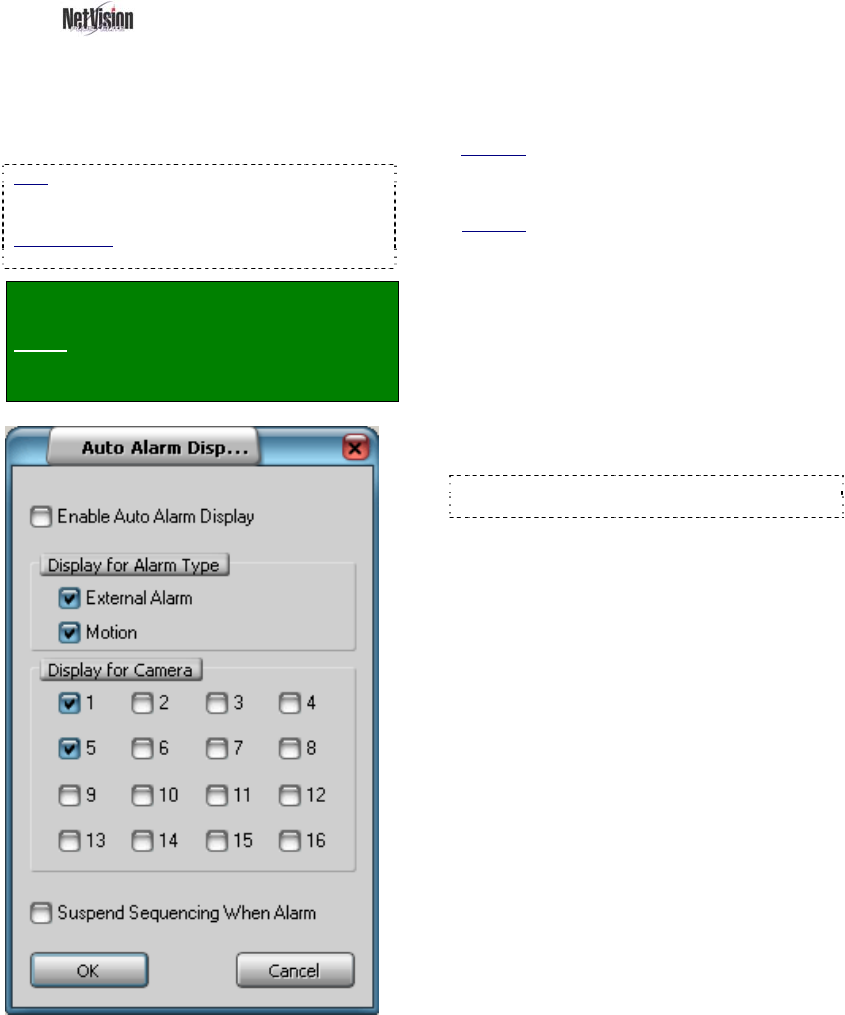
Auto Alarm Display
(v2.3 SP2)
This feature causes cameras to be displayed
automatically on the Video Server desktop
whenever an external alarm is triggered, or
motion is detected at selected cameras.
Note: This feature works only in conjunction with
alarm-based recording (motion-detection and/or via
an external input for each camera).
Related Topic:
18 Scheduled and/or Alarm-Triggered Recording
Locator: At the Video Server PC (will
prompt for "Supervisor" login),
Select: Windows Control Panel,
ÖDSR Configuration, ÖAuto Alarm
Display.
- Enable Auto Alarm Display: This turns this
feature on [9] and off [ ].
Display for Alarm Type
- External Alarm: Select this if you want an
external alarm at the selected cameras to trigger
this feature.
Also See: 25.3 Wiring Reference
- Motion: Select this if you want motion-detection
at the selected cameras to trigger this feature.
Also See:
11.3 Viewing a List of Motion-Detection Alarms
18.5 Setting up Video Motion-Detection
Display for Camera
- (check-box for each camera): Select each of
the cameras that you want to be monitored for
this feature.
- Suspend Sequencing When Alarm: This
stops on-screen sequencing while alarm-
triggered cameras are being displayed to ensure
they remain on-screen until the alarm recording
ends.
Tip: If multiple cameras are triggered, they will
appear on-screen in the order they were triggered.
------------------------
- [OK]: Click this to save your settings.
- [Cancel]: Click this to abort your entries,
leaving this screen in its previous state.
Attention: To recognize any changes made in DSR
Configuration while the NetVision Video Server
software is running, you may need to restart the
software.