
User`s guide


Table Of Contents
- Copyrights and Trademarks
- Disclaimer
- Welcome to NetVision
- Common / Daily Tasks
- 5 Starting your Software and Logging In
- 6 Alarm / Reporting Features and 'Chatting'
- 7 Playing or Downloading Video Recordings
- 7.1 Overview--Types of Playback
- 7.2 Playback--Technical Details
- 7.3 Synchronized Playback (v2.3 SP2)
- 7.4 Video Search (v2.3 SP2)
- 7.5 Searching for Motion
- 7.6 Working with the Playback Screen
- 7.7 Viewing and Printing 'Snapshots'
- 7.8 Working with the File List
- 7.9 Quad Playback
- 7.10 Server Management--Identifying Remote Servers for Playback
- 8 Viewing Live Cameras
- 9 Recording Camera-Views
- System Administration and Maintenance
- 10 Tasks Applicable to Remote Stations and the Video Server
- 10.1 PC Date and Time
- 10.2 Checking your Software Version
- 10.3 Introduction to Video File Management (Filekeeping and Housekeeping)
- 10.4 To Allow Using a Blank CD (Roxio - Easy CD Creator 5 basic with DirectCD)
- 10.5 Filekeeping (v2.3 SP2)
- 10.6 Housekeeping
- 10.7 Automatic Video File Management (Self Housekeeping)
- 11 Tasks Performed at the Video Server Only
- 10 Tasks Applicable to Remote Stations and the Video Server
- System Configuration
- Software Installation and Network Set Up
- 19 PC Requirements
- 20 Software Installation or Upgrade
- 21 Network and Connectivity Issues
- 21.1 General Network Requirements
- 21.2 IP Addressing on the Network
- 21.3 Network Services
- 21.4 Network Ports
- 21.5 To Connect via the Internet
- 21.6 Remote User Permissions
- 21.7 For Remote Viewing, Recording, Playback, and/or Audio Monitoring
- 21.8 For Alarm Alerts
- 21.9 For E-Mail Alerts
- 21.10 Windows Dial-Up Networking Connection (i.e., not via the Internet)
- 21.11 Network Usage
- Reference Topics
- 22 Using the Small Remote Module
- 23 Remote Configuration
- 24 The WatchDog Feature
- 25 Hardware Reference
- 26 Troubleshooting
- 27 Using the ATM Interface Option
- 28 Working with the Older Playback Engines
- 28.1 The Video Playback Feature (Micro DVR)
- 28.2 Step 1: Open the Video Player
- 28.3 Step 2: Local / Remote, and Connection Screen
- 28.4 Step 3: Searching for Video/Alarm Files
- 28.5 Smart Motion Search (Micro DVR)
- 28.6 Step 4: Playing a Video
- 28.7 Window Options and File Properties (Micro DVR, Quad Player)
- 28.8 Viewing and Printing 'Snapshots' (Micro DVR)
- 29 Viewing Cameras through a Web Browser
- 30 Setting up an IP Camera or Video Server module (v2.3 SP2)
- 31 Panoramic Video Surveillance--PVS (v2.3 SP2)
21-0400E v2.3.3
Welcome
Common
Admin Config Install Tech-Ref
43
8.4
Monitoring Cameras via TV
(Spot Monitor)
8.4.1
Introduction
Current video cards include a composite-video
output allowing individual cameras to be
displayed on television monitor(s) manually, in
sequence, or when an alarm occurs (external
input or video motion-detection).
8.4.2
Opening or Closing the TV-
Monitor Control
To open or close the TV-monitor control,
double-click the television/monitor icon on
your NetVision desktop.
If the TV Control is not Visible: This feature can be
turned on and off.
Related Topics: 14.2 Miscellaneous Settings
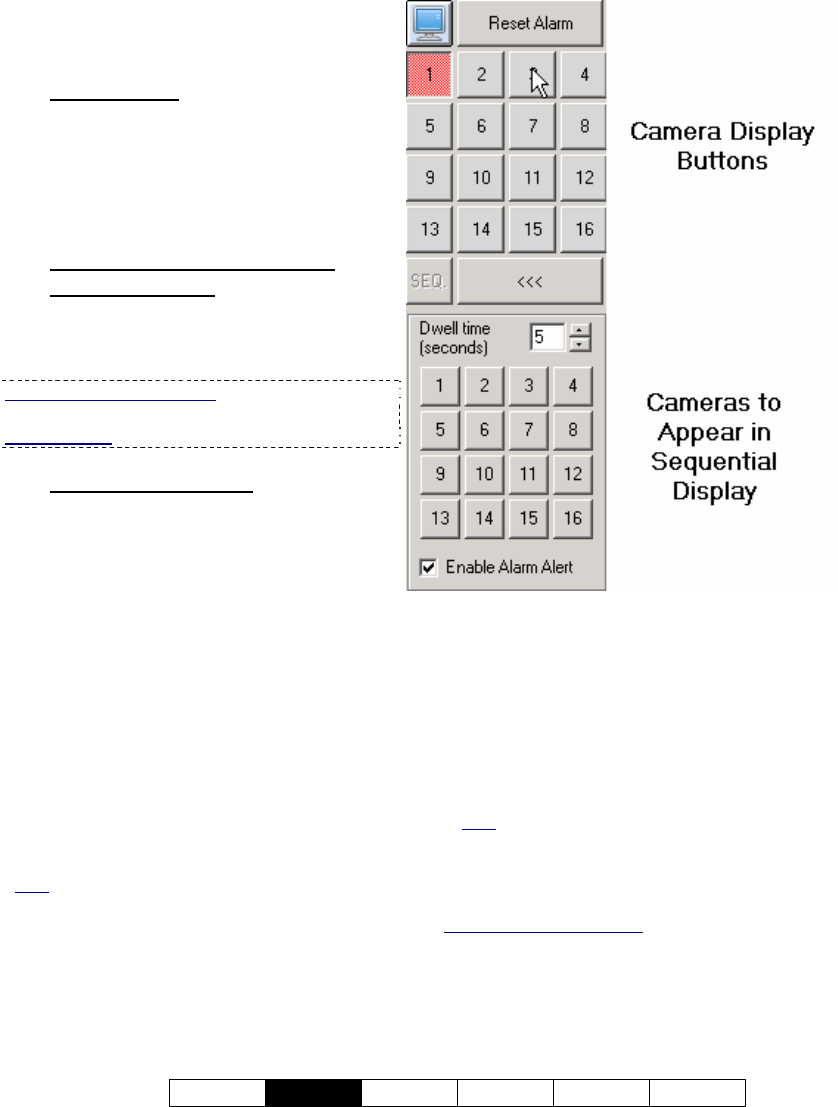
8.4.3
Things You Can Do
• Select a camera manually: Click its
associated button in the top portion of the
TV-monitor control;
• Loop through cameras in Sequence:
Click [>>>] to show additional controls,
ensure the cameras to appear in sequence
are selected (bottom portion of the monitor
control), and set the dwell time as desired
(display time for each camera). Then, click
[SEQ.] to start or stop sequential viewing.
• Set Alarms to Trigger Camera Monitoring:
To have camera(s) displayed whenever an
alarm occurs (external input or video motion-
detection), click [>>>] to open the bottom of
the TV-monitor control, and ensure “Enable
Alarm Alert” is selected.
Note: Although not specifically related to the “Alarm
Alerts” feature, this feature does require external
inputs to be enabled and/or video motion-detection to
be set up (see “Related Topics”).
• Clear an Alarm: For alarm-triggered
cameras, the camera button will turn red, a
[Reset Alarm] button will appear at the top of
the TV-monitor control, and the camera will
display until acknowledged by an operator.
To clear/acknowledge an alarm-triggered
camera, simply click [Reset Alarm] (while
the specific camera image is being
displayed).
Note: After clearing an alarm, a camera cannot be
tripped again until any alarm-triggered recording is
completed.
Related (and similar) Topics:
18.3 External Sensors and Recording Duration
18.5 Setting up Video Motion-Detection
25.1 Capture Board Reference
6.2 Responding to Alarm Alerts
15.1 Enable/Disable Alarm Alerts or E-Mail