
User`s guide


Table Of Contents
- Copyrights and Trademarks
- Disclaimer
- Welcome to NetVision
- Common / Daily Tasks
- 5 Starting your Software and Logging In
- 6 Alarm / Reporting Features and 'Chatting'
- 7 Playing or Downloading Video Recordings
- 7.1 Overview--Types of Playback
- 7.2 Playback--Technical Details
- 7.3 Synchronized Playback (v2.3 SP2)
- 7.4 Video Search (v2.3 SP2)
- 7.5 Searching for Motion
- 7.6 Working with the Playback Screen
- 7.7 Viewing and Printing 'Snapshots'
- 7.8 Working with the File List
- 7.9 Quad Playback
- 7.10 Server Management--Identifying Remote Servers for Playback
- 8 Viewing Live Cameras
- 9 Recording Camera-Views
- System Administration and Maintenance
- 10 Tasks Applicable to Remote Stations and the Video Server
- 10.1 PC Date and Time
- 10.2 Checking your Software Version
- 10.3 Introduction to Video File Management (Filekeeping and Housekeeping)
- 10.4 To Allow Using a Blank CD (Roxio - Easy CD Creator 5 basic with DirectCD)
- 10.5 Filekeeping (v2.3 SP2)
- 10.6 Housekeeping
- 10.7 Automatic Video File Management (Self Housekeeping)
- 11 Tasks Performed at the Video Server Only
- 10 Tasks Applicable to Remote Stations and the Video Server
- System Configuration
- Software Installation and Network Set Up
- 19 PC Requirements
- 20 Software Installation or Upgrade
- 21 Network and Connectivity Issues
- 21.1 General Network Requirements
- 21.2 IP Addressing on the Network
- 21.3 Network Services
- 21.4 Network Ports
- 21.5 To Connect via the Internet
- 21.6 Remote User Permissions
- 21.7 For Remote Viewing, Recording, Playback, and/or Audio Monitoring
- 21.8 For Alarm Alerts
- 21.9 For E-Mail Alerts
- 21.10 Windows Dial-Up Networking Connection (i.e., not via the Internet)
- 21.11 Network Usage
- Reference Topics
- 22 Using the Small Remote Module
- 23 Remote Configuration
- 24 The WatchDog Feature
- 25 Hardware Reference
- 26 Troubleshooting
- 27 Using the ATM Interface Option
- 28 Working with the Older Playback Engines
- 28.1 The Video Playback Feature (Micro DVR)
- 28.2 Step 1: Open the Video Player
- 28.3 Step 2: Local / Remote, and Connection Screen
- 28.4 Step 3: Searching for Video/Alarm Files
- 28.5 Smart Motion Search (Micro DVR)
- 28.6 Step 4: Playing a Video
- 28.7 Window Options and File Properties (Micro DVR, Quad Player)
- 28.8 Viewing and Printing 'Snapshots' (Micro DVR)
- 29 Viewing Cameras through a Web Browser
- 30 Setting up an IP Camera or Video Server module (v2.3 SP2)
- 31 Panoramic Video Surveillance--PVS (v2.3 SP2)
21-0400E v2.3.3
Welcome
Common
Admin Config Install Tech-Ref
41
8.3.3
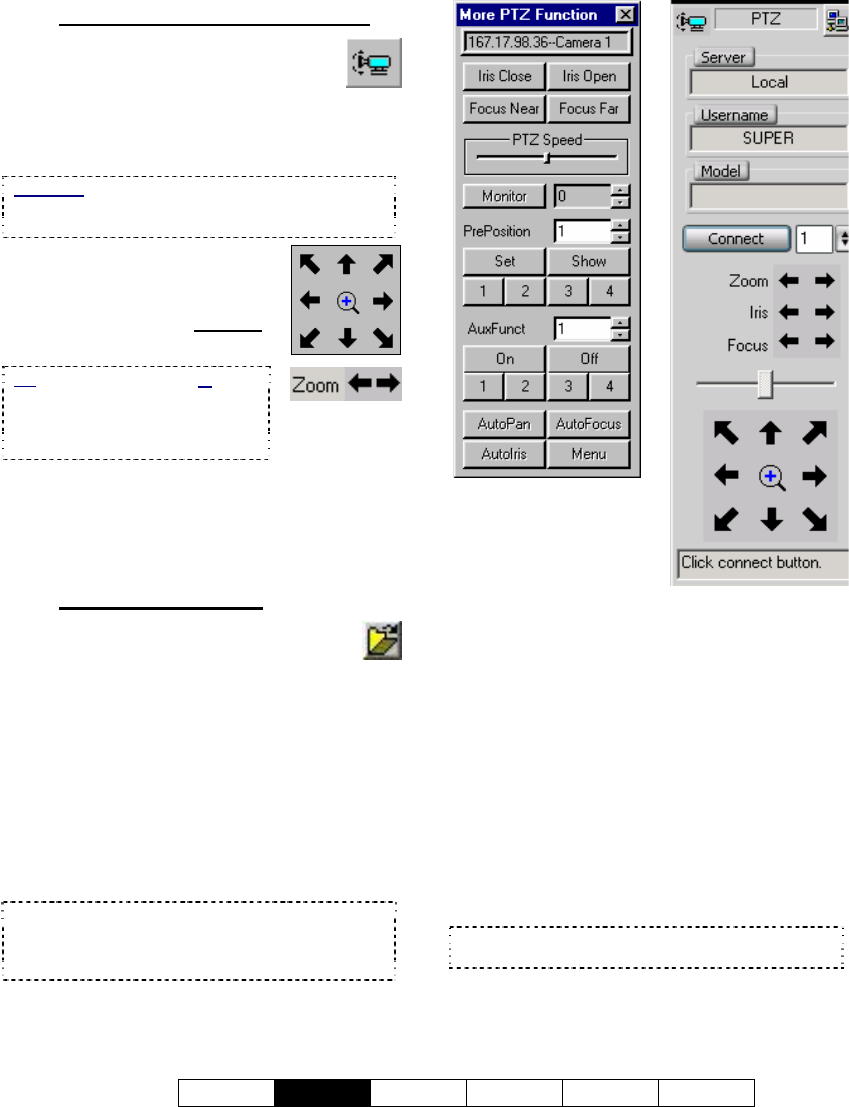
PTZ Control at a Video Server
After logging in, click the PTZ button
near the bottom-right corner of the
main desktop (a narrow form will
appear on the right). Then, select the camera
number (beneath "model"), and click
[Connect].
Exception: For cameras connected through a
switcher, you'll need to set the [Monitor] value first
(switcher port associated with this camera).
To 'aim' the camera, use the
arrow buttons (click-click-click,
or click-and-hold). To zoom in,
or out, use the arrows marked
"Zoom" (click-and-hold).
To close the PTZ control screen when finished,
right-click the PTZ icon in the top-left corner
(or any blank area) of the form, and select
Exit.
8.3.4
Other PTZ Features
On a remote station, these selections are
provided through a separate 'folder' button
(available when already using the PTZ feature).
To close the screen, click the [X].
Pre-Set Positions: This feature alone may
make you a believer in the value of PTZ
cameras: You can store 20 pan/tilt/zoom
positions and quickly recall them later. This
allows one camera to 'pretend' it's 20 cameras.
To Save a PTZ 'Pre-Set': Set the camera
position as desired, select an available 'pre-
position' number, and click [Set].
Tip: Store the most common/useful ones in the first
4 positions (available through buttons 1-4
thereafter). To check if a pre-set is available, see
the next topic.
Remote Station ×
Video Server
Ö
To Show a Pre-Set PTZ Position: The first
four positions are available by clicking [1], [2],
[3], or [4]. For any pre-set position (1-20),
select (or enter) the position number, and click
[Show].
[Clear Preset]: (If present). Clears all defined
preset positions at once.
Iris
(Close/Open, or Arrows): Allows manually
brightening or darkening the camera image
(iris).
Focus
(Near/Far, or Arrows): Allows manually
adjusting the focus for objects that are closer
vs. farther away.
Tip: This is useful where the camera view is
partially blocked by a nearer object in the frame.
PTZ Speed (Slider Bar): This allows
increasing or reducing the panning speed.
Tip: You can also zoom in using
the magnifying glass.
To set the panning speed, see
"Other PTZ Features", to follow.