
User`s guide


Table Of Contents
- Copyrights and Trademarks
- Disclaimer
- Welcome to NetVision
- Common / Daily Tasks
- 5 Starting your Software and Logging In
- 6 Alarm / Reporting Features and 'Chatting'
- 7 Playing or Downloading Video Recordings
- 7.1 Overview--Types of Playback
- 7.2 Playback--Technical Details
- 7.3 Synchronized Playback (v2.3 SP2)
- 7.4 Video Search (v2.3 SP2)
- 7.5 Searching for Motion
- 7.6 Working with the Playback Screen
- 7.7 Viewing and Printing 'Snapshots'
- 7.8 Working with the File List
- 7.9 Quad Playback
- 7.10 Server Management--Identifying Remote Servers for Playback
- 8 Viewing Live Cameras
- 9 Recording Camera-Views
- System Administration and Maintenance
- 10 Tasks Applicable to Remote Stations and the Video Server
- 10.1 PC Date and Time
- 10.2 Checking your Software Version
- 10.3 Introduction to Video File Management (Filekeeping and Housekeeping)
- 10.4 To Allow Using a Blank CD (Roxio - Easy CD Creator 5 basic with DirectCD)
- 10.5 Filekeeping (v2.3 SP2)
- 10.6 Housekeeping
- 10.7 Automatic Video File Management (Self Housekeeping)
- 11 Tasks Performed at the Video Server Only
- 10 Tasks Applicable to Remote Stations and the Video Server
- System Configuration
- Software Installation and Network Set Up
- 19 PC Requirements
- 20 Software Installation or Upgrade
- 21 Network and Connectivity Issues
- 21.1 General Network Requirements
- 21.2 IP Addressing on the Network
- 21.3 Network Services
- 21.4 Network Ports
- 21.5 To Connect via the Internet
- 21.6 Remote User Permissions
- 21.7 For Remote Viewing, Recording, Playback, and/or Audio Monitoring
- 21.8 For Alarm Alerts
- 21.9 For E-Mail Alerts
- 21.10 Windows Dial-Up Networking Connection (i.e., not via the Internet)
- 21.11 Network Usage
- Reference Topics
- 22 Using the Small Remote Module
- 23 Remote Configuration
- 24 The WatchDog Feature
- 25 Hardware Reference
- 26 Troubleshooting
- 27 Using the ATM Interface Option
- 28 Working with the Older Playback Engines
- 28.1 The Video Playback Feature (Micro DVR)
- 28.2 Step 1: Open the Video Player
- 28.3 Step 2: Local / Remote, and Connection Screen
- 28.4 Step 3: Searching for Video/Alarm Files
- 28.5 Smart Motion Search (Micro DVR)
- 28.6 Step 4: Playing a Video
- 28.7 Window Options and File Properties (Micro DVR, Quad Player)
- 28.8 Viewing and Printing 'Snapshots' (Micro DVR)
- 29 Viewing Cameras through a Web Browser
- 30 Setting up an IP Camera or Video Server module (v2.3 SP2)
- 31 Panoramic Video Surveillance--PVS (v2.3 SP2)
21-0400E v2.3.3
Welcome
Common
Admin Config Install Tech-Ref
21
7.4.3
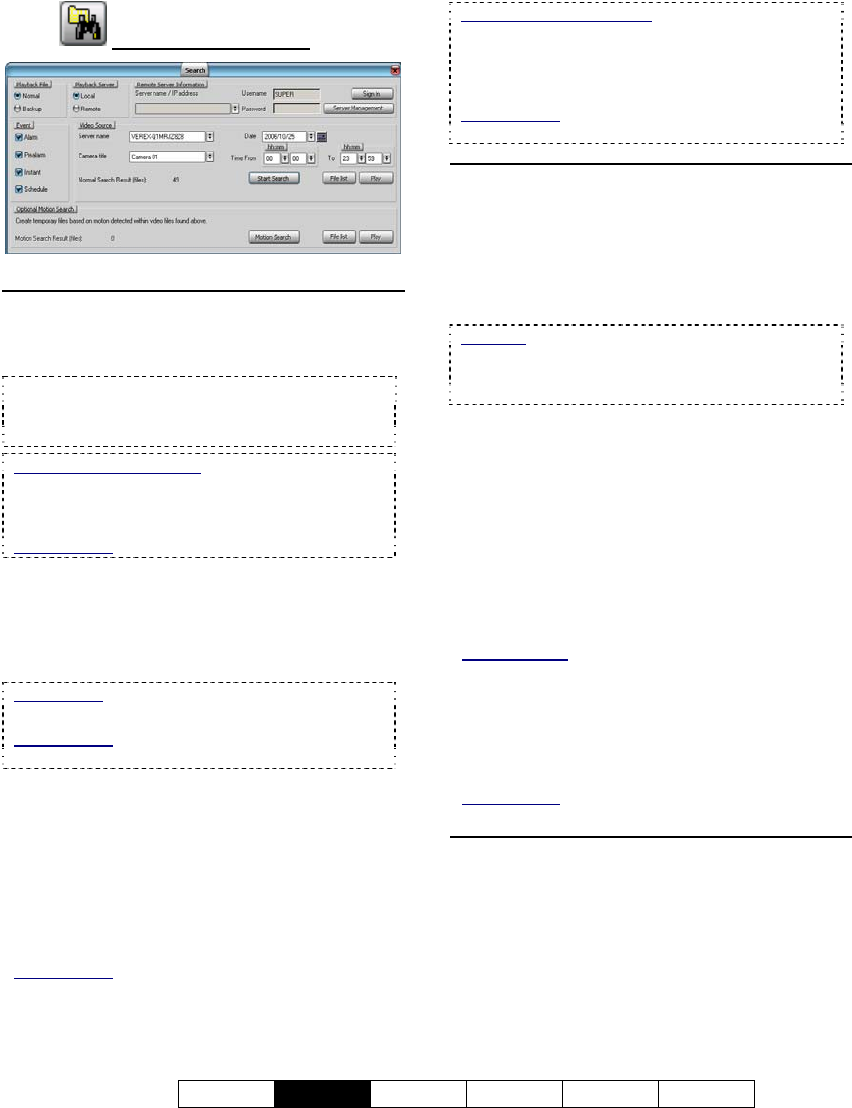
The Search Screen
Top of the Screen
- Playback File: Select the type of files to play
back (Normal or Backup files).
• Normal: Any type of original recording files.
• Backup: Files that had been backed up to some
other location/media.
CDs and Portable Drives: To play files that had
been backed up onto a CD or a portable drive,
ensure the CD or portable drive is accessible (and
formatted) before starting your search.
Related Topic: 10.4 To Allow Using a Blank CD
- Playback Server: Select whether you wish to
access local or remote files.
- Remote Server Information: For a remote
server, enter (or select) the server name or IP
address.
Initial Setup: Servers are added to this list via
[Server Management].
Related Topic: 7.10 Server Management--
Identifying Remote Servers for Playback (v2.3 SP2)
- Username and Password: For a remote
server, enter a valid username and password as
needed to access the remote files.
- [Sign In]: Select this to connect with a remote
server to allow searching through its video files.
- Server Management: This allows setting up
remote servers to be selectable under "Remote
Server Information".
Related Topic: 7.10 Server Management--
Identifying Remote Servers for Playback (v2.3 SP2)
Remote Station Software
: It is best to define
remote servers through the [Station List] on the
desktop, since this information is automatically
shared with the [Server Management] screen (but
not the other way around).
Related Topic:
13.3 Station List (Identifying the Video Servers)
Middle of the Screen
- Event: Select the types of recordings that you
wish to search for.
- Video Source: Select the desired server name
and camera (title).
- Date: Select the desired date for your search.
Calendar: You can also use the pop-up calendar to
select a date: 1) Click the calendar symbol; 2) Use
the arrows to browse to the desired month; 3) Click
to select a day.
- Time From and "To": Select the desired
starting time and end time for your search.
- [Start Search]: Select this to perform your
search. The number of 'found' video files will
appear onscreen (and be available to the [File
List] and [Play] functions).
- [File List]: This opens a list of files found by
your search, and allows: • Previewing files,
• Playing a file, and/or: • Selecting and marking
files for maintenance tasks.
Related Topics: 7.8 Working with the File List (v2.3
SP2)
10.5 Filekeeping (v2.3 SP2)
- [Play]: This opens the Playback screen with
your 'found' files loaded. If "Auto Play" is
selected there, the first file in the list will begin
playing automatically.
Related Topic:
7.6 Working with the Playback Screen (v2.3 SP2)
Bottom of the Screen
Optional Motion Search
This pertains to creating a new set of
temporary video files (after performing an initial
search) by 'looking' for motion within files.
- [Motion Search]: Select this to perform a
motion search. A small screen will appear to
allow setting up motion parameters. When you