
User`s guide


Table Of Contents
- Copyrights and Trademarks
- Disclaimer
- Welcome to NetVision
- Common / Daily Tasks
- 5 Starting your Software and Logging In
- 6 Alarm / Reporting Features and 'Chatting'
- 7 Playing or Downloading Video Recordings
- 7.1 Overview--Types of Playback
- 7.2 Playback--Technical Details
- 7.3 Synchronized Playback (v2.3 SP2)
- 7.4 Video Search (v2.3 SP2)
- 7.5 Searching for Motion
- 7.6 Working with the Playback Screen
- 7.7 Viewing and Printing 'Snapshots'
- 7.8 Working with the File List
- 7.9 Quad Playback
- 7.10 Server Management--Identifying Remote Servers for Playback
- 8 Viewing Live Cameras
- 9 Recording Camera-Views
- System Administration and Maintenance
- 10 Tasks Applicable to Remote Stations and the Video Server
- 10.1 PC Date and Time
- 10.2 Checking your Software Version
- 10.3 Introduction to Video File Management (Filekeeping and Housekeeping)
- 10.4 To Allow Using a Blank CD (Roxio - Easy CD Creator 5 basic with DirectCD)
- 10.5 Filekeeping (v2.3 SP2)
- 10.6 Housekeeping
- 10.7 Automatic Video File Management (Self Housekeeping)
- 11 Tasks Performed at the Video Server Only
- 10 Tasks Applicable to Remote Stations and the Video Server
- System Configuration
- Software Installation and Network Set Up
- 19 PC Requirements
- 20 Software Installation or Upgrade
- 21 Network and Connectivity Issues
- 21.1 General Network Requirements
- 21.2 IP Addressing on the Network
- 21.3 Network Services
- 21.4 Network Ports
- 21.5 To Connect via the Internet
- 21.6 Remote User Permissions
- 21.7 For Remote Viewing, Recording, Playback, and/or Audio Monitoring
- 21.8 For Alarm Alerts
- 21.9 For E-Mail Alerts
- 21.10 Windows Dial-Up Networking Connection (i.e., not via the Internet)
- 21.11 Network Usage
- Reference Topics
- 22 Using the Small Remote Module
- 23 Remote Configuration
- 24 The WatchDog Feature
- 25 Hardware Reference
- 26 Troubleshooting
- 27 Using the ATM Interface Option
- 28 Working with the Older Playback Engines
- 28.1 The Video Playback Feature (Micro DVR)
- 28.2 Step 1: Open the Video Player
- 28.3 Step 2: Local / Remote, and Connection Screen
- 28.4 Step 3: Searching for Video/Alarm Files
- 28.5 Smart Motion Search (Micro DVR)
- 28.6 Step 4: Playing a Video
- 28.7 Window Options and File Properties (Micro DVR, Quad Player)
- 28.8 Viewing and Printing 'Snapshots' (Micro DVR)
- 29 Viewing Cameras through a Web Browser
- 30 Setting up an IP Camera or Video Server module (v2.3 SP2)
- 31 Panoramic Video Surveillance--PVS (v2.3 SP2)
21-0400E v2.3.3
Welcome Common Admin Config Install
Tech-Ref
141
31
Panoramic Video
Surveillance--PVS
(v2.3 SP2)
31.1
Introducing PVS
Have you ever wanted to see everywhere at
the same time? All traditional lenses have
blind spots, and even PTZ cameras can only
'look' in one direction at a time. The PVS
option with ImmerVision IMV1™ - 1/3" lens
eliminates blind spots, and allows viewing and
recording a full 360° field of view (360° x 180°).
Unlike a standard fish-eye lens, any portion of
the image can be selected and viewed without
any annoying 'fish-eye' distortion.
The PVS option provides:
• Multiple viewing modes for camera
viewing and video playback;
• Virtual PTZ control for viewing and
playback;
• Digital zoom control for viewing and
playback.
Tip: Using the PVS control during recording does
not affect the recording. The whole image is always
recorded.
Sample Uses:
• Jewellery store, or other location with large
product display areas.
• ATM vestibule security
• Receptionist or guard station security
31.2
Technical Information
The PVS option uses an ImmerVision 360 lens
with 1/3" sensor, CS mount, and automatic
iris.
Resolution: The PVS option provides a digital
manipulation of a panoramic image (NTSC:
640x480; PAL: 640x576). This lens is intended to
work in conjunction with other cameras with
standard lenses for visual identification of intruders.
Remote Software: With the remote station (and
IRM) software, PVS control is supported only for
playback.
31.3
Installation and Licensing
Attention: The NetVision Server PC must have
access to the internet. Additional licensing for
remote PCs is not needed.
The NetVision PVS option includes a CD for
you to install on the NetVision server PC (and
remote PCs).
Select from the autorun menu (if provided), OR
look for setup.exe on the CD.
Attention: Do this with the NetVision software shut
down.
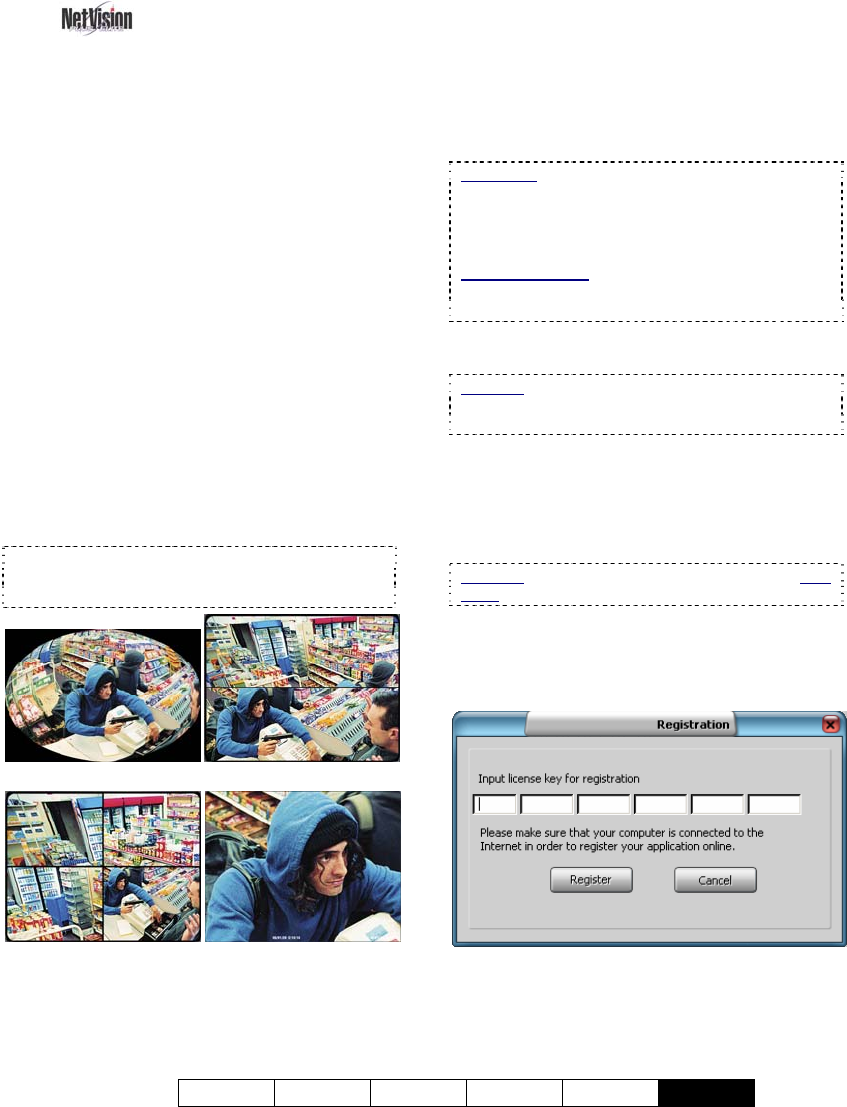
After installing the CD on the NetVision server
PC, the first time you run the NetVision
software, you will be prompted to enter your
license key for registration.
Enter your license key, and double check to
ensure you have typed it correctly. Then click
[Register]. Your new feature will be
registered through the internet. You will be