
User`s guide


Table Of Contents
- Copyrights and Trademarks
- Disclaimer
- Welcome to NetVision
- Common / Daily Tasks
- 5 Starting your Software and Logging In
- 6 Alarm / Reporting Features and 'Chatting'
- 7 Playing or Downloading Video Recordings
- 7.1 Overview--Types of Playback
- 7.2 Playback--Technical Details
- 7.3 Synchronized Playback (v2.3 SP2)
- 7.4 Video Search (v2.3 SP2)
- 7.5 Searching for Motion
- 7.6 Working with the Playback Screen
- 7.7 Viewing and Printing 'Snapshots'
- 7.8 Working with the File List
- 7.9 Quad Playback
- 7.10 Server Management--Identifying Remote Servers for Playback
- 8 Viewing Live Cameras
- 9 Recording Camera-Views
- System Administration and Maintenance
- 10 Tasks Applicable to Remote Stations and the Video Server
- 10.1 PC Date and Time
- 10.2 Checking your Software Version
- 10.3 Introduction to Video File Management (Filekeeping and Housekeeping)
- 10.4 To Allow Using a Blank CD (Roxio - Easy CD Creator 5 basic with DirectCD)
- 10.5 Filekeeping (v2.3 SP2)
- 10.6 Housekeeping
- 10.7 Automatic Video File Management (Self Housekeeping)
- 11 Tasks Performed at the Video Server Only
- 10 Tasks Applicable to Remote Stations and the Video Server
- System Configuration
- Software Installation and Network Set Up
- 19 PC Requirements
- 20 Software Installation or Upgrade
- 21 Network and Connectivity Issues
- 21.1 General Network Requirements
- 21.2 IP Addressing on the Network
- 21.3 Network Services
- 21.4 Network Ports
- 21.5 To Connect via the Internet
- 21.6 Remote User Permissions
- 21.7 For Remote Viewing, Recording, Playback, and/or Audio Monitoring
- 21.8 For Alarm Alerts
- 21.9 For E-Mail Alerts
- 21.10 Windows Dial-Up Networking Connection (i.e., not via the Internet)
- 21.11 Network Usage
- Reference Topics
- 22 Using the Small Remote Module
- 23 Remote Configuration
- 24 The WatchDog Feature
- 25 Hardware Reference
- 26 Troubleshooting
- 27 Using the ATM Interface Option
- 28 Working with the Older Playback Engines
- 28.1 The Video Playback Feature (Micro DVR)
- 28.2 Step 1: Open the Video Player
- 28.3 Step 2: Local / Remote, and Connection Screen
- 28.4 Step 3: Searching for Video/Alarm Files
- 28.5 Smart Motion Search (Micro DVR)
- 28.6 Step 4: Playing a Video
- 28.7 Window Options and File Properties (Micro DVR, Quad Player)
- 28.8 Viewing and Printing 'Snapshots' (Micro DVR)
- 29 Viewing Cameras through a Web Browser
- 30 Setting up an IP Camera or Video Server module (v2.3 SP2)
- 31 Panoramic Video Surveillance--PVS (v2.3 SP2)
6 NetVision Plus/Elite and Micro DVR v2.3 SP2 User's Guide 21-0400E v2.3.3
4.1
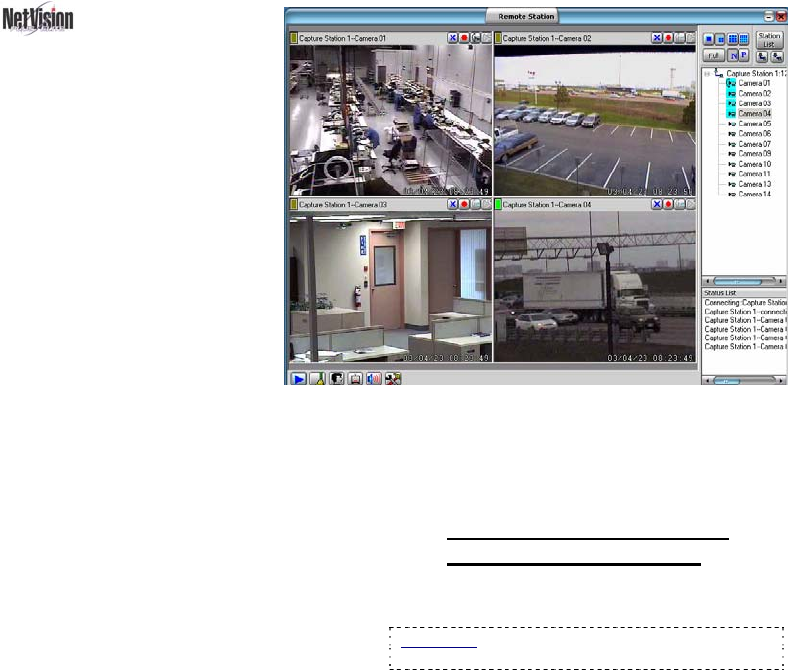
Remote
Surveillance Station
Desktop
The Main Window: Displays
selected camera views (one or
four);
Right-Hand Side of the Display:
This includes these items:
• Video format selector ([N] for NTSC
or [P] for PAL);
• Screen mode selector (1, 4, 9, or
16 camera/views);
• [ Full ]: Expands the camera area
to fill your whole screen (Press Esc
to cancel this);
• Video Server list and connection controls;
• Status / event list.
The Toolbar (bottom of the screen): This
includes:
• Play Back: Allows playing previously
captured videos, and capturing / printing
individual frames.
• HouseKeeping: Allows performing file
management and hard-drive maintenance
tasks;
• Alarm Alert: Allows viewing alarm alerts
sent from a Video Server (triggered by an
external sensor, video motion sense, or
video/signal-lost detection);
• Chat: Allows sending and receiving text to
alert or collaborate on-line with other
NetVision users;
• Audio Monitor: Allows remote stations to
monitor audio from Video Servers equipped
with a microphone (associated with a
camera);
• Utility
(tools symbol): Allows configuring some
auto-reconnect parameters, plus the
recording CODEC (compression and file-
type);
4.1.1
If you Wish to Minimize the
Remote Station Desktop
Click the minimize button in the top right corner
of the screen.
Alternative: Right-click the blue title-bar at the top
of the screen (try it!).
4
Your NetVision Desktop