
Installation Guide

Black plastic
stop
Tap this way
to remove
Adjusting
wrench
Plunger
pin
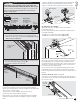
12. If you need to remove the door
(for painting, repairs etc).
Fit the club end of the adjusting wrench over the hexagonal
nut at the bottom of the hanger pin.
Use the extended part of the wrench to press down the
plunger pin that protrudes up from the mounting plate.
Once this plunger is fully depressed slide the wrench
sideways towards the plunger pin.
The whole carriage (including the shaft) will now disengage
from the mounting plate.
It is not always easy to slide the wrench sideways.
You may need to relieve the door’s weight by putting a
wedge between door and floor.
Mounting plates with stops: Remove the black plastic stop
that is tightly fitted into the mounting plate by tapping it out
in the direction shown using a hammer and drift.
Activator
setting
block
Activator
setting
block
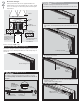
9. Set rear activator position.
a) Close the door and move the rear activator into the
approximate center of the pocket.
Do not tighten grub screws.
b) Position the activator setting block inside the back
stud and gently open the door onto it.
The activator will slide along the track into the correct
position.
11. Insert the track notch cover
if required.
Another quality product from:
Cavity Sliders USA Inc.
548 Finney Ct, Gardena, CA 90248
Phone: (888) 466 0030
Fax: (310) 769 5824
info@cavitysliders.com
www.cavitysliders.com
10. Refix the head jamb
once door has been mounted and desired door clearance is
achieved.
4
PAGE
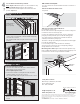
c) Without moving the activator, open the door and
securely tighten all four grub screws.
8. Set the front activator position.
Single & Twin
Twin ONLY
Note: Single Soft Close requires one front activator only.
Twin Soft Open & Close requires two activators.
One of them should already be in the track above the
pocket, Step 4C(a).
a) Open the door and insert the front activator, moving it
into the approximate center of the door opening.
Activator
Slide activator
to center of
door opening
b) Position the red activator setting block against the
center of the closing jamb or finished wall and gently
close the door onto it.
The activator will slide along the track into the correct
position.
c) Close the door and remove the activator setting block.
Without moving the activator, tighten all four grub
screws.
© All copyright and other property in this document is reserved by Cavity Sliders USA Inc.
Details and specifications are subject to change without notice. Whilst all care is taken to ensure
the accuracy of all information, no responsibility will be accepted for any errors or omissions.
Drawings are not to scale.
CS CAVITRACK™ (O.D. 2019). 06.2019 - ZG00262 / 61351/US