
Installation Guide
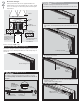

1. Prepare the doors.
Note whether your mounting plates have a stop or not
as the distance in from the edge of the door is different.
Drill holes both ends of the door in the positions shown
(A or B).
Screw both mounting plates to the door with the
plunger pins facing towards the edges of the door.
Make sure they are placed exactly in the center of the
door thickness.
At the bottom of the door, cut a groove to the
dimension and tolerance shown. Make it central of the
door thickness and absolutely straight.
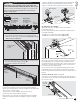
2. Mounting plate with stop.
The mounting plate with the black plastic stop fits
nearest to the leading edge of the door.
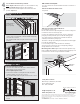
3. Fix the T-Guide.
Fix the T-Guide to the floor so that it is not visible
when the door is in the pocket. The front edge of the
T-Guide should sit flush with the final casings.
1
PAGE
Go to page 2 (overleaf)
IMPORTANT
CS carriages require a clean track running surface
free of any contamination or damage.
After installation but before lining, clean the full
length of the inside running surface of the track with
a soft rag to ensure no dirt, grit or aluminum swarf
get into the track. TAPE UP THE TRACK to ensure no
dust or debris enter the track during building works.
© Cavity Sliders USA Inc. Drawings are not to scale.
PREPARING DOORS
A Mounting plate without stop
B Mounting plate with stop
Mounting
plate
Plunger
pin
Fit screws as
shown
SUGGESTED T-GUIDE PLACEMENT
Installation
Instructions
These instructions cover the preparation of doors to be
fitted into a pocket that has the CS CaviTrack fitted.
Read through the notes carefully before beginning as
different mounting plate positions and setups may be
required for different configurations.
Fit screws
as shown
Black
plastic
stop
Mounting
plate
Track
stop
150mm (6”)
to center
20-21mm
(13/16”)
20-21mm
(13/16”)
5-5.5mm (1/4”)
5-5.5mm (1/4”)
Drill ø25mm (1”)
13mm (1/2”)
deep
Drill ø25mm (1”)
13mm (1/2”)
deep
T-Guide
T-Guide
85mm (3-3/8”)
to center
Door
T-Guide
Casings
Pocket framing