
Installation Sheet
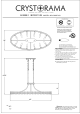
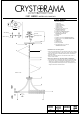
Table Of Contents

2 3/4"
PART NUMBER
MODEL #CLO-8897-AG
Part Number
Part Numbers
A.Mounting Hardware
(3)Wire Nut
(1)Mounting Plate
(2)Mounting Screws
(4)Wall anchor
5 3/4"
(4)Anchor Screw
B.(1)Oval canopy;10″x5″x1″h
XMO8897AGCAN10IN
C.(1)Screw Collar Loop
D.(4)Ball Nut;XMO8897AGBANUT
Wall Anchor
E.(2)Chain;36″L x Ø5.0mmT;
Wire Nut XMO8897AGCHA5.0MM
Mounting Screws
F.(4)Quick Link
Anchor Screw
A
G.(1)Loop
H.(2)Rod;
∅
0.5″x6″h;XMO8897AGROD6IN
I.(4)Rod;
∅
0.5″x12″h;XMO8897AGROD12IN
J.(1)Wiring Box
K.(4)Arm;
∅
0.5″
B
L.(1)Bottom Ring
D C
M.(120)Crystal ball
N.(12)Candle Sleeve;∅1″x2.4″h
XMO8897AGCDL2.4IN
F
E
Installation of mounting plate
1. Place the mounting plate over the outlet box and mark 4 Points
on the ceiling at the center of the 4 holes on the mounting plate.
2.Drill the holes at the 4 marked points.Insert the wall anchors
inside the holes.
3.Place the mounting plate over the outlet box and secure it
G
with 4 anchor screws.
H
Other two options for Mounting Plate installation:
1. Drill 4 holes in the wall aligning the 4 holes on Mounting Plate.
2. For concrete ceiling,assemble the Mounting Plate to the wall
outlet box by using the enclosed 4 Set Screws.For wooden
ceiling, assemble the Mounting Plate to the wall outlet box by
using the enclosed 4 Anchor Screws.
I
Side view
J
K
L
N
M
x4
x4
x2
x3
Wall Anchor
Anchor Screw
Mounting Screw
Wire Nut