
Installation Sheet

95CantiagueRockRoad,WestburyNY11590
Ph:516.931.9090fax:516.931.1254
info@crystorama.comwww.crystorama.com
RAMA
CRYST
C
C
C
C
1958
MODEL#: 8005-PN
ASSEMBLY AND DRESSING INSTRUCTION
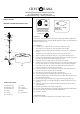
PARTS ENCLUDED
(A) Mounting strap
(B) Mounting screw
(C) Mounting loop
(D) Nipple
(E) Canopy
(F) Canopy ring
(G) Chain
(H) Top loop
(J) Threaded ring
(K) Shade
(L) Crystal drop 2"
WARNINGS:
Turn off power (unplug from the wall outlet) before replacing the bulb(s), making sure the
bulb(s) had sufficient time to cool down. DO NOT subject the lamp to any shock while lit as
shattering of lamp may result.
TO ASSEMBLE:
1. Carefully remove all parts from the box and remove all plastic covering.
2. Turn off power to the junction box where the pendant will be installed.
3. Attach side opening of shade spider (K) to threaded section and secure with threaded
ring (J).
4. Attach chain (G) to top loop (H) by opening and re-closing one link pliers.
5. Wire the pendant wires through the chain (G), canopy (E) and mounting loop (C).
6. Determine the desired hanging length of pendant. Adjust chain length by using pliers to
open and re-closing links. Fasten chain to mounting loop (C).
7. Gently pull wires from ceiling outlet box and allow the wires to hang.
8. Attach the fixture ground wire to the ground wire from the outlet box (usually green or
bare wire) with a plastic wire connector and wrap the connection with electrical tape.
9. Connect the hot wire to the hot outlet box wire (usually black) with a plastic wire
connector and wrap the connection with electrical tape.
10. Connect the neutral wire to the neutral outlet wire (usually white) with a plastic wire
connector and wrap the connection with electrical tape.
11. Tuck these wire connections neatly into the ceiling outlet box.
12. Insert thread nipple (D) in mounting strap (A) and secure by using hex nuts.
13. Attach the mounting strap (A) to the ceiling outlet box with the mounting plate screws
(B). Tighten with screwdriver.
14.
Unscrew canopy ring (F) and slide canopy ring (F) and canopy (E) on chain (G).
15. Attach mounting loop (C) to the nipple (B) and lock with the mounting loop screw at
side of (C).
16. Tighten the canopy (E) by screwing the threaded canopy ring (F) to the base of the
canopy until snug.
17. Hook the crystal drop (L) to the bottom of light fixture.
18. Insert the recommended 60-watt Type B bulbs (not included) into the threaded sockets.
19. Restore power to the junction box and test the pendant fixture.
20. Assembly is complete.
CARE INSTRUCTIONS:
To clean, use a soft cloth only. DO NOT use any chemical or abrasive cleaners.
WARNING:
Electrical Danger
Turn Power Off
All electrical componets must be
installed by a licensed electrician
in accordance with the National
Electric Code and the appropriate
local electrical codes.
L
E
R
T
(K)
(A)
(B)
(C)
(D)
(E)
(F)
(G)
(J)
(H)
(L)
You will need 3 - Cand. Bulb
60 Watts Max
Bulb not included.