
Operating instructions


PAGE 6 OPERATING INSTRUCTIONS AUTOSAT 2
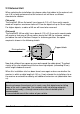
3.0 Mounting the External Unit
Proceed in the following sequence
Use Sikaflex-252 as an adhesive/sealant
1. Position external unit with the outgoing cable pointing towards the rear of
the vehicle.
2. Drill 2 diagonal holes from the base plate of the external unit by using a 2.4
mm drill.
3. Fix external unit by two self-tapping screws of 3.9 x 25 to the roof. Lightly
tighten screws. The aluminium coating of the roof is thin and the
screws may be easily tightened too hard. Then drill remaining holes.
4. Lift off external unit and clean underside and edges of base plate as well as
the roof mounting area from dirt and fatty residues. Fully coat base plate
with a thin coating of Sikaflex-252 and position external unit on roof in
chosen position.
5. Before turning in the screws, seal holes with Sikaflex. Arrange a sealing
joint around edge of base plate.
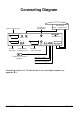
6. Drill a hole (min. dia. 15 mm) for the three cables through the roof.
7. Wrap cable contacts with adhesive tape to avoid damage. Carefully push
cables from side into junction box and through roof. Fix junction box over
this hole with Sikaflex-252 and 3 bolts of 3.9 x 25.Position and fix cables to
roof. It is recommended to use a cable trunking 20 x 20 mm, attached to
the roof by Sikaflex-252.
8. The aerial can only be mounted after the system has been connected to
the power supply and is ready for operation, as the arm of the aerial will
have to be extended from stationary position. Switch on AutoSat2, wait until
arm has sufficiently extended and interrupt power supply (remove cable).
Use washers for all four screws.
8.1 Flat aerial: Carefully tighten nut of aerial cable on aerial by a 11mm open-
ended spanner but not too tightly.
8.2 Dish aerial: After assembly of aerial dish, fasten support block, whilst
the aerial is in stationary position, below free end of aerial dish.
This concludes work on the roof.