
Installation Guide

Fixing Instructions
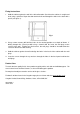
1. Hold the cabinet against the wall in its desired location. Check that the cabinet is straight and
level using a spirit level. Open the door and mark the wall through the holes in the back with a
pencil (see figure 1).
Fig 1
2. Using a 6mm masonry drill, drill the holes in the marked positions to a depth of 50mm. If
drilling through tiles, please pre-drill using a ceramic drill bit. Insert the wall plugs to the
surface of the wall. If fitting to a tiled surface, the wall plugs should be inserted below the
surface of the tile to avoid cracking.
3. Hold the cabinet against the wall and align the holes in the back of the cabinet with the wall
plugs.
4. Insert the screws through the cup washers through the holes in the back panel and into the
wall plugs.
Product Care
To retain the best quality finish, clean product regularly with a soft cloth and mild detergents. Do
not use abrasive or chemical cleaners, as these will damage the product.
Do not place hot objects onto the surface of the glass shelves.
For details of other items in the Croydex range please visit our website:
www.croydex.co.uk
Croydex Limited, Central Way, Andover, Hants, SP10 5AW, UK
REVISION 2
SEPT 2006