
Instructions / Assembly

7. Drill the holes to a depth of 35mm in the marked positions using a 6mm
masonry drill. If the product is to be fitted onto a ceramic tiled wall, a ceramic
drill bit should be used.
8.
Insert the wall plugs flush to the surface of the wall. If fitting to a tiled surface,
the wall plugs should be inserted below the surface of the tile to avoid cracking.
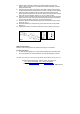
9.
Insert the screws provided through the wall fixing bracket and the circular
plastic gasket and screw them onto the wall. Ensure the wall bracket is vertical
and in the correct orientation. (See Fig.1).
DO NOT OVERTIGHTEN.
10.
Insert the screws provided through the keyhole plate and the small oval plastic
gasket and screw them onto the wall. Ensure the keyhole plate is vertical and
in the correct orientation. (See Fig.1). DO NOT OVERTIGHTEN.
11.
Place the clothes line body onto the fixing bracket and tighten the grub screw
as shown. (Fig. 1)
12.
Extend the clothes line chord (See Fig.2) and place the knob into the cradle.
(See Fig.2)
13.
Tighten the knurled nut to lock the clothes line chord in position. (See Fig.3)
WMA 049 R01
g
Fi .3
Fig.2
Fig.1
Additional Information
Maximum safe working load for the clothes line is 5kg. Do not overload.
Product Care Advice
• To retain the best quality finish, clean product regularly with a soft damp cloth.
• Do not use abrasive or chemical cleaners, as these will damage the product.
For details of the other items in the Croydex range please visit our website: www.croydex.co.uk
Croydex Limited, Central Way, Andover, Hants, SP10 5AW, UK
Tel: +44 (0) 1264 365881.
Fax: +44 (0) 1264 356437
Website: www.croydex.co.uk
. E-mail: info@croydex.co.uk