
Installation Guide

Installation Instructions
Position the grab bar in the desired position on the supporting wall. Use the three
mounting holes in the grab bar wall brackets as a template and use the pencil to mark the
position of the mounting holes on the supporting wall.
Drill the holes to the correct size and depth for your fixing components using a suitable
masonry drill bit. If the grab bar is to be fitted onto a ceramic tiled wall then a suitable
ceramic drill bit should be used.
Insert the wall plugs into the holes drilled in the supporting wall. If fitting to a tiled surface,
the wall plugs should be inserted below the surface of the tile to avoid cracking.
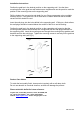
Position the grab bar in the desired position on the supporting wall, ensuring that the
mounting holes grab bar wall brackets are in alignment with the wall plugs inserted into
the supporting wall. Insert the mounting screws through the mounting holes grab bar wall
brackets and into the wall plugs. Tighten the mounting screws to securely fix the grab bar
to the supporting wall (see Fig 1).
Fig 1
Product Care Advice
To retain the best quality finish, clean product regularly with a soft damp cloth.
Do not use abrasive or chemical cleaners, as these will damage the product.
Please retain this leaflet for future reference.
Croydex Ltd, Central Way, Andover, Hants, SP105AW, UK
Tel: +44 (0) 1264 365881 ~ Fax: +44 (0) 1264 356437
website: www.croydex.com
~ Email: info@croydex.co.uk
S&H 023 R01