0102 095 50621 7+( 52<$/ %8&.
DESCRIPTION This Royal Cozy Fires Decorative Fuel Effect gas fire has been developed to give a realistic coal burning appearance with the convenience of gas. The fire is complemented with an attractive detachable Marblesque Frame. The appliance has been designed to enable it to be installed into most applications where the warmth and comfort of an open fire, with a high radiant heat is required.
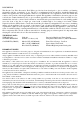
Clearance to Side Minimum clearance required to any combustible material to the side of the appliance must be l50mm. Clearance to Shelves Minimum clearance to the underside of a l50mm combustible shelf from the hearth must be 790mm, add 12.5mm to this dimension for every 25mm increase in the depth of the shelf. To light The Appliance Remove the Fret (controls cover) to gain access. Press and turn the gas control knob anticlockwise until the indicator dot is opposite the IGN.
Dismantling the Fire Bed for Cleaning Allow the fire bed to cool for 1 hour before handling any components. Should any soot accumulation become excessive, the fuel effect pieces should be removed from the fire for cleaning. Cleaning should be carried out in a well-ventilated area or in the open air, by gently brushing with the pieces held away from your face so that you avoid inhaling the dust. We do not recommend the use of a normal domestic vacuum cleaner, which may blow dust back into the air.
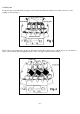
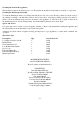
Coal Lay-out Position 4 large coals with their rear edge located on the burner inserts and the front on the coal front - rotate slightly as shown in Fig 3. Place 4 large coals against the coal support shelf and over the three centre spaces of the front row of coals. Place 4 large coals vertically on the triangular sections of the coal support shelf as shown in Fig 4.
Sectional View of firebed (without small coals laid) Place the eight small coals randomly and in a stable position between the large coals.
Cleaning the Front of the Appliance The fire must be turned off and allowed to cool. The paintwork should be cleaned with a soft cloth or soapy water. Cleaning the Marblesque Surround To clean the Marblesque frame, use a damp cloth and allow to dry. Do not use abrasive polishes etc. In the event of any damage occurring to the finish the frame it can be removed by removing by lifting vertically. Care must be taken to avoid any damage being caused to the frame or the appliance.
0102 095 50631 7+( 52<$/ %8&.
DESCRIPTION This Royal Cozy Fires Decorative Fuel Effect gas fire has been developed to give a realistic coal burning appearance with the convenience of gas. The fire is complemented with an attractive marblesque frame. The appliance has been constructed to enable it to be installed in most applications, where the warmth and comfort of an open fire and a high radiant heat is required.
The following relevant Codes of Practice and British Standards: The Building Regulations issued by the Department of the Environment. The Building Standards (Scotland) (Consolidation) Regulations issued by the Scottish Development Department. BS 8303 BS 1251 BS 6891 BS 715 BS 7566 Pts. 1986 1987 1988 1989 1-4 1992 BS 5440 Pt. 1 1990 & Pt. 2 1989 BS 5871 Pt. 2 1991 & Pt. 3 1991 BS 6461 Pt. 1 1984 BS 1289 Pt.
Contents Check List Fire Box Assembly-c/w Burner Assembly Lower Fibre Back L& R Hand Side Cheeks Simulated Coal front Burner Inserts Coal Support Shelf Spacer Frame Assy. Spacer frame Fixing Kit Fitting Kit: - Coal Pack Including; 11 Medium Strata Coals 8 Small Strata Coals 7" (175mm.) & 5" (125mm.
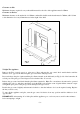
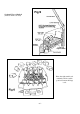
Installation using a 5" Diameter Metal Flue Box. Important: The spigot restrictor marked B’ must be fitted See Fig. 4 When the metal flue box is to be built-in as a false chimneybreast using timber studwork with plasterboard facing, the metal flue box should be enveloped with insulation material such as rockwool or similar to prevent a build-up of heat within the structure.
-6-
Installation of the Appliance Check that the chimney conforms to the required specifications as previously stated. Examine the condition and carry out any remedial work as necessary, if the flue has been used for solid fuel it should be swept and a smoke test carried out to check that satisfactory smoke clearance has been established. If all the smoke is not drawn into the flue, pre-heat the flue with a blowtorch or similar and recheck.
Important THE RESTRICTOR PLATES MARKED ’A’ AND ’B MUST NOT BE USED WITH PRE-CAST FLUES. The restrictor marked A is for use with 7in. (175mm) diameter flues and the restrictor marked ’B’ is for use with sin. (l25mm) diameter flues. The appliance is supplied without any Flue Restrictor fitted in position i.e. suitable for pre-cast flues. Installing the Spacer Frame and Vent Box Before installing the appliance protect the hearth from scratches and damage that could occur during the installation.
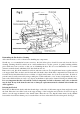
Locate and screw the vent box to the spacer frame with two 8 x ¾ self-tapping screws at the top and two M4 Taptite screws at the bottom, ensuring that a good seal exists with the back panel. Complete the gas supply to the location of the burner connecting elbow and place the burner into the vent box locating the feet of the rear legs into the two tags in the base. Secure into position with the 2 No.8 self-tap screws supplied and complete the gas connection using either a restrictor elbow or isolating cock.
- 10 -
Laying the Coal Bed Place the L & R hand side cheeks with the rebated edges on the sides of the burner support frame and push towards the back. Place the lower fibre back on the support flange of the back plate and locate the L & R coal support shelves over the support channel of the burner frame. Place the two Tee shaped burner inserts in the channel between the front and rear burner ports locate the fibre coal front on the shelf above the fascia panel.
- 12 -
Checking Operation of Fine Turn on the gas supply at the meter and to the appliance at the isolating cock. Purge the air to the appliance. Rotate the control knob to the ignition position, depress the control and push the piezo to ignite the pilot. Check that the electrode is sparking to the tip of the thermocouple and continue until a pilot ignition is established.
Advise that the appliance be fitted with an Oxy-pilot to prevent continued operation in the event of spillage occurring. If the fire shuts ’OFF’ repeatedly the appliance must be turned off and not used until an expert is consulted. Complete the registration section in the end booklet enclosed. Advise that any component part of this appliance be guaranteed against defective workmanship or faulty materials for a period of twelve months from the date of purchase.
IV) TO REPLACE THE OXY-PILOT ASSEMBLY: The assembly is not an item that can be serviced as part of its calibration depends on the proximity of the spark electrode and thermocouple tip. The assembly can be replaced by removing the tube nut and tube from the base of the pilot and the thermocouple from the FSD. Also the igniter lead and the two M4 screws securing the brackets to the framework. Replace in reverse order, the spark gap is shown in Fig. 15.
Royal Cozyfires are manufactured by: CROSSLEE plc Aber Park Industrial Estate, Aber Road, Flint, Flintshire.