
Technical Manual

Technical Manual
ARGUS AM Floor System
How to adjust the ARGUS AM Floor System v1.2 Page 63 of 65
14 How to adjust the ARGUS AM Floor System
This section describes the adjustment procedure for the ARGUS AM Floor System. Please
carefully follow this procedure for optimal functioning and performance.
Make pictures during the various installation steps and of the final
placement of all the components in the floor BEFORE the floor is covered
with concrete. Without being able to see exactly how the various
components are placed in the floor, we will not be able to supply any
useful support.
14.1 Pre-installation testing
Before doing any work to the floor, the ARGUS AM Floor System must be placed at the
exact location where it is going to be installed. There it must be properly tested to determine
the actual performance of the system. Make sure to configure the system exactly as
planned:
• Place shielding tiles underneath the floor antennas,
• Use spacers between the shielding tiles and floor antennas,
• Place the antennas at the exact required horizontal distance of each other,
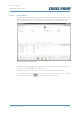
• Connect the system to your CCAP and Device Explorer and tune the antenna
according to the instructions in section 13.5.7.4
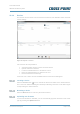
• Adjust the sensitivity settings as described in section 13.5.7.1
• Determine the maximum detection height that can be achieved by presenting a
hard tag and/or DR-label.
• In case the maximum detection height is valued as being too low, make alterations
to the configuration described in the previous steps.
14.2 Prepare the floor and place antennas
Once you and your customer are satisfied with the achieved maximum detection height,
determined in the pre-installation test described in the previous section, you can start
working on the floor.
In case the floor is already prepared for placement of the floor antennas, you can continue
to prepare for closing the floor once you are convinced that all work on the floor antennas
and cabling has been done properly.
In case a cavity has to be created in the floor, excavation of the floor can now start, taking
all precautions into consideration that come with working on the floor, as described in
section 4.
Once the cavity has been created, place the shielding tiles, spacers and floor antennas in
the cavity, following the instructions in section 7, the way you have also tested the system
as described in section 14.1. Do not cover the antennas yet, but perform another detection
test to determine if the previously determined maximum detection height can still be
achieved.
14.3 Close the floor
Once you are convinced of the proper functioning of the system, the cavity in the floor can
be closed, following the instructions given in section 4.