
Owner's Manual


OWNER’S MANUAL
CO
2
Powered, Semi, BB or Pellet Air Pistol
Caliber- .177 (4.5mm) BB or Pellet
READ ALL INSTRUCTIONS AND WARNINGS IN THIS MANUAL BEFORE USING
Crosman Corporation
7629 Routes 5 & 20
Bloomeld, NY 14469
United States of America
www.crosman.com
1-800-7AIRGUN (724-7486)
PDM9B-515
If you have questions contact Crosman at 1-800-724-7486, 585-657-6161 or www.crosman.com.
REMEMBER, THIS AIR RIFLE IS NOT A TOY. ALWAYS TREAT THE AIR RIFLE AS THOUGH IT IS LOADED AND WITH THE SAME RESPECT YOU WOULD A FIREARM.
A SPECIAL MESSAGE TO PARENTS Personal injury or death can result from improper handling if a pellet or BB strikes someone in a vulnerable spot. This air rie is not a toy. Therefore, if you
purchased this air rie for use by a younger shooter, please make certain he or she operates it under the supervision of an adult.
We are concerned that all users learn to use this gun properly without injury to themselves or others. You may be able to obtain further information for instruction in shooting from
one or more of the following groups: Boy Scouts of America, National Rie Association, conservation clubs, gun clubs, 4-H Clubs, hunter safety groups, or write to Crosman Corporation,
Rts 5 & 20, Bloomeld NY 14469. For more information on Crosman products and accessories visit our website at www.crosman.com
NOT A TOY. ADULT SUPERVISION REQUIRED. MISUSE OR CARELESS USE MAY CAUSE SERIOUS INJURY OR DEATH. DANGEROUS
WITHIN 450 YARDS 411 METERS.
THIS AIR PISTOL IS INTENDED FOR USE BY THOSE 16 YEAR OF AGE OR OLDER.
YOU AND OTHERS WITH YOU SHOULD ALWAYS WEAR SHOOTING GLASSES TO PROTECT YOUR EYES.
BUYER AND USER HAVE THE DUTY TO OBEY ALL LAWS REGARDING THE USE AND OWNERSHIP OF THIS AIR RIFLE.
DO NOT BRANDISH OR DISPLAY THIS AIR RIFLE IN PUBLIC IT MAY CONFUSE PEOPLE AND MAY BE A CRIME. POLICE AND OTHERS
MAY THINK IT IS A FIREARM. DO NOT CHANGE THE COLORATION AND MARKINGS TO MAKE IT LOOK MORE LIKE A FIREARM. THAT IS DANGEROUS AND MAY
BE A CRIME.
THIS PRODUCT CONTAINS ONE OR MORE CHEMICALS KNOWN TO THE STATE OF CALIFORNIA TO CAUSE CANCER AND BIRTH
DEFECTS OR OTHER REPRODUCTIVE HARM.
1. IMPORTANT SAFETY INFORMATION
• ALWAYS treat the airgun as though it is loaded and ready to re.
• ALWAYS treat airguns with the same respect you would a rearm.
• ALWAYS store the airgun unloaded and away from children.
• ALWAYS aim in a SAFE DIRECTION.
• ALWAYS keep the muzzle of the airgun pointed in a SAFE DIRECTION.
• ALWAYS keep your nger o the trigger and out of the trigger guard until ready to shoot.
• ALWAYS keep the airgun “ON SAFE” until you are ready to shoot (Figure 2).
• ALWAYS check to see if the airgun is “ON SAFE” (Figure 2) and unloaded when removing it from storage.
• ALWAYS check to see if the airgun is “ON SAFE” (Figure 2) and unloaded when handing it to, or receiving it from another person.
• ALWAYS have you and others wear shooting glasses to protect your eyes.
• ALWAYS wear shooting glasses over reading or prescription glasses.
• ALWAYS place a shooting backstop in a location that will be safe should the backstop fail.
• ALWAYS check your backstop for wear before and after each use. All backstops are subject to wear and will eventually fail. Replace your backstop if
the surface is worn or damaged, or if a ricochet occurs.
• ALWAYS use the proper size ammo in your air gun. Check the markings on your airgun to verify the ammo size.
• NEVER point the airgun at any person or at anything you do not intend to shoot.
• NEVER reuse ammunition.
• NEVER shoot at hard surfaces or at the surface of water. The ammo may bounce o or ricochet and hit someone or something you had not
intended to hit.
• NEVER attempt to disassemble or tamper with your airgun. Use an Authorized Service Station. Using an unauthorized service or repair center, or
modifying the function of your airgun in any way, may be unsafe and will void your warranty.
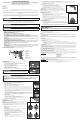
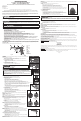
2. LEARNING THE PARTS OF YOUR AIRGUN
Learning the names of the parts of your new airgun will help you understand your owner’s manual.
Fig. 2A
A. Rear Sight
B. Slide
C. Barrel Latch Button
D. Barrel
E. Front Sight
F. Hammer
G. Grip
H. Trigger
I. Trigger Guard
J. Safety
K. Muzzle
L. Magazine Release
M. Lanyard Loop
3. OPERATING THE SAFETY
CAUTION:
Like all mechanical devices, an air pistol safety can fail. Even when the safety is “ON SAFE”, you should continue to handle
the air pistol in a safe manner.
• Locate the safety above the trigger (see Fig. 1).
• The letters “F” and “S” are above the trigger. The condition of the safety is indicated by the direction of the safety.
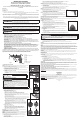
A. To Put the Airgun “ON SAFE”
1.
Push the safety all the way forward toward the “S” for “ON SAFE”.
2. The safety is in the SAFE position and the air pistol is “ON SAFE” when the WHITE indicator is showing (Fig. 2A).
B. To Put the Airgun “OFF SAFE”
1.
Push the safety all the way back toward the “F” for FIRE or “OFF SAFE.”
2. The safety is in the FIRE positon and “OFF SAFE” when the RED indicator is showing (Fig. 2B).
KEEP THE AIR PISTOL IN THE “ON SAFE” POSITION UNTIL YOU ARE ACTUALLY READY
TO SHOOT. THEN PUSH THE SAFETY TO THE “OFF SAFE” POSITION.
4. INSTALLING AND REMOVING THE CO
2
CARTRIDGE
• CO
2
CARTRIDGE MAY EXPLODE AT TEMPERATURES ABOVE 120°F 48.9°C. DO NOT MUTILATE OR INCINER
ATE THEM. DO NOT EXPOSE THEM TO HEAT OR STORE CO
2
CARTRIDGES AT TEMPERATURES ABOVE 120°F
48.9°C.
• ALWAYS MAKE SURE THE CO
2
CARTRIDGE IS EMPTY BEFORE ATTEMPTING TO REMOVE IT FROM THE AIR
PISTOL BY SLOWLY TURNING THE WING COUNTERCLOCKWISE ALL THE WAY UNTIL YOU NO LONGER
HEAR THE ESCAPE OF CO
2
GAS.
• KEEP HANDS AND FACE AWAY FROM ESCAPING CO
2
GAS. IT CAN CAUSE FROSTBITE IF ALLOWED TO COME
IN CONTACT WITH SKIN.
CAUTION:
• We recommend the use of Crosman Powerlet CO
2
cartridges. They are made to t your air pistol. Other brands of CO
2
cartridges may not t
properly and may result in injury to you or damage to your air pistol.
• Do not store your air pistol with a CO
2
cartridge in it. Doing so can cause damage to the seals.
A. Installing a New CO
2
Cartridge
1.
Put the air pistol “ON SAFE” (Section 3).
2. Make sure the air pistol is UNLOADED and pointed in a SAFE DIRECTION.
3. Press the magazine release button and remove the magazine from the air pistol.
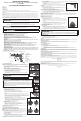
4. Turn the piercing wing counter-clockwise to remove tension and allow for clearance of the CO
2
cartridge (Fig. 4).
5. Put 1 drop of Crosman Pellgunoil on the tip of every CO
2
cartridge in order to properly maintain the air pistol seal.
6. Insert a new CO
2
cartridge into the magazine, small neck rst, pointing toward the piercing assembly (Fig. 5).
7. With your thumb and forenger, turn the piercing wing clockwise until it pierces the CO
2
cartridge. If you hear a hissing sound when piercing
the cartridge, try tightening the wing slightly more. Be careful not to over-tighten when piercing. Over-tightening the CO
2
cartridge can cause injury to you or damage to your air pistol.
8. Insert magazine in the air pistol
9. To make sure the cartridge has been pierced, point the gun in a SAFE DIRECTION, take “OFF SAFE” and pull the trigger. If the
air pistol does not make a popping noise after pulling the trigger, the CO
2
is not being discharged. In that event, remove the
grips and tighten the piercing wing a little more. Point the air pistol in a SAFE DIRECTION, and pull the trigger until there is a
popping noise, which means the air pistol is releasing CO
2
with each pull of the trigger.
B. Removing the CO
2
Cartridge
1.
Put the air pistol “ON SAFE” (Section 3).
2. Make sure the air pistol is UNLOADED and pointed in a SAFE DIRECTION.
3. Press the magazine release button and remove the magazine from the air pistol.
4. Slowly turn the piercing wing counter-clockwise to release any remaining CO
2
, being careful not to come in contact with the escaping gas.
5. Tip out the empty cartridge. It may be cold to the touch.
REMEMBER: Keep hands and face away from escaping CO
2
gas. It can cause frostbite if allowed to come in contact with skin.
5. LOADING AND UNLOADING BBs AND PELLETS
CAUTION:
This air pistol was designed to shoot either .177 caliber BBs or pellets to function best with CROSMAN
®
,
COPPERHEAD
®
and BENJAMIN
®
BBs and/or pellets.
NOTE: The magazine is designed to hold 4 clips. The TOP clip will engage the FIRING mechanism and the BOTTOM three
are for storage. The same clip is used no matter which type of ammo you shoot, but only one type of ammo should be
used in a clip at a time.
• Use of other ammunition may cause the gun to malfunction and could cause damage to the air pistol.
• Never reuse ammunition.
• Review the entire manual, including the section on Safety, before ring your air pistol.
A. Loading BBs
1.
Make sure the air pistol is “ON SAFE” and pointed in a SAFE DIRECTION.
2. Press the magazine release button and remove the magazine from the air pistol.
3. Remove the clip(s) and place a .177 caliber (4.5mm) BB in each chamber (Fig. 6).
NOTE: To avoid jamming your air pistol, make sure to load no more than one BB in each chamber.
4. Replace the clip(s) with the ratchet teeth facing the front.
5. After following these steps and reading the entire manual, including the section on reviewing safety
procedures, your air pistol is now loaded and ready to re.
B. Loading Pellets
1.
Make sure the air pistol is “ON SAFE” and pointed in a SAFE DIRECTION.
2. Press the magazine release button and remove the magazine from the air pistol.
3. Remove the clip(s) and place a .177 caliber (4.5mm) pellet, nose rst, in each chamber (Fig. 7).
NOTE: To avoid jamming your air pistol or deforming the pellet, make sure that the pellet skirt is ush or slightly below
the rim of the chamber.
4. Replace the clip with the ratchet teeth facing the front in the magazine.
5. After following these steps and reading the entire manual, including the section on reviewing safety
procedures, your air pistol is now loaded and ready to re.
C. Unloading/ Removing a Jammed BB or Pellet
Caution:
Never look down the muzzle end of the barrel to see if a jam has been cleared
1. Put your air pistol “ON SAFE” and pointed in a SAFE DIRECTION.
2. Press the magazine release button and remove the magazine from the air pistol.
3. Use a ramrod (sold separately) to gently push out the pellet or BB towards the muzzle rear sight until the pellet or
BB comes out (Fig. 8).
4. Replace the EMPTY clip with the ratchet teeth facing the front sight.
CAUTION: PINCH HAZARD: Close the air pistol by pushing downward on the barrel until it locks into place. Be careful not to
pinch your hand or ngers.
Note: If you are not able to unjam your air pistol by following this procedure, take no further action. An Authorized Service Station will unjam your air pistol at no cost during the
warranty period.
6. AIMING AND FIRING SAFELY
CAUTION:
• REMEMBER, choose your targets carefully and be sure that the area around the target is clear.
• THINK about what you will hit if you miss the target!
1. YOUR air pistol is designed to target shooting and is suited for both indoor and outdoor use.
2. Follow the instructions for loading the CO
2
(Section 4) and loading BBs or Pellets (Section 5).
3. The air pistol is correctly aimed when the front sight blade is positioned in the notch of the rear sight (Fig. 9).
4. The top of the front blade should be even with the top of the notch in the rear sight. The bulls-eye should appear to rest
on top of the front sight.
5. When you are sure of your target and backstop, and the area around the target is clear, take the air pistol “OFF SAFE” and
pull the trigger to re.
7. MAINTAINING YOUR AIR PISTOL
A. General Maintenance:
1.
Before you attempt to oil your air pistol, make sure the gun is unloaded and the CO
2
cartridge has been removed.
2. Putting a drop of Pellgunoil on the tip of every CO
2
cartridges will help to maintain the air pistol seal in your air pistol. DO
NOT use petroleum distillate based oil or solvent and DO NOT over-oil as this can cause damage to your air pistol.
3. If you drop the air pistol, visually inspect for damage before using it again.
4. If anything seems changed, like a shorter or weaker trigger pull, this may mean broken parts.
• DO NOT ATTEMPT TO DISASSEMBLE YOUR AIR PISTOL.
• DO NOT MODIFY OR ALTER YOUR AIR PISTOL. ATTEMPTS TO MODIFY THE AIR PISTOL IN ANY WAY INCONSISTENT WITH THIS MANUAL MAY MAKE YOUR
AIR PISTOL UNSAFE TO USE, CAUSE SERIOUS INJURY OR DEATH, AND WILL VOID THE WARRANTY.
B. TROUBLESHOOTING:
If you experience inaccuracy or lower velocity, be sure you have not depleted the CO
2
supply:
1. As you use up the CO
2
accuracy will drop o.
2. Get to know your gun and the number of shots it takes for this to happen.
3. Change cartridges as needed.
PERFORMANCE
Many factors aect velocity, including brand of projectile, type of projectile, lubrication, barrel condition and temperature. This air pistol was designed to function best with CROSMAN
®
and BENJAMIN
®
branded ammunition. Use of other ammunition may cause the air pistol to malfunction.
LIMITED ONE YEAR WARRANTY
This product is warranted to the retail consumer for one year from date of retail purchase against defects in material and workmanship and is transferable. You should retain the original
sales receipt as record of date of purchase. If no receipt, the product is warranted for one year from date of manufacture.
WHAT IS COVERED:
1. Replacement parts and labor.
2. Transportation charges to consumer for repaired product.
WHAT IS NOT COVERED:
1. Transportation charges to Authorized Service Station for defective product.
2. Damages caused by abuse, modication or failure to perform normal maintenance – see Owner’s Manual.
3. Any other expense.
4. CONSEQUENTIAL DAMAGES, INCIDENTAL DAMAGES, OR INCIDENTAL EXPENSES INCLUDING DAMAGE TO PROPERTY. SOME LOCAL, STATE OR FEDERAL LAWS DO NOT ALLOW THE
EXCLUSION OR LIMITATION OF INCIDENTAL OR CONSEQUENTIAL DAMAGES SO THE ABOVE LIMITATION OR EXCLUSION MAY NOT APPLY TO YOU.
IMPLIED WARRANTIES
ANY IMPLIED WARRANTIES INCLUDING THE IMPLIED WARRANTIES OF MERCHANTABILITY AND FITNESS FOR A PARTICULAR PURPOSE ARE LIMITED IN DURATION TO ONE YEAR FROM DATE OF
RETAIL PURCHASE. SOME STATES DO NOT ALLOW LIMITATIONS ON HOW LONG AN IMPLIED WARRANTY LASTS SO THE ABOVE LIMITATIONS MAY NOT APPLY TO YOU.
To the extent any provision of this warranty is prohibited by federal, state or municipal law, which cannot be preempted, it shall not be applicable. This warranty gives you specic legal
rights and you may have other rights, which vary, from state to state.
STOP – BEFORE YOU RETURN THIS PRODUCT TO THE STORE
Save on gas and avoid the trip back to the store. Contact our Customer Service/Technical Support representatives for information and trouble-shooting help. Call 1-800-7AIRGUN
(1-800-724-7486) or nd answers to frequently asked questions at www.crosman.com.
WARRANTY CLAIM AND REPAIR SERVICE
If your air gun needs repair - DO NOT ATTEMPT TO DISASSEMBLE IT! Your air gun requires special tools and xtures to repair it. Any disassembly or modication not performed by a
Crosman Authorized Service Center will void the warranty.
U.S. Customers - Contact Crosman Customer Service at 800-724-7486 or email us via www.crosman.com. You will be instructed where and how to send your air gun in for repair under
warranty or referred to one of our authorized service centers in your area.
Crosman Corporation
Attn: Warranty Dept.
7629 Route 5 & 20
Bloomeld, NY 14469
Include with your product a copy of your receipt and a brief description of the problem. Be sure to indicate your name, mailing address, email address and telephone number. Allow 2-4
weeks for repairs. We recommend you use a method of shipping that provides you with a tracking number and insurance options. Crosman is not liable for any damaged, lost or stolen
merchandise during shipping.
Canadian Customers - Contact the Gravel Agency, in Quebec at 866- 662-4869.
Outside U.S. Customers - Please contact your point of purchase dealer/distributor. If you do not know your dealer/distributor, contact our International Dept. for assistance at
585-657-6161 or email us via www.crosman.com.
Crosman, Copperhead, Benjamin and Powerlet are trademarks of Crosman Corporation in the Unites States and other countries.
© 2015 Crosman Corporation
09-15_OM
“ON SAFE”
Fig. 2A
“OFF SAFE”
Fig. 2B
RED Indicator
Piercing Wing
Fig. 4
Fig. 5
BBs
Ratchet
Teeth
Fig. 6
Pellets
Fig. 7
Ratchet
Teeth
Fig. 9
Fig. 9