
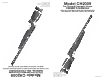
Owner's Manual

Trigger Maintenances The trigger is assembled with a moly graphite EP grease that should last for years.
In the event your trigger becomes contaminated with debris and is not functioning properly, contact a
qualified gunsmith to examine for repair or maintenance.
After adjusting your trigger, always check that the trigger and safety are functioning properly. If you are s
not sure if the trigger or safety is operating properly, take your gun to an experienced gunsmith.
Re-insert the action into the stock, and replace and tighten the stock screw.s
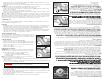
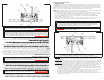
B. Adjusting the Hammer Energy
The CH2009 is designed to be tuned to work at various fill pressures up
to 2000 psi (138 bar) The gun is factory tuned to allow minimum velocity
deviation and maximum shot count. However, a shooter may decide
to adjust the hammer energy to meet his or her needs. This is done by
adjustment of the hammer spring preload and hammer stroke length. In
either case the adjustment changes the amount of energy the hammer
generates when striking the valve. It is advised to always record your set-
tings when tuning your rifle.
The CH2009 has been factory set to suit most hunting and target s
uses. If you, as the owner, wish to alter the factory settings you should
do so only after reading the following instructions carefully
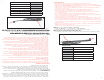
Generally, setting the knob at a position so there is a .25 inch view of
threads visible between the hammer spring adjustment knob and the re-
ceiver will achieve minimum velocity deviation and maximum shot output.
(fig 12)
Hammer Spring Preload
To increase the energy, turn the hammer spring adjustment knob s
clockwise (fig 12), up to 6 revolutions.
NOTE: More revolutions will simply cause the adjuster to spin but will not yield any higher force. Increasing
the preload will be required to facilitate use of higher fill pressures.
Hammer Stroke Length
The striker can be adjusted using a 1/8” Allen wrench. Insert the wrench into the hole in the hammer s
spring adjustment knob and push the wrench all the way in.. Turning the striker clockwise will shorten
the hammer stroke and turning counter clockwise will lengthen (fig 13) the stroke. A long stroke length
will yield higher hammer energy while a short stroke length will yield lower hammer energy. The striker
can be adjusted inward by up to 12 revolutions.
If during tuning you are not sure which direction to move, or need to start over, turn the allen wrench
counter-clockwise until it reaches a hard stop. This will give you a point of reference to start over. Turning
the wrench out clockwise from this position about 4 ½ turns and then turning the knob to a .25 inch gap
will bring the adjustments back to a point near the factory preset.
TIP! Too little hammer energy at high fill pressures may result in very low velocities which is the result of
partial valve lock.
Tuning the rifle to obtain various velocity profiles can be achieved through use of these adjustment s
points and should be done in harmony with each other. Start slow to understand how each one affects
the rifle’s performance. Experience and testing is the best way to understand these capabilities.
13
12
.25”
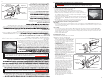
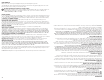
A. AJUSTADOR DEL PESO DEL GATILLO B. AJUSTADOR DE LA PRIMERA ETAPA C. AJUSTADOR DE
LA SEGUNDA ETAPA D. POSICIÓN DEL GATILLO E.GATILLO F. PALANCA DEL SEGURO
G. ESLABÓN H. FIADOR
s Resistencia del gatillo Con una llave Allen de 1/8” gire el tornillo de ajuste (A) en el sentido de las man-
ecillas del reloj para aumentar la fuerza de resistencia del gatillo y en sentido contrario al de las manecillas
del reloj para disminuir la fuerza de resistencia del gatillo. Este ajuste no afectará el enganche del fiador.
s Posición del gatillo Con una llave Allen de .050” se puede ajustar la posición del gatillo en descanso.
Gire el tornillo (D) en el sentido de las manecillas del reloj para mover el gatillo hacia atrás y en sentid
o
contrario a
las manecillas del reloj para moverlo hacia delante. Este ajuste podría afectar el enganche del
fiador, y por tanto podría hacer que el rifle se dispare al caerse o sacudirse.
s Etapas del gatillo Con una llave Allen de .050” para los tornillos (B) y (C), se pueden hacer cambios a
la posición y longitud de la primera y segunda etapas del movimiento del gatillo. Estos ajustes podrían
afectar el enganche del fiador, y por tanto podrían hacer que el rifle se dispare al caerse o sacudirse.
s%LTOrnillo (B) cambia la primera etapa. Girar el tornillo (B) en el sentido de las manecillas del reloj
aumentará la longitud de la primera etapa y disminuirá el enganche del fiador. Girarlo en sentido con-
trario al de las manecillas del reloj disminuirá la longitud de la primera etapa y aumentará el enganche
del fiador.
s%LTOrnillo (C) cambia la segunda etapa. Girar el tornillo (C) en el sentido de las manecillas del reloj hará
que la segunda etapa ocurra más rápido, mientras que girarlo en sentido contrario al de las manecillas
del reloj hará que la segunda etapa ocurra después.
s%LAJUSTEDELOSTOrnillos (B) y (C) debe hacerse en armonía uno con otro, ya que trabajan unidos para
crear el perfil del gatillo. Empiece lentamente para entender lo que hace cada ajuste y la relación que
tiene con el otro.
s Mantenimiento del gatillo El gatillo está ensamblado con una grasa EP de moly grafito que debe durar
años. En caso de que el gatillo se contamine con desechos y no esté funcionando adecuadamente, comu-
níquese con un armero calificado para que lo examine y haga las reparaciones o mantenimiento necesarios.
Después de ajustar su gatillo, siempre compruebe que el gatillo y el seguro estén funcionando correcta-
mente. Si no está seguro de que el gatillo o el seguro están funcionando correctamente, lleve su arma a un
armero experimentado.
Guarde el rifle de aire en un sitio seguro.
y de que el rifle no esté amartillado (vea la sección 6).
2
para mantener las válvulas cerradas contra la
suciedad.
B. Ajuste de la energía del martillo
El CH2009 está diseñado para afinarse de modo que funcione a s
varias presiones de llenado, hasta desde 2000 psi (138 bar).El arma
está afinada de fábrica para permitir una mínima desviación de la
velocidad y un máximo recuento de disparos. No obstante, un tirador
puede decidir ajustar la energía del martillo para ajustarse a sus
necesidades. Esto se hace mediante el ajuste de la precarga de
resorte del martillo y la longitud de recorrido del martillo. En cualquier
caso, el ajuste cambia la cantidad de energía que el martillo genera al
golpear la válvula. Se recomienda siempre anotar sus ajustes al afinar
su rifle.
El CH2009 se ha ajustado de fábrica para ser adecuado a la mayoría s
de los usos de cacería y tiro al blanco. Si usted, como propietario,
desea alterar los ajustes de fábrica, debe hacerlo únicamente
después de leer cuidadosamente las siguientes instrucciones.
Generalmente, ajustar la perilla en una posición tal que pueda verse s
.25 de pulgada de la rosca visible entre la perilla de ajuste del resorte
del martillo y el receptor conseguirá la mínima desviación de la veloci-
dad y el máximo rendimiento de disparos. (fig. 12)
Precarga del resorte del martillos
Para aumentar la energía, gire la perilla de ajuste del resorte del s
martillo en el sentido de las manecillas del reloj (fig. 12), hasta 6
revoluciones.
NOTA: Más revoluciones sólo harán que el ajustador gire pero no pro-
ducirán ninguna fuerza adicional. Será necesario aumentar la precarga para
facilitar el uso de presiones de llenado más elevadas.
Longitud del recorrido del martillo
El percutor se puede ajustar con una llave Allen de 1/8”. Inserte la llave en el orificio que está en la s
perilla de ajuste del resorte del martillo y empújela para que entre totalmente (fig. 13). Girar el percutor
en el sentido de las manecillas del reloj reducirá el recorrido del martillo y girarlo en sentido contrario
al de las manecillas del reloj alargará el recorrido. Una longitud de recorrido larga producirá una mayor
energía del martillo, mientras que una longitud de recorrido corta producirá una menor energía del
martillo. El percutor se puede ajustar hacia dentro por hasta 12 revoluciones.
13
12
.25”
8
8