
Owner's Manual

10. Advanced Tuning Techniques
A. Trigger Adjustment
The CH2009 trigger assembly can be adjusted and customized but unless you are experienced in making
such adjustments, Crosman recommends that these adjustments to factory settings be made only by a
qualified gunsmith after reading all instructions. Adjusting the trigger assembly can result in a light trigger
pull, decreased sear engagement that could make the gun more susceptible to discharge when dropped or
jarred, or a non-functioning safety. Make only the adjustments identified in this manual.
NOTE: these adjustment features are for advanced shooters. Most shooters can use the settings provided
during manufacturing of the gun and should not need to make modifications.
The match grade trigger on your pellet air rifle is a two stage, fully adjustable unit. It has been factory s
set to an efficient setting that will suit most hunting and target uses. If you, as the owner, wish to alter
the factory settings you should do so only after reading the following instructions carefully.
Put the air rifle “ON SAFE”, remove the clip and keep the airgun pointed in a SAFE DIRECTION. s
Depressurize the airgun (see section 4)s
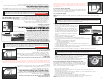
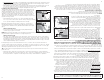
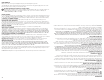
Remove the stock screw, (fig 11). Using a 3/16” Allen wrench, to separate the stock from the action. s
Do not remove the trigger guard screws as the trigger guard should remain with the stock.
WARNING:
Adjustment of trigger screw (B) could inhibit proper function of the safety
lever (F). Thus, always check for full engagement and smooth function of the safety lever
upon completion of any changes to the trigger screw. If you are not sure if the safety is en-
gaging and operating properly, take your gun to an experienced gunsmith.
WARNING:
Adjustment to the trigger assembly could allow this airgun to fire if dropped
or jarred, with or without the safety engaged.
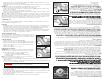
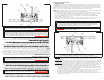
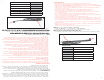
A. TRIGGER WEIGHT ADJUSTER B. FIRST STAGE ADJUSTER C. SECOND STAGE ADJUSTER
D. TRIGGER POSITION E. TRIGGER F. SAFETY LEVER G. LINK H. SEAR
Trigger Pulls Using a 1/8” Allen wrench turn the adjuster screw (A) clockwise to increase trigger pull
weight and counterclockwise to decrease trigger pull weight. This adjustment will not affect
sear engagement.
Trigger Positions Using a .050” Allen wrench the trigger position at rest can be adjusted. Turn screw (D)
clockwise to move the trigger back and counter clockwise to move the trigger forward. This adjustment
could affect sear engagement, and therefore could allow the gun to fire when dropped or jarred.
Trigger Stagess Using a .050” Allen wrench for adjustment of screws (B) and (C), changes can be made
to the position and length of first and second stages of the trigger motion. These adjustments could
affect sear engagement, and therefore could allow the gun to fire when dropped or jarred.
Screw (B) changes the first stage. Turning screw (B) clockwise will increase the length of the first s
stage and decrease the sear engagement. Turning counter clockwise will decrease the length of
the first stage and increase the sear engagement.
Screw (C) changes the second stage. Turning screw (C) clockwise will cause the second stage to s
occur sooner while turning counterclockwise will cause the second stage to occur later.
Adjustment of screws (B) and (C) should be done in harmony with each other as they work s
together to create the trigger’s profile. Start slowly to understand what each adjustment does and
its relationship to the other.
Aplíquelo aquí
s-ANTENGATODOSLOSLUBRICANTESABASEDEPETRØLEOAPARTADOSdel niple de llenado. NO DEBEN intro-
ducirse en eLDEPØSITODEalta presiØn.
El uso de lubricantes a base de petróleo en esta área podría dar
como resultado una explosión que provoque lesiones personales.
ADVERTENCIA:
forma que no esté indicada en este manual pueden hacer que el rifle de aire no sea seguro para usarse,
ocasionar graves lesiones o la muerte, y anular la garantía.
parece que cualquier cosa ha cambiado, como que el gatillo esté más suave o más duro, puede ser indi-
caciØNDEPiezas desgastadas o rotas. Llame a servicio al cliente de Crosman para obtener ayuda antes
de volver a usar el rifle de aire.
No intente reparar el rifle de aire ni desarmarlo para corregir un
llenado en exceso o un bloqueo de válvula. Pueden salir piezas volando del rifle de aire a
velocidades peligrosas cuando se desarma mientras está presurizado.
ADVERTENCIA:
10. Técnicas avanzadas de afinación
A. Ajuste del conjunto del gatillo
El conjunto del gatillo del CH2009 se puede ajustar y personalizar, pero a menos que usted tenga expe-
riencia en la rEALIZACIØNDETALESAJUSTES#rosman recomienda que estos ajustes a los valores de fábrica
sean rEALIZADOSSØLOPORUNARMEro calificado después de leer todas las instrucciones. Ajustar el conjunto
del gatillo puede dar como resultado una poca resistencia del gatillo, menor enganche del fiador que podría
causar que se dispare al caerse o sacudirse, o que el seguro no funcione. Haga únicamente los ajustes
identificados en este manual.
NOTA: estas funciones de ajuste son para tiradores avanzados. La mayoría de los tiradores pueden usar la
CONlGURACIØNProporcionada duranteLAFABRICACIØNDELRImEYNODEBERÓANTENERQUEHACERMODIlCACIONES.
-
mente ajustable. Se ha ajustado de fábrica a un estado eficiente que será adecuado para la mayoría de
los usos de cacería y tiro al blanco. Si usted, como propietario, desea alterar los ajustes de fábrica, debe
hacerlo únicamente después de leer cuidadosamente las siguientes instrucciones.
DIRECCIÓN SEGURA.
s1UITEELTOrnillo de la culata (Fig. 11) (con una llave Allen de 3/16” para separar la culata del accionador.
No quite los tornillos del guardamonte ya que éste debe permanecer con la culata.
El ajuste del tornillo del gatillo (B) podría impedir la función
adecuada de la palanca del seguro (F). Por tanto, compruebe siempre el enganche completo
y el funcionamiento suave de la palanca del seguro al finalizar cualquier cambio en estos
tornillos de ajuste. Si no está seguro de que el seguro se esté enganchando y funcionando
correctamente, lleve su arma a un armero experimentado.
ADVERTENCIA:
Los ajustes al conjunto del gatillo podrían hacer que este rifle de
aire se dispare al caer o al sacudirse, con o sin el seguro puesto.
ADVERTENCIA:
7
7