
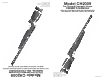
Owner's Manual

7 Aiming and Firing Safely
A. Aiming the Airgun
Always point your airgun in a SAFE DIRECTION. s
Follow the instructions for filling the air gun (section 3A) and loading pellets (section 5.s
You and others with you should always wear shooting glasses to protect your eyes. s
Do not shoot at hard surfaces or at the surface of water. The pellet may bounce off or ricochet and hit s
someone or something you had not intended to hit.
Always choose your target carefully. It is best to shoot at paper bull’s-eye targets which are attached to s
a safe backstop. A heavy blanket should be hung behind the backstop to prevent ricochet should you
miss the backstop.
Your airgun is designed for target shooting and is suited for both indoor and outdoor use. Always s
remember to place your target carefully. THINK about what you will hit if you miss the target.
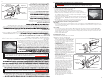
Before firing the air gun make certain there is sufficient pressure for proper operation. The gauge s
needle should be pointing to an area in the green zone on the gauge.
8 Removing a Jammed Pellet
A jammed pellet is usually the result of trying to fire the airgun when the pressure is too low. Before firing
the airgun make certain there is sufficient pressure for proper operation. The gauge needle should be
pointing to an area in the green zone on the gauge.
WARNING:
In this procedure you will put a cleaning rod down the barrel of a charged
airgun. It is extremely important that while you are doing this the airgun be “ON SAFE”, the
bolt remains in open position and that your finger be kept away from the trigger. Failure to
follow this warning may result in serious injury or death.
s Point the airgun in a SAFE DIRECTION.
Put the airgun “ON SAFE” (see section 2A.)s
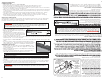
Open the bolt by pulling it all the way back until s
you hear two clicks.
With the bolt in the rearward position insert a s
ramrod of the proper size into the barrel (start at
the muzzle). The barrel could be damaged if the
proper sized cleaning rod is not used
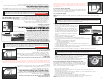
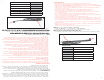
Using the ramrod push the pellet into the pellet loading port (forward of the bolt) see fig 10, remove and s
discard the pellet. Do not reuse that pellet.
Point the airgun in a SAFE DIRECTION, close the action, take “OFF SAFE” and fire. Put the airgun “ON s
SAFE”.
If you are not able to unjam your airgun by following this procedure, s
take no further action. Crosman Corporation or an Authorized Service
Station will unjam your airgun. (no cost during the warranty period)
9 Maintaining Your Air gun
Apply Crosman silicone chamber oil (part number RMCOIL) on the s
barrel o-ring every 3 months or 500 shots. Apply with a cotton swab
as shown in figure 11.
Apply a moly graphite EP grease to the sliding bolt mechanism every s
3 months or 500 shots.
Keep all petroleum-based lubricants away from the fill nipple. They s
MUST NOT be introduced into the high pressure reservoir.
WARNING:
Use of petroleum-based lubricants in this area could result in an explosion
resulting in personal injury.
DO NOT MODIFY OR ALTER YOUR AIRGUN. Attempts to modify the airgun in any way inconsistent s
with this manual may make your airgun unsafe to use, cause serious injury or death, and will void the
warranty.
If you drop your airgun, visually check to see that it works properly before you use it again. If anything s
seems changed, like a shorter or weaker trigger pull, this may mean worn out or broken parts. Call
Crosman customer service for assistance before using your airgun again.
WARNING:
Do not attempt to repair the airgun or to disassemble to correct an over fill
or valve lock. Parts can fly from the airgun at dangerous speeds when it is disassembled
while pressurized.
Rod
Pellet
10
11
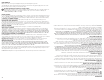
culata hasta la posición deseada. Apriete los tornillos de abrazadera para bloquearla en su posición.
s#UANDOHAYATERMINADOCONLOSAJUSTESALAPIEZAPARALAMEJILLAYOLAALMOHADILLAHORIZONTALDELACULATA,
apriete los tornillos de abrazadera.
s ALMOHADILLA DE LA CULATA- Verti-
cal: Con una llave Allen de 532, afloje
el tornillo de la almohadilla de la culata.
Deslice la almohadilla de la culata hacia ar-
riba o hacia abajo a la posición deseada.
almohadilla de la culata para cumplir con
algunos reglamentos de competencia que
prohíben el ajuste vertical de la almohadilla
de la culata. También se ha proporcionado
un puerto de visión para permitir la verifi-
cación visual del uso del perno de fijación
de la almohadilla de la culata. El perno de fi-
jación se encuentra dentro de la almohadilla
de la culata. Para ubicar el perno de fijación
de la culata en el interior de la almohadilla,
debe quitarse ésta.
s PARA BLOQUEAR LA ALMOHADILLA DE LA CULATA:
Vuelva a colocar la almohadilla de la culata. Insértelo y apriete el tornillo de la almohadilla de la culata.
7. Apuntar y disparar con seguridad
A. Apuntar el rifle de aire
s5STEDYLASDEMÉSPERSONASDEBENSIEMPre usar anteojos de tiro para proteger sus ojos.
algo que usted no tenía intención de tocar.
respaldo seguro. Debe colgarse una manta gruesa deTRÉS del respaldo para evitar rebotes en caso de que
no atine al respaldo.
Recuerde siempre colocar su blanco con cuidado. PIENSE en lo que puede golpear si no atina al blanco.
aguja del manómetro debe estar apuntando a un Érea en la zona verde del manómetro.
8. Extracción de un diábolo atorado
5NDIÉBOLOATASCADOESHABITUALMENTEresultado de los intentos de disparar el rifle de aire con la presión
demasiado baja. Antes de disparar el rifle de aire, asegúrese de que hay suficiente presión para su oper-
ación correcta. La aguja del manómetrODEBEESTARAPUNTANDOAUNÉrea en la zona verde del manómetro.
En este procedimiento meterá una baqueta de limpieza por el
cañón de un rifle de aire cargado. Es en extremo importante que mientras esté haciendo
esto el rifle de aire tenga el seguro activado (“ON SAFE”), que el cerrojo permanezca en
posición abierta y que mantenga el dedo apartado del gatillo. No respetar esta advertencia
podría causar lesiones graves o la muerte.
ADVERTENCIA:
la Sección 2A).
s!BRAELCERrojo tirando de él completamente hacia
atrÉs hasta que escuche dos clics.
sCon el cerrOJOENLAPOSICIØNMÉSTRASERAINSERTe
una baqueta del tamaño adecuado en el cañón
(empezando por la boca). Se puede dañar el cañón si no se usa una baqueta de limpieza del tamaño correcto.
deseCHEELDIÉBOLO. No vuelva a utilizar ese diÉbolo.
SAFE”) y dispare. Ponga el rifle de aire “ON SAFE” (Seguro activado).
emprenda ninguna otra acción. Crosman Corporation o una Estación
de servicio autorizada le desatascarÉn el rifle (no tiene costo durante el
período de garantía).
9. Mantenimiento de su rifle de aire
sPonga aceite de rECÉMAra de silicona Crosman (número de pieza RM-
COIL) en la junta tórica del cañón cada 3 meses o cada 500 disparos.
Aplíquelo con una torunda de algodón, como se muestra en la figura 11.
9B
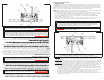
Pieza Para La Mejilla
Puerto De
Visión
Perno de
bloqueo de la
almohadilla de
la culata
Tornillos de
la almoha-
dilla de la
culata
Almohadilla
De La Culata
Tornillos De
Abrazadera
Espaciador De La
Almohadilla De
La Culata
BAQUETA
DIABOLO
10
11
6
6