
Owner's Manual

5. Cocking, Loading, Unloading and Un-cocking the Airgun
WARNING:
Use .177 caliber pellets only in your CH2009. Never reuse ammunition.
Use of any other ammunition can cause injury to you or damage to the airgun.
A. Cocking and Loading Pellets
Put the airgun “ON SAFE.” (See Section 2A).s
Point the airgun in a SAFE DIRECTION.s
s Be sure your airgun is properly pressurized (see section 3).
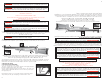
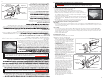
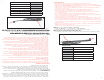
Open the bolt by pulling the bolt handle all the way back (fig 8).s
With the bolt in the rearward position, place one pellet, nose first, into s
the loading port (breech). This is a single shot pellet airgun. Load no
more than one pellet at a time.
Lightly push the pellet into the barrel by pushing the bolt handle all the s
way forward to lock. DO NOT jam the bolt forward. This will damage
your airgun.
Be sure the bolt is completely closed and locked before firing. If it is s
not closed and locked, the pellet may not be discharged.
B. Unloading Pellets and Un-cocking Your Air Gun
Unloading
The most common way to unload a pellet is to fire your airgun in a SAFE DIRECTION following the sec-s
tion on Aiming and Firing Safely. If a pellet has become lodged in the barrel follow the steps in section 8
removing a Jammed Pellet.
Un-cocking
To un-cock the action, take the airgun “OFF SAFE.” With the muzzle pointed in a SAFE DIRECTION, s
open the bolt and pull all the way to the rear. Holding the bolt handle securely, pull the trigger with your
other hand and ease the bolt as far forward as it will go with your hand. You may now release the bolt
and the airgun is un-cocked.
Put the airgun “ON SAFE”s
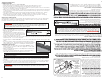
6. Adjusting The Stock
Your CH2009 is designed with a stock with an
adjustable cheek piece and butt pad.
Make sure the airgun is “ON SAFE.” (See Sec-s
tion 2A) and pointed in a SAFE DIRECTION.
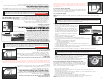
Loosen the two clamp screws located s
below the cheek piece using a 5/32 Allen
head wrench. (fig 9A)
CHEEK PIECE:s Pull up on the cheek piece
to adjust for height. To adjust the cheek
piece downward, place your hand on the
top of the cheek piece only and push down,
being careful not to pinch your fingers.
BUTT PAD- Horizontal:s Pull out on the
butt pad to desired position. Tighten the
clamp screws to lock into position.
When you are finished with the cheek piece s
and/or the horizontal but pad adjustments
tighten the clamp screws.
BUTT PAD- Vertical:s Loosen the butt
pad screw using a 5/32 Allen head
wrench. Slide the butt pad up or down
to desired position.
A butt pad locking pin has been pro-s
vided to comply with some competition
regulations that prohibit vertical butt
pad adjustment. A viewing port has
also been provided to allow for visual
verification of the use of the butt pad
locking pin. The locking pin is stored
inside the butt pad. To locate the lock-
ing pin on the inside of the butt pad,
the pad must be removed.
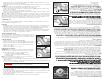
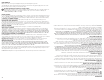
TO LOCK THE BUTT PAD:s (See fig
9B) Remove the butt pad to locate
the pin underneath. Remove the pin,
and insert in the top hole of the butt.
Replace the butt pad. Insert and tighten
the butt pad screw.
8
9A
Cheek Piece
Viewing Port
Butt Pad
Butt Pad Spacer
Clamp Screws
9B
Cheek Piece
Viewing Port
Butt Pad
Locking Pin
Butt Pad
Screw
Butt Pad
Clamp Screws
Butt Pad Spacer
NOTA: Si ha levantado la pieza para la mejilla, quizá tenga que bajarla para usar la herramienta de desgasado.
resorte del martillo como se muestra en la figura 6.
sienta resistencia. Esto indicará que la punta de la herramienta ha entrado en contacto con el martillo.
Realizar el procedimiento siguiente expulsará el aire del cañón a
gran velocidad. Asegúrese de que el rifle de aire esté apuntado en una DIRECCIÓN SEGURA.
ADVERTENCIA:
palanca para girar la herramienta en el sentido de las manecillas del reloj y forzar a que se abra la válvula
interna. Esto puede requerir aproximadamente 1 ó 2 vueltas completas para desgasar totalmente el rifle
de aire.
interferirá con la operación normal del mecanismo de disparo.
que se ha liberado toda la presión del rifle de aire.
5. Amartillado, carga, descarga y desamartillado del rifle de aire
Use únicamente diábolos de calibre .177 en el CH2009. Nunca
reutilice la munición. El uso de cualquier otro tipo de munición puede causarle lesiones o
dañar el rifle de aire.
ADVERTENCIA:
A. Amartillado y carga de los diábolos
sección 3).
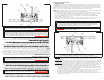
sCon el cerrojo en la posición más trasera, coloque un diábolo, empezando
por la nariz, en el puerto de carga (recámara). Éste es un rifle de aire de
diábolos de un solo tiro. No cargue más de un diábolo a la vez.
s)NTroduzca ligeramente el diábolo en el interior del cañón empujando
totalmente hacia delante la palanca del cerrojo, para asegurarlo en su
sitio. NO meta a la fuerza el cerrojo hacia delante. Esto podría dañar el
rifle de aire.
s#UIDEQUEELCERrojo esté totalmente cerrado y asegurado antes de disparar. Si no está cerrado y comple-
tamente bloqueado, el diábolo podría no dispararse.
B. Descarga de los diábolos y desamartillado de su rifle de aire
Descarga
e de aire en una DIRECCIÓN SEGURA
siguiendo las indicaciones de la sección sobre Apuntar y disparar con seguridad. Si un diábolo se atasca
en el cañón, siga los pasos de la sección 8 Extraer un diábolo atascado.
Desamartillado
en una DIRECCIÓN SEGURA, abra el cerrojo y tire completamente hacia atrás. Sosteniendo firmemente
la palanca del cerrojo, tire del gatillo con su otra mano y lentamente lleve hacia delante el cerrojo con la
mano tanto como avance. Ahora puede bajar el cerrojo y el rifle de aire estará desamartillado.
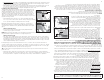
6. AJUSTE DE LA CULATA
Su CH2009 está diseñado con una culata que
tiene una pieza para la mejilla y una almohadilla
de cacha ajustables.
de aire (“ON SAFE”) (consulte la Sección 2A)
y que esté apuntado en una DIRECCIÓN
SEGURA.
tornillos de abrazadera que están situados
debajo de la pieza para la mejilla. (fig. 9A)
s PIEZA PARA LA MEJILLA: Tire hacia arriba
en la pieza para la mejilla con objeto de ajustar
la altura. Para ajustar hacia abajo la pieza para
la mejilla, coloque la mano en la parte superior
de la pieza para la mejilla y empuje hacia
abajo, cuidando de no pellizcarse los dedos.
s ALMOHADILLA DE LA CULATA-Horizon-
tal: Tire hacia fuera de la almohadilla de la
8
9A
Pieza Para La Mejilla
Puerto De
Visión
Almohadilla De
La Culata
Tornillos De
Abrazadera
Espaciador De La
Almohadilla De
La Culata
5
5