
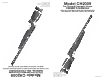
Owner's Manual
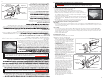

Slowly open the valve on your tank and start filling the gun SLOWLY. Filling too quickly will cause heat s
buildup that can affect accuracy of the fill pressure.
Watch the gauges on the airgun and your tank (if equipped) until the desired pressure is reached (1000-s
2000 psi)
DO NOT fill the airgun to more than 2000 psi. See “Overfill” information in section 3C.
Turn the valve on your tank off when the desired fill pressure is reached.s
Follow instructions with your tank and hose to BLEED the fill hose COMPLETELY to avoid hose whip s
from pressure in the fill hose
Disconnect the tank’s fill hose from the fill nipple on the airgun.s
Replace the cap over the fill nipple and tighten. Always keep the fill nipple capped to eliminate the pos-s
sibility of dirt entering the check valve.
TIP: If your airgun is being filled from completely empty (zero pressure) the tension of the hammer pressing
against the valve may keep the valve open which will cause air to leak down the barrel. This is most likely to
happen with a gun where the hammer spring is adjusted to a high rate. In the event this occurs try cocking
the bolt and leaving it in the rear (fully open) position to eliminate the force on the valve allowing it to close.
Always make certain the airgun is not loaded and there is not a pellet in the chamber.
C. Filling with CO
2
Refer to instruction manual included in FAH001 or FAH002 Fill Adapters. Read all instructions and warn-
ings included with the adaptor prior to use.
D. Overfill:
Over filling beyond the “as tuned” best fill pressure does not improve performance. It will actually lessen s
performance and may cause the valve to lock. If you discover that the airgun has been over filled, try to
dry fire the airgun (cock and shoot with no pellet loaded) in a SAFE DIRECTION until pressure on your
airgun drops to 2,000 psi or less depending on where your gun’s tuned best fill pressure is.
If the airgun will not discharge air with each shot, the valve may be completely pressure locked and will s
require use of the degassing tool included with your airgun. Follow the instructions included with the
degassing tool, or see section 4B on degassing tool method.
4. Depressurizing the airgun:
Your CH2009 airgun, like most PCP airguns, is best stored with some
pressure in the reservoir. This keeps the seals in the airgun forced against
the sealing surfaces. In the event you want or need to depressurize (e.g.
for service) follow the following steps:
A. Dry Fire Method:
Keep the air rifle pointed in a SAFE DIRECTION.s
Remove all the air from your air rifle by repeatedly cocking and dry-s
firing with the air rifle pointed in a SAFE DIRECTION until the pressure
gauge on your airgun shows no pressure and air cannot be heard
when the shot is fired.
Put the air gun “ON SAFE” see section 2A.s
B. Degassing tool method:
CAUTION: Failure to ensure the gun is NOT cocked when using the de-
gassing tool WILL cause damage to the sear mechanism in the trigger.
Make certain the airgun is not in the cocked position by:s
o Pointing the airgun in a SAFE DIRECTION.
o Closing the airgun bolt by sliding forward and latching.
o Pulling the trigger.
Note: If you have raised your cheek piece, you may need to lower the
cheek piece in order to use the degassing tool.
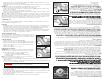
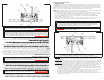
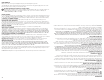
Insert the degassing tool, (included with your CH2009), into the hammer spring adjustment knob as s
shown in figure 6.
Turn the tool in to the airgun in a clockwise direction until resistance is felt. This will indicate the nose of s
the tool has come in contact with the hammer.
WARNING:
Performing the following procedure will exhaust air from the barrel at a high
rate. Make certain the airgun is pointed in a SAFE DIRECTION.
Using an Allen wrench or screwdriver through the hole in the degassing tool apply leverage to turn the s
tool clockwise and force the internal valve open. This may require approximately 1-2 complete turns to
totally degas the airgun.
Remove the degassing tool completely from the airgun. Leaving the tool in the airgun will interfere with s
the normal operation of the firing mechanism.
Cock the airgun and dry-fire (no pellet) in a SAFE DIRECTION to make certain all pressure has been s
relieved from the airgun
Check the gauge to make certain all pressure has been relieved from the airgun.s
6
7
B. Presurizar (llenar) el rifle de aire con un tanque
El CH2009 puede llenarse con un tanque de alta presión (botella) como
el Benjamin HPB3K. Utilice el adaptador universal de llenado Crosman
FAH002 con esta opción. También pueden utilizarse tanques de buceo
autónomo para esta tarea. En el caso de los tanques de buceo, utilice el
adaptador de yugo para tanques de buceo Crosman FAH003.
s!SEGÞrese de utilizar protección para los ojos
(Vea la sección 5 para obtener instrucciones sobre cómo descargar y
desamartillar.)
s,EATODASLASINSTRUCCIONESQUEVIENENCONSUTANQUEYADAPTADORDe
manguera, para familiarizarse con su operación.
NOTA: el aditamento debe ser un aditamento de desconexión rápida Foster #12FS.
rápido ocasionará una acumulación de calor que puede afectar la precisión de la presión de llenado.
presión deseada (1000-2000 psi)
NO llene el rifle de aire a más de 2000 psi. Vea la información sobre “Llenado en exceso” en la sección 3C.
s#IERre la válvula de su tanque cuando se llegue a la presión de llenado deseada.
s3IGALASINSTRUCCIONESQUEVIENENCONSUTANQUEYMANGUERAPARA052'!2LAMANGUERADELLENADo
COMPLETAMENTE para evitar que latiguee por tener presión.
s$ESCONECTELAMANGUERADELLENADODELTANQUEDELNIPLEDELLe
sVuelva a colocar el tapón sobre el niple de llenado y apriételo. Mantenga siempre el niple de llenado
tapado para eliminar la posibilidad de que entre suciedad a la válvula de retención.
SUGERENCIA: Si está llenando su rifle de aire estando éste totalmente vacío (presión cero), la tensión del
martillo presionando contra la válvula puede mantener la válvula abierta, lo que hará que escape aire hacia el
cañón. Es más probable que esto ocurra con un rifle en el que el resorte del martillo esté ajustado a una alta
proporción. En caso de que esto ocurra, intente amartillar el cerrojo y dejarlo en posición trasera (totalmente
abierto) para eliminar la fuerza sobre la válvula, permitiéndole cerrarse. AsegÞrese de que el rifle de aire no
esté cargado y no tenga un diábolo en la recámara.
C.Llenado con CO
2
Consulte el manual de instrucciones incluido en los adaptadores de llenado FAH001 o FAH002. Antes de
usar el adaptador, lea todas las instrucciones y advertencias que vienen con él
D. Llenado en exceso:
-
peño. De hecho, puede disminuir el desempeño y ocasionar que se bloquee la válvula. Si descubre que
se ha llenado en exceso el rifle de aire, intente dispararlo en seco (amartille y dispare sin cargar diábolos)
en una DIRECCIÓN 3%'52!HASTA que la presión de su rifle de aire caiga a 2,000 psi o menos, dependi-
endo de cuál sea la mejor presión de llenado afinada de su rifle.
la presión y requerirá el uso de la herramienta de desgasado incluida con su rifle de aire. Siga las instruc-
ciones incluidas con la herramienta de desgasado o vea la sección 4B sobre el método de la herramienta
de desgasado.
4. Despresurizar el rifle de aire
Su rifle de aire CH2009, como la mayoría de los rifles de aire PCP, es mejor
guardarlo con algo de presión en el depósito. Esto mantiene los sellos del
rifle de aire presionados contra las superficies de sellado. En caso de que
desee o tenga que despresurizar (por ejemplo, para darle servicio), siga los
pasos que aparecen a continuación:
A. Método de disparo en seco:
repetidamente con el rifle apuntado en una DIRECCIÓN 3%'URA hasta
que el manómetro de su rifle de aire muestre que no hay presión y no se
pueda escuchar aire cuando se hace el disparo.
B. Método de la herramienta de desgasado:
PRECAUCIÓN: No asegurarse de que el rifle NO esté amartillado al usar
la herramienta de desgasado PROVOCARÁ daños al mecanismo del fiador
en el gatillo.
o Apuntando el rifle de aire en una DIRECCIÓN SE'5RA.
o Cerrando el cerrojo del rifle de aire deslizándolo hacia delante y
asegurándolo.
o Tirando del gatillo.
5
6
7
4
4