
User Manual


5
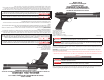
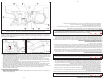
a. Riel cola de milano de 3/8”(mira Williams
®
)
ºAfl oje el tornillos de fi jación en el lado derecho de la mira hasta que el interior del tornillo quede alineado
con el interior de la mira. Fig. 6A
ºAfl oje el tornillo en la parte superior de la mira apenas lo sufi ciente como para deslizar por completo el
tornillo (y la montura acoplada) hacia la derecha.
º Deslice la mira en la parte posterior
del arma, de modo que la muesca u
óptica quede hacia la parte posterior
del arma.
º Apriete bien el tornillo superior para
evitar inclinar el riel al ajustar los dos
tornillos de fi jación.
º Apriete los dos tornillos de fi jación.
º Apriete el tornillo superior.
º Siga el procedimiento para ajustar el
arma según las instrucciones de la
mira.
b.Ranura tipo cola de milano más
delgada (mira LPA
®
)
ºAfl oje los dos tornillos hexagonales
de la mira (observe los dos agujeros
pequeños en la parte superior de la
mira). Fig 6B
º Deslice la mira hacia la cola de milano
más delgada y el centro del arma.
º Ajuste los dos tornillos hexagonales.
º Siga el procedimiento para ajustar el arma según las instrucciones de la mira.
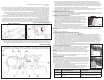
6. Extracción de un perdigón atascado
Por lo general, un perdigón se atasca cuando se intenta disparar la pistola de aire a una presión muy baja.
Antes de disparar la pistola de aire, asegúrese de que haya presión sufi ciente para una operación adecuada.
Para ello, verifi que que la aguja del manómetro señale el área que se encuentra entre 1000 y 3000 psi.
Para realizar este procedimiento coloque una baqueta de limpieza en el cañón
de la pistola de aire cargada. Es de suma importancia que mientras realice este procedimiento el seguro
de la pistola de aire se encuentre activado (“ON SAFE”), que el cerrojo permanezca abierto y que su
dedo se mantenga alejado del gatillo. De lo contrario, podría causar lesiones graves e incluso la muerte.
• Apunte la pistola en una DIRECCIÓN
SEGURA.
• Active el seguro de la pistola de aire
(“ON SAFE”) (consultar la sección 2A).
• Abra el cerrojo tirando de la palanca del
cerrojo hacia arriba y completamente
hacia atrás.
• Con el cerrojo en la posición más
retrasada, introduzca una baqueta
del tamaño adecuado en el cañón
(empezando por la boca). (Fig. 6) Es
posible que se dañe el cañón si no usa
una baqueta de limpieza del tamaño
adecuado.
Nota: El cerrojo debe estar montado y abi-
erto para que el perdigón atascado despeje
la recámara al ser expulsado por la baqueta.
• Con la baqueta, empuje el perdigón hacia el puerto
de carga de perdigones (frente del cerrojo), quite
y descarte el perdigón. No vuelva a usar dicho
perdigón.
• Apunte la pistola en una DIRECCIÓN SEGURA.
Cierre, desactive el seguro (“OFF SAFE”) y dispare.
• Active el seguro de la pistola de aire (“ON SAFE”) (consultar la sección 2A).
• Si no puede desatascar la pistola de aire con este procedimiento, no emprenda
ninguna otra acción. Crosman Corporation o una Estación de Servicio Autorizada
lo ayudará a desatascar su pistola de aire. (Sin costo alguno durante el período
de garantía)
Fig. 6A
tornillos
hexagonales
tornillos
Fig. 6B
tornillos
hexagonales
Fig. 7
Fig. 7
Fig. 8
Fig. 8
5
6. Removing a Jammed Pellet
A jammed pellet is usually the result of trying to fi re the airgun when the pressure is too low. Before fi ring the
airgun make certain there is suffi cient pressure for proper operation, by making sure the gauge needle is
pointing to the area between 1000 and 3000 psi.
WARNING:
In this procedure you will put a cleaning rod down the barrel of a charged airgun. It is
extremely important that while you are doing this the airgun be “ON SAFE”, the bolt remains in open
position and that your fi nger be kept away from the trigger. Failure to follow this warning may result in
serious injury or death.
• Point the airgun in a SAFE DIRECTION.
• Put the airgun “ON SAFE” (see section 2A.)
• Open the bolt by pushing the bolt handle up and
pulling it all the way back.
• With the bolt in the rearward position insert a
ramrod of the proper size into the barrel (start at the
muzzle). (fi g. 6) The barrel could be damaged if the
proper sized cleaning rod is not used.
Note: The bolt must be cocked and open for the jammed pellet to clear the
breech when it is pushed out by the ram rod.
• Using the ramrod push the pellet into the pellet loading port (forward of the
bolt), remove and discard the pellet. Do not reuse that pellet.
• Point the airgun in a SAFE DIRECTION. Close the action take “OFF SAFE” and fi re.
• Put the airgun “ON SAFE” (see section 2A.)
• If you are not able to unjam your airgun by following this procedure, take no
further action. Crosman Corporation or an Authorized Service Station will
unjam your airgun. (no cost during the warranty period)
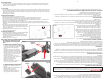
7. Maintaining Your Airgun
WARNING:
Use of petroleum-based lubricants in the pressure reservoir could result in an explo-
sion resulting in personal injury.
• Keep all petroleum-based lubricants away from the fi ll nipple. They MUST NOT be introduced into the high
pressure reservoir.
• Apply Crosman silicone chamber oil (part number RMCOIL) on the bolt o-ring every 3 months or 500
shots (fi g. 7)
• Apply a moly graphite EP (Extreme Pressure) grease to the sliding bolt mechanism every 3 months or 500 shots.
DO NOT MODIFY OR ALTER YOUR AIRGUN. Attempts to modify the airgun in any way inconsistent with
this manual may make your airgun unsafe to use, cause serious injury or death, and will void the warranty.
If you drop your airgun, visually check to see that it works properly before you use it again. If anything seems
changed, like a shorter or weaker trigger pull, this may mean worn out or broken parts. Call Crosman cus-
tomer service for assistance before using your airgun again.
WARNING:
Do not attempt to repair the airgun or to disassemble to correct an over fi ll or valve
lock. Parts can fl y from the airgun at dangerous speeds when it is disassembled while pressurized.
8. Changing the Bolt Direction
The bolt direction on your 1701P Silhouette PCP pistol is capable of being changed to the opposite hand. The
1701P is factory assembled to accommodate a right handed Silhouette shooter by having the bolt pointing
left. This allows cocking of the bolt and loading pellets with the left hand while maintaining the grip hold with
the right. Disassembly of the Breech and Barrel assembly from the Reservoir Tube assembly is required to ac-
cess the parts contained within the Breech that facilitate the change to the opposite hand. Crosman Corpora-
tion recommends the use of an approved Service Station to perform the change. An approved Service Station
may be found through www.crosman.com or by calling Customer Service at 1-800-724-7486.
9. Advanced Tuning Techniques
A. Adjusting the Trigger (Overview)
The Marauder pistol trigger assembly can be adjusted to achieve a variety of trigger profi les. It has been fac-
tory set for a two stage profi le but can also be changed to a single stage. Unless you are experienced in mak-
ing such adjustments, Crosman recommends that adjustments to factory settings be made only by a qualifi ed
gunsmith after reading all instructions.
WARNING:
Adjusting the trigger assembly can result in a light trigger pull and or decreased sear
engagement that could make the gun more susceptible to discharge when dropped or jarred WITH OR
WITHOUT THE SAFETY ENGAGED. Make only the adjustments identifi ed in this manual.
NOTE: These adjustment features are for advanced shooters. Most shooters can use the factory settings and
should not need to make modifi cations.
• Put the air pistol“ON SAFE”, remove the clip and keep the air pistol pointed in a SAFE DIRECTION.
• Depressurize the air pistol (see section 3D).
• Remove the right side Grip Screw and Grip using a straight blade screw driver.
Fig. 7
Fig. 7
Fig. 8
Fig. 8