
User Manual


4
B. Unloading Pellets
• The most common way to unload a pellet is to fi re your airgun in a SAFE DIRECTION following section
5 on Aiming and Firing Safely. If a pellet has become lodged in the barrel follow the steps in section 6
Removing a Jammed Pellet.
C. Un-cocking
• To uncock the action, take the airgun “OFF SAFE.” With the muzzle pointed in a SAFE DIRECTION, open
the bolt and pull all the way to the rear. Holding the bolt handle securely, pull the trigger with your other
hand and slowly ease the bolt as far forward as it will go with your hand. You may now lower the bolt and
the airgun is un-cocked.
• Put the airgun “ON SAFE”.
5. Aiming and Firing Safely
• Always point your airgun in a SAFE DIRECTION.
• Follow the instructions for fi lling the air gun (section 3) and loading pellets (section 4A).
• You and others with you should always wear shooting glasses to protect your eyes.
• Do not shoot at hard surfaces or at the surface of water. The pellet may bounce off or ricochet and hit
someone or something you had not intended to hit.
• Always choose your target carefully. It is best to shoot at paper bull’s-eye targets attached to a safe
backstop. A heavy blanket should be hung behind the backstop to prevent ricochet should you miss the
backstop.
• Your airgun is designed for target shooting and is suited
for both indoor and outdoor use. Always remember to
place your target carefully. THINK about what you will hit
if you miss the target.
• Before fi ring the airgun make certain there is suffi cient
pressure for proper operation.
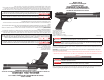
A. Front sight adjustment
• The front sight can be rotated to provide the desired sight
picture with a variety of rear sight notch widths.
• To adjust, loosen the set screw labeled “A” in fi gure 5
and rotate the front sight blade by hand to achieve the
desired sight picture.
• Tighten setscrew “A” to secure.
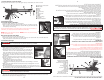
B. Rear Sight Assembly-(THE REAR SIGHT IS NOT INCLUDED WITH THIS PRODUCT)
• The receiver is designed to accept
two confi gurations of sight attach-
ment
a. 3/8th dovetail rail (Williams
®
sight)
º Loosen the set screws on the right side
of the sight until the inside of the screw
is fl ush with the inside of the sight.
Fig. 6A
º Loosen the screw on top of the sight
just enough to slide the screw (and the
attached mount) all the way to the right.
º Slide the sight on the back of the gun,
so that the notch or peep is toward
the back of the gun.
º Tighten the top screw to snug to
prevent canting on the rail while tight-
ening the two set screws
º Tighten the two set screws
º Tighten the top screw
º Follow the procedure for sighting in
the gun per sight instructions
b. Tapered dovetail groove (LPA® sight)
º Loosen the two sight hex screws.
Fig. 6B
º Slide the sight into the tapered dove-
tail and center on the gun
º Tighten the two hex screws
º Follow the procedure for sighting in
the gun per the sight instructions
Fig. 5
Fig. 5
Fig. 6A
sight hex
screws
screw
sight hex
screws
Fig. 6B
4
• Si no puede liberar la presión de la pistola usando el proceso de disparo en seco, podría darse un caso
de bloqueo de la válvula. En esta situación se requiere el uso de la herramienta de desgasifi cación
PCPDT4 que se encuentra disponible en www.crosman.com; o bien, puede contactar al Centro de Aten-
ción al Cliente de Crosman al 1-800-724-7486.
4. Montado, Carga, Descarga y Desmontado de la Pistola de Aire
En la pistola de aire use solamente perdigones de calibre .177 Nunca reutilice una
munición. El uso de una munición diferente podría causar lesiones personales o hacer que la pistola de aire
se dañe.
A. Montado y carga de perdigones
Active el seguro de la pistola de aire (“ON SAFE”) (consulte la sección 2A) y apunte en una DIRECCIÓN
SEGURA.
Asegúrese de que su pistola de aire se encuentre correctamente presurizada (consulte la sección 3).
Abra el cerrojo tirando de la palanca del cerrojo hacia arriba y completamente hacia atrás. Con el cerrojo en
la posición más retrasada, coloque un perdigón, empezando por la nariz, en el punto de carga. Esta es una
pistola de aire de perdigones de un sólo tiro. No cargue más de un perdigón a la vez.
Empuje ligeramente el perdigón hacia el interior del cañón, cerrando el cerrojo y empujando la palanca hacia
abajo para asegurarlo. NO golpee el cerrojo hacia adelante. Esto dañará su pistola de aire.
Asegúrese de que el cerrojo esté cerrado y trabado antes de disparar. De lo contrario, podría no descargarse
el perdigón.
B. Descarga de los perdigones
La forma más habitual de descargar un perdigón es disparar su pistola de aire en una DIRECCIÓN SEGURA
siguiendo las indicaciones de la sección 5 sobre Cómo apuntar y disparar de forma segura. Si un perdigón
ha quedado atascado en el cañón, siga las indicaciones de la sección 6 sobre Cómo quitar un perdigón
atascado.
C. Desmonte
Para desmontar la pistola, desactívele el seguro (“OFF SAFE”). Con la boca apuntando en una DIRECCIÓN
SEGURA, abra el cerrojo y tírelo totalmente hacia atrás. Sosteniendo fi rmemente la palanca del cerrojo, tire el
gatillo con la otra mano y lentamente suelte el cerrojo hacia adelante tal como se desplazaría con su mano.
Ahora puede llevar el cerrojo a la posición inferior y habrá logrado desmontarla.
Active el seguro de la pistola de aire (“ON SAFE”).
5. Apuntar y disparar de forma segura
• Siempre apunte su pistola de aire comprimido en una
DIRECCIÓN SEGURA.
• Siga las instrucciones para llenar la pistola de aire (sec-
ción 3) y cargar los perdigones (sección 4A).
• Usted y quienes lo acompañen siempre deben usar
gafas de tiro para protegerse los ojos.
• No dispare hacia superfi cies duras o hacia la superfi -
cie del agua. El perdigón puede rebotar o impactar en
alguien o algo que usted no tenía intención de impactar.
• Siempre elija su blanco con cuidado. Es recomendable
disparar contra blancos de papel fi jos a un respaldo
seguro. Debe colgarse una manta gruesa detrás del
respaldo para evitar rebotes en caso de que no acierte
al respaldo.
• Su pistola de aire está diseñada para tiro al blanco y
es adecuada para su uso en interiores y exteriores. Recuerde siempre colocar su blanco con cuidado.
PIENSE en lo que podría impactar si no acierta al blanco.
• Antes de disparar la pistola de aire, asegúrese de que hay presión sufi ciente para llevar a cabo una oper-
ación correcta.
A. Ajuste del guión
• El guión se puede girar para proveer la imagen del blanco deseada con una variedad de anchos de la
muesca del alza.
• Para ajustar, afl oje el tornillo de fi jación con la etiqueta “A” en la fi gura 5 y gire la hoja del guión manual-
mente para lograr la imagen del blanco deseada.
• Ajuste el tornillo de fi jación “A” para asegurar.
B.Conjunto de alza (EL ALZA NO SE INCLUYE CON ESTE PRODUCTO)
• La corredera está diseñada para aceptar dos confi guraciones del acople de la mira
Fig. 5
Fig. 5