
Instructions / Assembly


4
#1
x1
#5
x5
#4
#6
x1
x2
#7
x1
#3
x2
#1
x3
#5
x7
#4
#6
x1
x2
#7
x1
#2
x2
#7
#1
#5
#7
#3
#5
#5
#4
#6
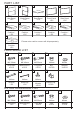
Step 3.
short bolts (part #1), long bolts (part #3),washers (part #5) ,nuts (part #4),
wrench (part #6) and allen key (part #7).
NOTE:Please do not fully tighten bolts until unit is fully assembled.
Attach front panel (part D) to arm panel (part A) and seat panel (part C) using
#7
#1
#5
#5
#4
#6
#7
#2
#5
Step 4.
,medium bolts (part #2),washers (part #5) ,nuts (part #4) ,wrench (part #6)and
allen key (part #7).
NOTE: Please fully tighten all bolts at this time.
Attach side panel (part E) to assembled unit (parts B ,C&D) using short bolts (part #1)