Express Crock Multi-Cooker User Guide CPE200 CPE200_18EM3.
CPE200_18EM3.
Contents Crock-Pot's Safety Precautions 1-2 Features of your Express Crock 3-4 Things to know about your Express Crock 5-6 Using your Express Crock 7 Time Delay Function 8 Pressure Cooking 9 - 11 Slow Cooking 12 Cooking Guide 13 Steaming 14 - 15 Brown/Sauté 16 Rice/Risotto 16 - 17 Care & Cleaning 18 - 20 Troubleshooting & Notification Codes Hints & Tips 21-22 23 Important Instructions - retain for future use CPE200_18EM3.
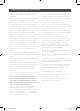
Crock-Pot's Safety Precautions • • • • • • • • • • • • • SAFETY PRECAUTIONS FOR YOUR MULTI COOKER. Do not plug in or switch on the unit without having the cooking pan inside the unit. Do not operate the unit on an inclined surface Use your unit well away from walls and curtains, and don’t use in confined spaces. Check the pressure and steam release valve before use, and if clogged clean as necessary. Do not operate the unit without food or liquid in the cooking pan.
Crock-Pot's Safety Precautions • • • • • • • • • Crock-Pot is very safety conscious when designing and manufacturing consumer products, but it is essential that the product user also exercise care when using an electrical appliance. Listed below are precautions which are essential for the safe use of an electrical appliance: Read carefully and save all the instructions provided with an appliance. Always turn the power off at the power outlet before you insert or remove a plug.
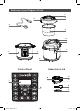
Features of your Express Crock C D B A E H I F J G K Control Panel Underside of Lid N O L PRESSURE COOK M P Q R S 3 CPE200_18EM3.
Features of your Express Crock A. Power Cord Removable power cord for added flexibility and ease of storage. B. Lid Lock Pin Acts as safety feature to ensure lid is secured properly before pressure starts to build during cooking. C. Lid Handle Comfortable and easy to grip handle allows removal of the lid and convenient way to carry the Express Crock. D. Lid Locks securely to the Heating Base during cooking. Cannot be unlocked until all pressure inside the unit has been released.
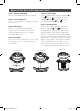
Before First Use of the Express Crock Step 1. Remove Packaging Ensure all packaging has been removed. Step 2. Position Machine Place the Heating Base facing you on a dry, level surface. Step 3. Wash Parts Wash the Cooking Pot and Lid and Condensation Collector in warm water using a mild detergent. Dry each part thoroughly before use. Step 4. Assembly Insert the Power Cord into the Power Cord Port and insert the Cooking Pot into the Heating Base. Locked Lid Step 5.
Things to know about your Express Crock The Express Crock Multi-Cooker has been designed with safety in mind and has various safety measures. • Pressure will not build if the Lid is not shut correctly and has not sealed. • Ensure Lid is in the completely locked position and the is aligned with . • Pressure will not build if the Steam Release Valve has not been switched to the Seal “ ” position. • Over filling may cause a risk of clogging the vent pipe and developing excess pressure.
Using your Express Crock Note: The Multi-Cooker beeps as each button is pressed. • Add desired ingredients to Cooking Pot. Place Lid on top of Multi-Cooker and align with . To lock, twist counterclockwise, aligning with . • Plug provided Power Cord into the Power Cord Port of the Multi-Cooker. • Plug other end of the Power Cord into a wall power outlet. • Select the cooking function you would like to use. • The START/STOP button and the time on the screen will flash.
Time Delay Function This Multi-Cooker allows you to delay the start of your cooking so that cooking finishes when you need it. Note: The DELAY TIMER function is not available on the BROWN/SAUTÉ, KEEP WARM, or YOGURT settings. Note: Do not use the DELAY TIMER function when the recipe has perishable ingredients such as meat, fish, eggs, or dairy, as these may spoil. • Adjust the Multi-Cooker settings using the instructions on pages 9-17. • After setting the cooking time, press the DELAY TIMER button.
Cooking Pot Markings Inside the removable Cooking Pot are markings to guide the fill level of the Cooking Pot. The word MAX indicates the maximum fill line. The 1/3, 1/2, and 2/3 markings are handy guides to use in your recipes. CAUTION: Never load the Cooking Pot above the maximum ingredient level line marked MAX on the inside of the Cooking Pot. Foods that expand during cooking (e.g. rice) should never go above the 1/2 mark. MAX 2 3 1 2 1 3 Note: The Multi-Cooker cannot pressure cook without liquid.
Using the Pressure Cooking functions Place the Multi-Cooker on a flat, level surface. Place Cooking Pot inside Heating Base. Plug the Multi-Cooker into a wall outlet. The MultiCooker will beep, and the Display Screen will illuminate with four dashes (- - - -). • Place your food and liquid inside the removable Cooking Pot. • Place the Lid onto the Multi-Cooker and align with . To lock, rotate counterclockwise to the LOCKED position.
Releasing Pressure at the End of Cooking Natural Pressure Release Method: After cooking cycle is complete, let MultiCooker naturally release pressure through the Bobber Valve. Unit will gradually cool down on its own. Wait at least 10 minutes after cooking has completed. If using a higher volume of food and liquid, this can take up to 20 minutes. And then, using a kitchen utensil, gradually flick the tab on the Steam Release Valve to the “Release” position (see Figure 4).
Slow Cooking LOW Setting: This is suitable for simmering and slow cooking. Recommended cooking times in LOW are from 6 to 8 hours. HIGH Setting: This is for faster cooking. Recommended cooking times in HIGH are from 2 to 4 hours. KEEP WARM Setting: When cooking time is completed, the Multi-Cooker automatically switches to the KEEP WARM setting to prevent overcooking and to keep your cooked food warm until serving - perfect for busy families, those on the run and those who need flexible meal times.
Cooking Guide Cooking Function Default Setting Pressure Adjustments Temperature Adjustments Cook Time Range SLOW COOK High temp / 4 hours N/A Low-High 30 minutes – 20 hours STEAM High pressure / 10 minutes Low-High N/A 3 minutes - 1 hour BROWN/ SAUTÉ High temp / 30 minutes N/A Low-High 5 minutes - 30 minutes KEEP WARM Warm temp / 4 hours N/A Warm 30 minutes – 4 hours MEAT/STEW High pressure / 35 minutes Low-High N/A 5 minutes - 2 hours BEANS/ CHILI High pressure / 20 minutes
Steaming The STEAM function is perfect for gently steaming fish and vegetables. It is pre-programmed to use the HIGH pressure cooking setting. When steaming, use the Steaming Rack. Capacity: When the Multi-Cooker is used with the STEAM function, the maximum capacity of liquid should be just under the rack wires, so that the liquid is not touching the food. Note: The unit cannot pressure cook without liquid. Ensure a minimum of 250ml of liquid is used inside the removable Cooking Pot.
Steaming Chart Food Amount Amount of water Asparagus 250g 400ml trim woody ends 2 Broccoli 300g 400ml trim stalks 2 Brussel Sprouts 400g 400ml peel outer leaves, leave whole 4 1 whole, 900g-1kg 400ml cut in half, remove seeds, slice into 6 7 Carrots 500g 400ml sliced into 1 cm rounds 5 Carrots and Swede 600g 400ml peel and cut into similar sized pieces 6 Cauliflower 500g 400ml cut into 5cm florets 3 Corn on the Cob 2 400ml remove any outer leaves 3 Frozen Chunky Veg
Using the BROWN/SAUTÉ Function This setting does not cook under pressure. It works similarly to standard cooking, requiring dry heat, and therefore does not need the Lid. Important: Do not use the Lid with this function. Place the Multi-Cooker on a flat, level surface. Place Cooking Pot inside Heating Base. Plug the Multi-Cooker into a wall outlet. The MultiCooker will beep, and the Display Screen will illuminate with four dashes (- - - -).
Using the RICE/RISOTTO Function Place the Multi-Cooker on a flat, level surface. Place Cooking Pot inside Heating Base. Plug the Multi-Cooker into a wall outlet. The MultiCooker will beep, and the Display Screen will illuminate with four dashes (- - - -). • Measure the desired quantity of rice. Note: 1 cup uncooked white rice = 2 cups of cooked white rice (approximately). 1 cup uncooked brown rice = 2 cups cooked brown rice (approximately).
To Change a Setting It’s easy to switch functions during cooking. Press the START/STOP button and then select the new desired cooking function. A new timer will flash on the Display Screen, and the selected function will also flash. Select the desired time, pressure, and/or temperature. Press the START/STOP button and the new function will begin preheating. To Change the Cooking Time You can change the cooking time before cooking begins by pressing the + and buttons before pressing START/STOP.
Care & Cleaning If food sticks or burns to the surface of the Cooking Pot, then fill it with hot soapy water and let it soak before cleaning. Use a rubber or nylon spatula to remove stubborn residue. If scouring is necessary, use a non-abrasive cleaner and a nylon scouring pad or brush. Hand wash the Cooking Pot with mild detergent in warm water to protect the inner coating. Note: Cooking Pot is dishwasher safe however the outer aluminium finish may discolour over time.
Care & Cleaning Bobber Valve Gently press the valve up and down 2-3 times and ensure it is clear from debris before you begin using the Multi-Cooker. Lid Lock Pin Gently press the pin and ensure it is clear from debris before you begin using the MultiCooker. Note: Condensation may collect inside the Heating Base under the removable Cooking Pot. This is normal. Allow to cool, and then dry using kitchen cloth. Note: Always make sure that each component (pot, valves, gasket, etc.
Troubleshooting Subject Power Question My Multi-Cooker will not turn on Solution Make sure outlet is functioning properly Check that the Multi-Cooker is plugged in Call Customer Service on 1300 881 861 (Aus), 0800 786 232 (NZ) Doneness of food My food was undercooked Make sure you selected the proper cooking setting Make sure the Lid is properly placed and locked, and that Steam Release Valve in “Seal” (closed) position.
Notification Codes Error Solution “CLOSE LID” blinking light Ensure that the Lid is closed completely and in the LOCKED aligning with . Display “E1” The Multi-Cooker will stop the cooking cycle. Unplug Multi-Cooker and contact service center. Display “E2” The Multi-Cooker will stop the cooking cycle. Unplug Multi-Cooker and contact service center. Display “E3” The Multi-Cooker will stop the cooking cycle. Unplug Multi-Cooker, and allow to cool down completely.
Hints & Tips With your Express Crock you can create a large variety of delicious meals, snacks and desserts. Various foods take different times to cook perfectly, so sometimes it may take some trial and error to get the cooking times right for you. • Please refer to your Express Crock user guide when using your Multi-Cooker. • Never fill the Cooking Pot past the MAX line. • Do not leave Multi-Cooker plugged in when not in use. • Make sure Multi-Cooker is kept away from cabinets and walls when in use.
CPE200_18EM3.
Need help with your appliance? Contact our Customer Care Team or visit our website for information and tips on getting the most from your appliance. AUSTRALIA Visit: www.crockpot.com.au Phone: 1300 881 861 Mail: Units 5 & 6, 13 Lord Street, Botany NSW 2019 NEW ZEALAND Visit: www.crockpot.co.