
Specifications


28
7.4 OUTPUT CODE DESCRIPTIONS, CONT’D…..
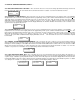
3232 “REMOTE ANALOG OUTPUT ADDRESS INITIALIZATION”: This code allows the user to add remote analog output module(s) to
a PDC system by setting the digital ID (address) so the PDC will recognize it. The device must be installed, wired and powered up to accom-
plish this. To achieve this, input code “3232” and the LCD will look like the box below. At this point, someone must walk over and push the
small white button located on the bottom left corner of all the remote analog output module boards. The ID code-1 indicate on the LCD will
automatically advance to “2”. If more than one analog output module has been installed, walk to the next output module and press the small
white button on it. This causes the ID code to advance to “2”. Repeat this procedure for each installed output module. Next, use the “1” button
to scroll down to “Done” on the LCD then push the “2” button. The LCD indicates ‘Wait” while it acknowledges the new ID coded device(s).
3231 “ENABLE 4 - 20 MA ANALOG OUTPUT MODULE”: This code allows the user to enable or disable any analog output modules
(M/N RAO-8) attached to the system. To achieve this, input code ‘3231 and the LCD looks like the box below. Use button “1” to select “No” or
button “3” to select “3”. Then push button “2” to scroll to DAC 002 and perform the same operation. Pressing button “2” after DAC 008 moves
the user out of the menu and back to normal scrolling.
3112 “MONITORING CHANNEL(S) FOR 4 - 20 MA OUTPUT MODULE”: This code allows the user to select which channels each 4-20
mA output of the analog output module will monitor. To achieve this enter “3112” and the LCD will look like the box below. Press “2” to select
the first channel to monitor. If no other channels are to be monitored by this output, push button “2” again until the LCD indicates “done”. Press
button “2” once again to scroll to analog output 2. Repeat these steps for each output channel.
1321 “SETTING LOW (NULL VALUE) FOR 4 - 20 mA OUTPUT MODULE”: This code allows the user to set a value representing the
4.00 mA output. Example: Typically 4.00 mA would represent “0” ppm or “0” % LEL gas, so the user would set this value to “0”. To achieve this,
input code “1321” and the LCD will look like the box below. Use the “1” button to decrement the value or the “3” button to increment the value.
When you have set the value to the desired number, push the ‘2” button and the menu scrolls to the next DAC output. Once you have set a
value for all eight outputs, the display will indicate “wait” then go back to normal monitoring and scrolling all enabled channels. The settable
scale is 0 to 100 representing 0 to 100% of the signal. NOTE: DAC = Digital to Analog Converter
1322 “SETTING HIGH (SPAN VALUE) 4 - 20 mA OUTPUT MODULE”: This code allows the user to set a value representing the 20.0
mA output. Example: Typically 20.0 mA could represent “200” ppm or “100” % LEL gas, so the user would set this value to “200” or “100”. To
achieve this, input code “1322” and the LCD will look like the box below. Use the “1” button to decrement the value or the “3” button to in-
crement the value. When you have set the value to the desired number, push the ‘2” button and the menu scrolls to the next DAC output. Once
you have set a value for all eight outputs, the display will indicate “wait” then go back to normal monitoring and scrolling all enabled channels.
The settable scale is 0 to 100 representing 0 to 100% of the signal.
1331 “CALIBRATING LOW (NULL) OF 4 - 20 mA OUTPUT MODULE”: This code allows the user to calibrate the “Null” (4.00 mA) out-
put of the DAC. To achieve this, the user must use an accurate digital multi-meter.
1332 “CALIBRATING HIGH (SPAN) OF 4 - 20 mA OUTPUT MODULE”: This code allows the user to calibrate the “ Span” (20.0 mA)
output of the DAC. To achieve this, the user must use an accurate digital multi-meter.
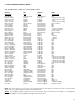
DA 001 MENU 3112
Mon Channel 1
DA 001 Menu 1321
Null Value 0
DA 001 Menu 1322
Span Value
DA 001 Menu 1331
4 mA Cal 204
DA 001 Menu 1332
20 mA Cal 1023
DA 001 Menu 3232
ID 1
DA 001 Menu 3231
Enabled? Yes