
Specifications


22
7.2 INPUT CODE DESCRIPTIONS, CONT’D…..
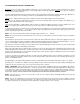
1221 “AUTO NULL”: This code allows the user to force the remote DST (digital signal transmitter) to null and reset to zero with clean
air flowing. To achieve this, enter code “1221”and the LCD indicates “Channel-1, Menu 1221 and Auto Null”. Press button “2” to accept this
and the LCD briefly indicates “NULL”. Press button “3” to scroll to the next channel, if more than one channel has been enabled. If not, the
LCD indicates “\Finished”.
Note: If you are not flowing clean air over the sensor, ensure that the background air is clean. If there is a slight background level of
target gas, the auto null function will null adjust the transmitter anyway, assuming it is clean.
1222
“MODIFY CALIBRATION GAS CONCENTRATION”: This code allows the user to change the calibration span gas value to match
the value of cylinder span gas they are using to calibrate the sensor. To achieve this, enter code ‘1222”. The LCD indicates CH 001, Menu
1222, and Cal Gas Value. Use button “1” tp decrement this value or button ‘3” to increment this value. Press “2” button to accept the change.
The LCD then indicates “Wait” while it writes the new value to the system memory, then indicates ‘Finished”.
2133 “SET LOW INPUT RANGE” (NULL VALUE): This code allows the user to change or set the null value represented and displayed
when the PDC receives a 4.00 mA incoming signal for a specific channel. To achieve this, input code 2133 and the LCD indicates “CH 001,
Menu 2133, Null Value = 0”. Press button “1” to decrement this value or button “3” to increment this value. Press button “2” to accept the
change.
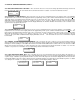
2233 “SET HIGH INPUT RANGE (SPAN VALUE): This menu pertains to the analog channels only and allows the user to select the span
value range. This is the reported value that appears on the display with a 20.0 mA analog input signal. To achieve this, enter “2233” and the
display will look like the box below. Use the “1” or “3” button to decrement or increment then push the “2” button to scroll
to the next channel.
2131 “CALIBRATE LOW INPUT RANGE: This code is used to calibrate the analog input channels “low input”, for accuracy. Eg; a 4.00
mA input source sets that channel for “0”. To achieve this, first connect a 4.00 mA source to analog channel-1, then input code 2131 and the
LCD indicates “CH 001, Menu 2131, NULL”. Press button “3” and the LCD momentarily indicates “0” as it adjusts the input for channel-1 to “0”.
Press button “2” to scroll to the next channel and repeat the procedure, remembering to move the accurate 4.00 mA
source to the next channel.
2231 “CALIBRATE HIGH INPUT RANGE”: This code is used to calibrate the analog input channels “high input”, for accuracy. Eg; a
20.0 mA input source sets that channel for “200” (example for CO sensor). To achieve this, first connect a 20.0 mA source to analog channel-
1, then input code 2231 and the LCD indicates “CH 001, Menu 2231, SPAN”. Press button “3” and the LCD momentarily indicates 2000” as it
adjusts the input for channel-1 to “200”. Press button “2” to scroll to the next channel and repeat the procedure, re-
membering to move the accurate 20.00 mA source to the next channel.
NOTE: An accurate 4.00 mA current source is required to complete this procedure. If an accurate source is not used, the LCD will
indicate values that do not correspond to the incoming signal.
1323 “UNLOCK CODE”: This code is used to unlock the firmware for specific codes. Some codes are a little more important than
others and the user is informed by the fact that they must input the unlock code to access and change them. To
achieve this, input code 1323 and the LCD indicates “Unlocked” momentarily.
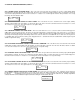
CH 001 Menu 2231
SPAN
CH 001 Menu 2233
Span Value 200
CH 001 Menu 2131
NULL
CH 001 Menu 1323
Unlocked
CH 001 Menu 1221
Auto Null
CH 001 Menu 1222
Cal Gas 100