
Specifications


20
7.2 INPUT CODE DESCRIPTIONS
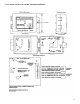
1211 “LOW ALARM SET POINT”: This code allows the user to set or change the system low alarm set point. This is the point at which
the low alarm LED illuminates and any relays designated as “LOW” are de-energized. To achieve this, enter code “1211” and the LCD indicates
the channel number (it always starts at channel-1), the menu number you just entered and the existing low alarm set point. Use the button “1” to
decrement this value or button “3” to increment this value. Press button “2” to accept this value and the LCD advances to the next channel.
Repeat this procedure for any channels to be changed then press button “2” at the last channel to scroll out of the menu and the LCD goes back
to normal operating state.
1212 “MID ALARM SET POINT”: This code allows the user to set or change the system mid alarm set point. This is the point at which
the mid alarm LED illuminates and any relays designated as “MID” are de-energized. To achieve this, enter code “1212” and the LCD indicates
the channel number (it always starts at channel-1), the menu number you just entered and the existing mid alarm set point. Use the button “1” to
decrement this value or button “3” to increment this value. Press button “2” to accept this value and the LCD advances to the next channel.
Repeat this procedure for any channels to be changed then press button “2” at the last channel to scroll out of the menu and the LCD goes back
to normal operating state.
1213 “HIGH ALARM SET POINT”: This code allows the user to set or change the system high alarm set point. This is the point at
which the high alarm LED illuminates, any relays designated as “HIGH” are de-energized and the front door mounted audible alarm is activated.
To achieve this, enter code “1211” and the LCD indicates the channel number (it always starts at channel-1), the menu number you just entered
and the existing low alarm set point. Use the button “1” to decrement this value or button “3” to increment this value. Press button “2” to accept
this value and the LCD advances to the next channel. Repeat this procedure for any channels to be changed then press button “2” at the last
channel to scroll out of the menu and the LCD goes back to normal operating state.
2211 ‘LOW ALARM ASCENDING / DESCENDING: This code allows the user to set the low alarm response for each channel to be as-
cending or descending to suit their specific application. To achieve this, input code 2211 and the LCD indicates “CH 01 Menu 2211, Low Alarm
Asc”. Use button ‘1” to change to descending “DESC” or button ‘3” to change to ascending “ASC”. Press button “2” to accept change and the LCD
will indicate “Finished”.
2212 “MID ALARM ASCENDING / DECSENDING”: This code allows the user to set the mid alarm response for each channel to be
ascending or descending to suit their specific application. To achieve this, input code 2212 and the LCD indicates “CH 01 Menu 2212, Mid Alarm
Asc”. Use button ‘1” to change to descending “DESC” or button ‘3” to change to ascending “ASC”. Press button “2” to accept change and the LCD
will indicate “Finished”.
2213
“HIGH ALARM ASCENDING / DECSENDING”:This code allows the user to set the high alarm response for each channel to be
ascending or descending to suit their specific application. To achieve this, input code 2213 and the LCD indicates “CH 01 Menu 2213, High Alarm
Asc”. Use button ‘1” to change to descending “DESC” or button ‘3” to change to ascending “ASC”. Press button “2” to accept change and the LCD
will indicate “Finished”.
NOTE: This code tells the PDC to respond by activating the LEDs and relays to either the descending alarm (eg: Oxygen sensors) or
ascending alarms 9eg: CO sensors).
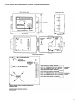
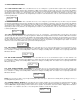
3211 “CHANNEL ENABLE / DISABLE: This code allows the user to enable or disable one or more channels. The channels that have been disa-
bled have not been removed from the enumerated channels on the system, they have simply been ignored by the microprocessor. Disabled
channels WILL NOT be displayed during normal or alarm modes of operation. To achieve this, enter “3211” and the display will look like the box
below. Use the “1” or “3” button to select “No” or “Yes” then push the “2” button to scroll to the next channel.
CH 001 Menu 1211
Low Set Pt: 25
CH 001 Menu 1212
Mid et Pt: 50
CH 001 Menu 1213
High Set Pt: 100
CH 001 Menu 2211
Low Alarm Asc
CH 001 Menu 2212
Mid Alarm Asc
CH 001 Menu 2213
High Alarm Asc
CH 001 Menu 3211
Enabled? Yes