
User Manual


Rev. B | 2022.09 cGas Ammonia Vent Line Transmitter - Addendum
© 2022 All rights reserved. Data subject to change without notice. 17
The replacement sensor comes potted in a 2” pipe with the wires attached to a Plug & Play
smart board that plugs into the main board.
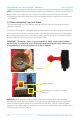
The image in Section 4.3 Interior Enclosure shows the sensor installed.
NOTE: In order to remove the smart board from the interior of the enclosure, the transmitter
needs to be removed from vent stack. For instructions, see Section 5.1 Remove Detector
from Vent Stack.
Open the enclosure, remove the 3 screws connecting the smart board to the main board and
remove the smart board from the main board socket.
With the transmitter is free from the vent stack, unscrew the old sensor pipe from the back
of the transmitter and feed the old smart sensor board through the hole in the back of the
enclosure and remove the old assembly completely.
Feed the wires and new smart board through the hole in the back of the enclosure into the
interior of the transmitter and screw the new sensor pipe assembly into the back of the
transmitter and. Press smart board into the left side socket and replace the 3 screws.
IMPORTANT: The catalytic sensor is very susceptible to shock - when working with the
sensor do not hit it. Manually loosen then senso. When replacing the tting does not have
to be pressurized, so minimal tightness is all that is required.
Reattach the transmitter to the vent stack.
The replacement sensor comes pre-calibrated from the factory and should not require
calibration at the time of a replacement.
NOTE: Temperature affects calibration. If the sensor is being used in an extreme temperature
range, the sensor should be re-calibrated in that temperature range.
If the replacement sensor is not installed within two weeks of delivery, the sensor may
require a longer warm up time to stabilize (approximately 48 hours) and provide accurate
readings.