
Installation guide


Crestron QM-FTCC-TPS4 FlipTop Touchpanel Computer Center
Interface
INTERFACE MENU
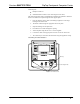
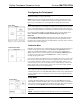
The touchpanel communicates with a control system to activate commands or to
display feedback from components within the system. The communication interface
must be correctly specified or communication will not occur. To set communication
parameters, first select the Interface button on the SETUP MENU to display the
INTERFACE MENU screen, shown to the left. Then, use the CRESNET ID UP
and DOWN buttons to set the Cresnet ID for the touchpanel.
Use the other buttons on the screen to enable/disable the preferred communications
protocol: Cresnet II, Ethernet, or CIP.
After the Cresnet ID setting has been verified and the communications protocol has
been selected, press Return to save the settings and return to the SETUP MENU.
Audio
AUDIO MENU
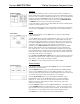
From the SETUP MENU, press the Audio button to open the AUDIO MENU
screen, shown at left.
Press the WAV button to open the AUDIO SETUP – WAV screen. Use the buttons
on this screen to set the WAV file volume level, to enable/disable the WAV file
function and to play the WAV file to verify your settings. The area to the right of
the volume UP/DOWN buttons shows the relative volume from 0% to 100%, both
as a numeric value and, for a quick visual reference, as an analog bar.
Similarly, press the KEY CLICK Enabled/Disabled button to open the AUDIO
SETUP – KEY CLICK screen. Use the buttons on this screen to adjust the key
click volume level (0 – 100%), and to enable/disable an audible tone (beep) when
the touchpanel buttons are pressed. The area to the right of the volume UP/DOWN
buttons shows the relative volume from 0% to 100%, both as a numeric value and,
for a quick visual reference, as an analog bar.
Press the Restore Default Audio Settings button to cancel any changes and restore
all default audio settings: WAV volume = 100%, and WAV function enabled; key
click volume = 100%, and key click function enabled.
Press Return to save the settings and return to the SETUP MENU.
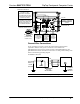
Screen Settings
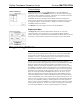
SCREEN SETTINGS
From the SETUP MENU, press the Screen Settings button to open the SCREEN
SETTINGS screen, shown at left.
Press the Brightness button to open the SCREEN SETTINGS – BRIGHTNESS
screen. Use the UP/DOWN buttons to set the display brightness (0 – 100%). The
area to the right of the buttons shows the relative brightness from 0% to 100%, both
as a numeric value and, for quick visual reference, as an analog bar.
Press the Key Backlight button to open the SCREEN SETTINGS – KEY
BACKLIGHT screen. Use the UP/DOWN buttons to set the key backlight
brightness (0 – 100%). The area to the right of the buttons shows the relative
brightness from 0% to 100%, both as a numeric value and, for quick visual
reference, as an analog bar.
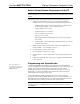
Press the LCD Bias button to open the SCREEN SETTINGS – LCD BIAS screen.
Use the UP/DOWN buttons to set the LCD bias (0 – 255). Use the graphic on the
right side of the screen to see the effects of the adjustment. The bias setting is best
when the lines are crisp and dark and the white area around them is bright.
Press Return to save the settings and return to the SETUP MENU.
Operations & Installation Guide – DOC. 6393 FlipTop Touchpanel Computer Center: QM-FTCC-TPS4 • 23