
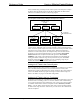
System information


Reference Guide Crestron 2-Series Control System
166 • 2-Series Control Systems Reference Guide – DOC. 6256A
By using Device ID, each classroom program can use the same IP ID. The control
room touchpanel (with the help of Device ID and the JNR Program) will direct the
presses from the control room touchpanel to the correct classroom and route
feedback from each classroom to the appropriate join number on the control room
touchpanel.
Added benefits include ease of maintenance by using only one program to control
the classrooms (as opposed to three), and easy scalability when adding more rooms.
If a room needs to be added, all that needs to be done is the addition of another IP
table entry in the control room touchpanel and the required screens. New rooms just
receive the same program file used in the original classrooms.
Implementing JNR for Ethernet Applications
Using the theories for implementing JNR in an Ethernet application, the following
demonstrates how this would be programmed in SIMPL Windows.
The IP Table
Before any programming can take place, the IP table in the control room touchpanel
must be created.
To create an entry:
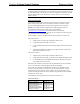
1. Use Crestron Toolbox to establish communication with the touchpanel and
select Functions | IP Table Setup…. For instructions on establishing
communication with a touchpanel, refer to the touchpanels Operations
Guide.
IP Table Setup Window
2. If the touchpanel already has an IP table that is to be modified, click Load
From Device to retrieve the IP table that is stored on the touchpanel.
3. To add a new table entry, click Add Entry. Existing entries can be
modified by selecting an entry from the list and clicking Modify Entry.
Click Remove (Del) to remove a selected IP entry or click Clear List to
remove all of the entries from the IP table.
To Add an IP Table Entry
a) Click Add Entry to add a new IP table entry for a control system. The
“IP Table Entry” window will open.