
Installation guide


Crestron DIN-AP2 DIN Rail 2-Series Automation Processor
marked Ethernet however, communications must be established in
order to see this information in the “System Info” window.
2. Display the DIN-AP2’s “System Info” window (click the
icon);
communications are confirmed when the device information is
displayed.
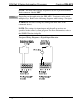
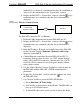
TCP/IP
Ethernet Communication
PC Running
Crestron Toolbox
LAN
DIN-AP2
The DIN-AP2 connects to PC via Ethernet:
1. Establish USB communication between DIN-AP2 and PC.
2. Display the DIN-AP2’s “System Info” window (click the
icon);
communications are confirmed when the device information is
displayed.
3. Enter the IP address, IP mask, and default router of the DIN-AP2
via the Crestron Toolbox (Functions | Ethernet Addressing);
otherwise enable DHCP.
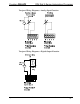
4. Confirm Ethernet connections between DIN-AP2 and PC. If
connecting through a hub or router, use CAT5 straight through
cables with 8-pin RJ-45 connectors. Alternatively, use a CAT5
crossover cable to connect the two LAN ports directly without
using a hub or router.
5. Use the Address Book in Crestron Toolbox to create an entry for
the DIN-AP2 with the DIN-AP2’s TCP/IP communication
parameters.
6. Display the “System Info” window (click the
icon) and select
the DIN-AP2 entry.
7. Use Crestron Toolbox to create the DIN-AP2 IP table.
a. Select Functions | IP Table Setup.
b. Add, modify or delete entries in the IP table. The DIN-AP2 can
have up to 252 IP table entries.
c. A defined IP table can be saved to a file or sent to the device.
Operations & Installation Guide – DOC. 6662C DIN Rail Automation Processor: DIN-AP2 • 21